
Batch Image Resizer
Quickly resize, crop, rotate, flip, and resample lots of images in just a few clicks!
Resize, crop, rotate, flip 1000s of Images20 Resampling modes: Bi-Linear, Bi-Cubic, Lanczos…
Shrink Images to Fit a Box / Aspect RatioScale down images maintaining proportions
Crop Images in Various WaysAutomatic, From Edges, to Fixed Size, to Aspect Ratio
Built-in Face DetectionAuto-rotate & crop photos based on face position
130+ Actions, Filters, and EffectsConvert, watermark, adjust brightness, contrast…
How it Works
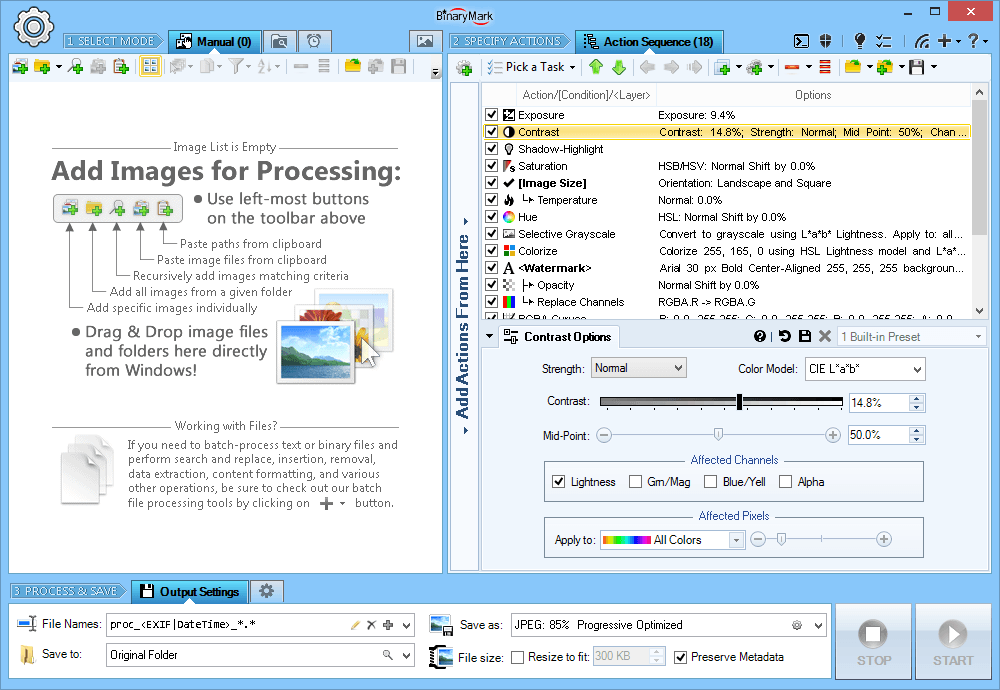
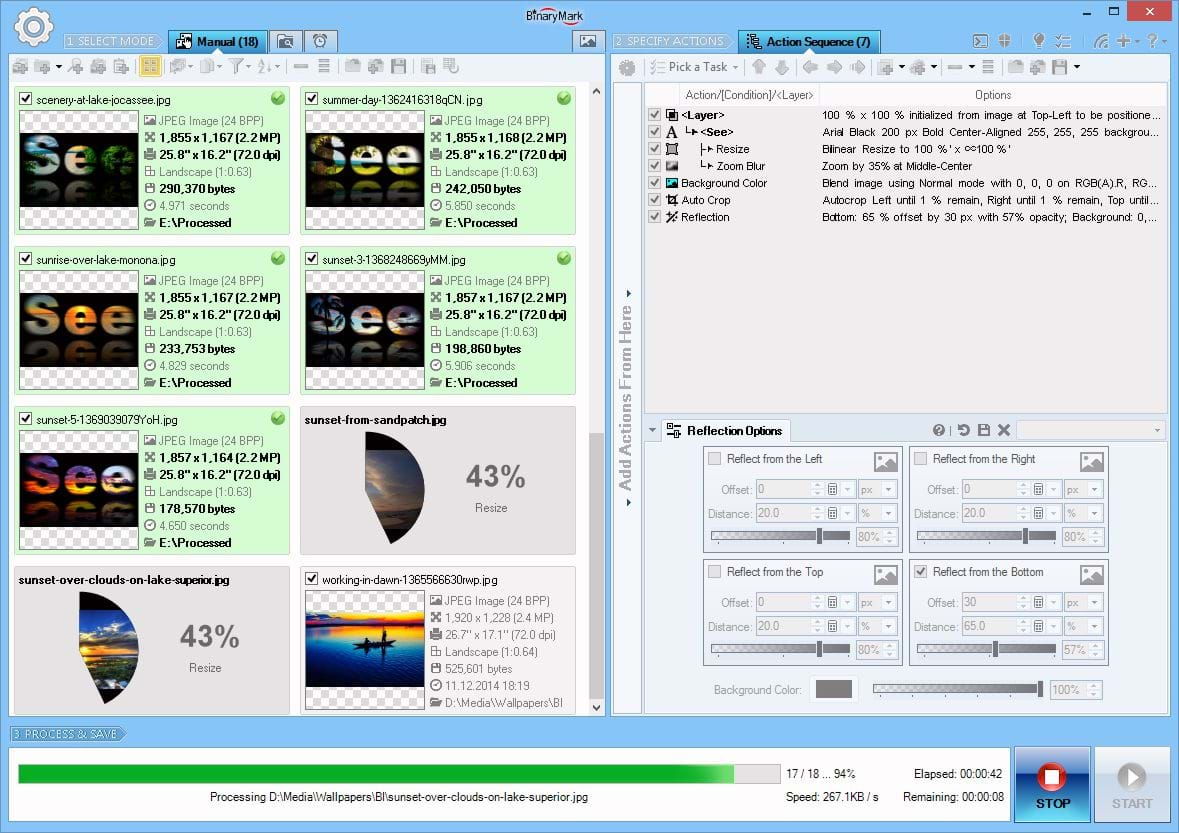
Choose Processing Mode and Select Images
Batch Image Resizer can process files in 3 distinct modes:
- Manual Mode - images are selected for processing, which is then started manually by clicking on the Start button
- Automatic / Background Mode - "monitors" are setup that scan specified folders for either existing, new, or modified images matching criteria, which are then automatically processed once the program starts "monitoring"
- Scheduled / Triggered Mode - processing is performed by processing jobs that can run on schedule or be started on specified events
In Manual mode images for processing can be selected and added to the processing list in multiple ways:
- One by one or in groups
- All from a given directory
- Recursive searching for files with names matching a pattern
- Recursive searching for images with specific properties like width, height, color depth, meta-data, format
- Drag & drop from Windows Explorer
- Paste from clipboard, paste paths
- Import from text-based file containing paths
- Right-clicking on selected images or folder in Windows Explorer
Specify Actions to Perform
You specify which actions and operations should be performed, which filters should be applied during processing by using an Action Sequence.
Specify which actions should be performed and in what order by simply drag & dropping them.
Then you can specify various options and settings for each action to specify exactly how the action should process your images.
- Perform certain actions only when specific requirements are met using conditions
- Perform actions only on specific pixels or regions using layers
- Save action sequence for future use as a template
- The hierarchical structure is clearly displayed if conditions are used
- Get instant feedback about any errors
- Actions are color-coded to help you distinguish different types of actions


Step 3 - Select Output Format, Process, and Save
In the last step you choose the destination directory where processed images will be saved; file naming pattern; image file format; and some other processing options.
- Use both relative and absolute paths when specifying output location.
- Specify very detailed file naming pattern: use file attributes, random characters, hashes, EXIF meta-data, and more!
- Output file names can include image attributes: width, height, etc.
- Adjust file dates and attributes
- Set backup and other options
When you have configured all the output options, the program can begin processing images. As it processes images, image list will be automatically updated reflecting detailed progress. Processing can be stopped any time.
When an image has been processed, its preview in the list is automatically updated, and any changed attributes like size will be shown in bold next to its thumbnail, making it easy to identify changed properties.
At the end the program will display a detailed summary; a processing log will also be available so you can examine any warnings or errors if they occurred.
Top Features
- 4 Processing Modes Manual, Automatic / Continuous, Triggered / Scheduled, Command Line.
- 130+ processing actions: brightness, contrast, levels, curves, watermark, resize, crop, convert, remove noise, rotate, etc.
- 30+ Image Formats: read 32 and write 18 different image file formats.
- Conditional Processing lets you perform different operations with different images.
- Layers let you perform actions within image regions, on specific pixels/hues/colors, and on watermarks.
- Face Detection lets you perform different operations on images with recognized human faces: for example you can auto-rotate those images so that the face is upright.
- Live Preview makes it easy to see how the processed images will look like after processing.
- Advanced File Naming and Renaming: use file properties, image attributes, random characters, EXIF tags, perform search and replace.
- Advanced Image Search: advanced wildcards, image attributes, file properties, regular expressions, search within pixel data.
- Very detailed processing logging capabilities.
- Fast multithreaded processing that can utilize all available cores/CPUs.
- Run multiple program instances simultaneously.
Fit Images to Specific Size or Aspect Ratio
It may not be enough to just resize or shrink pictures. You might need to fit your images to a given shape, area, or size, optionally preserving proportions or aspect ratio.
Fit to Size without Padding
Proportionately resize / scale down an image maintaining aspect ratio until it entirely fits inside the specified dimensions.
Fits to Specific Size No Crop No Padding
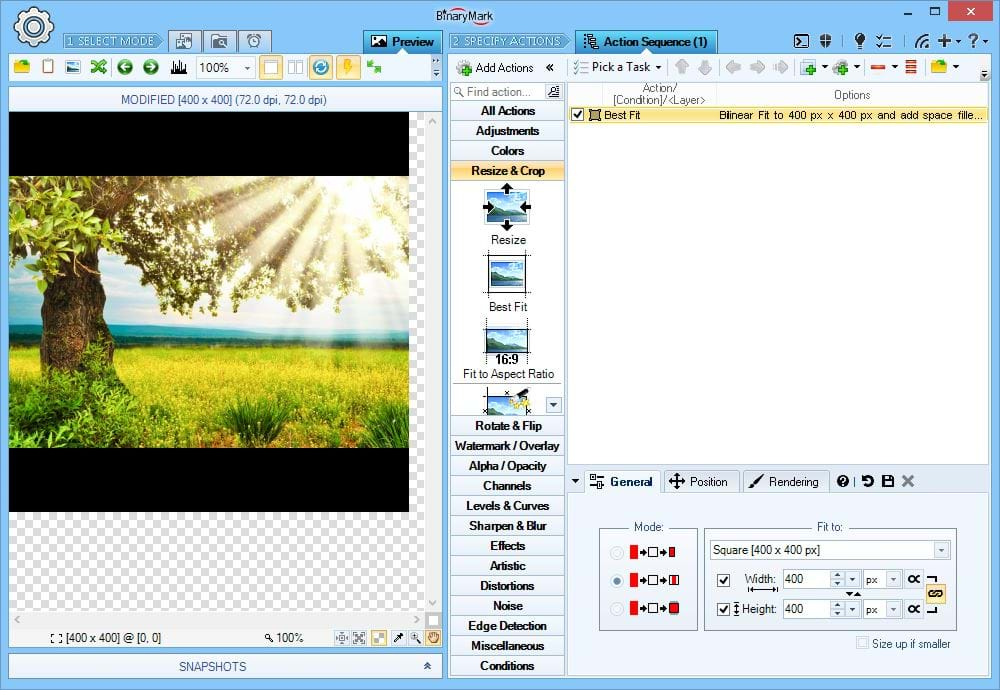
Fit to Size and Add Padding
Proportionately resize / scale down an image maintaining aspect ratio until it entirely fits inside the specified dimensions, and add padding when necessary to make sure the resulting image has exactly the specified width and height.
Fits to Specific Size No Crop Adds Padding
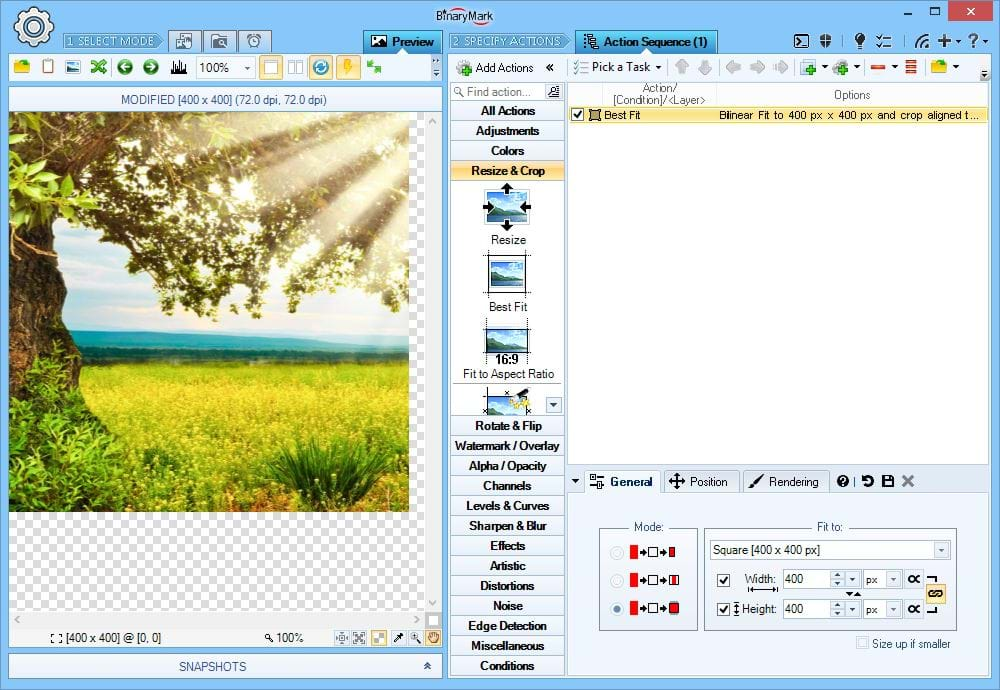
Crop to Size
Crop an image to match specified width and height. You can specify where the remaining image region should be located on the original image using alignment and offsets.
Fits to Specific Size Crop No Padding
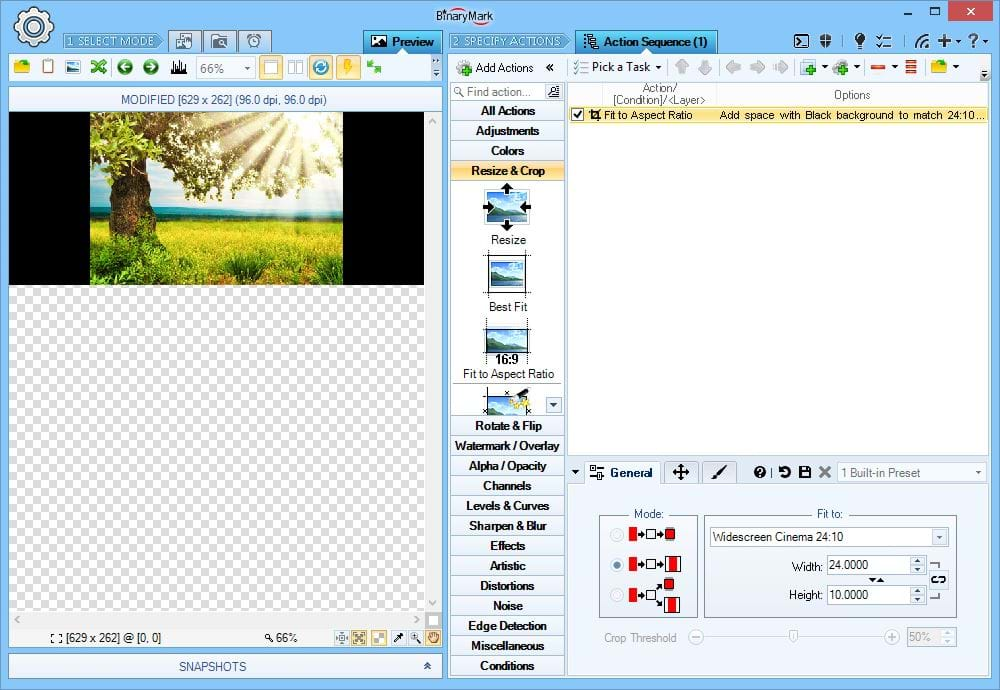
Fit to Aspect Ratio and Add Padding
Proportionately resize / scale down an image maintaining aspect ratio and adding extra padding as necessary until its resulting size matches a given aspect (width:height) ratio.
Fits to Width:Height Ratio No Crop Adds Padding
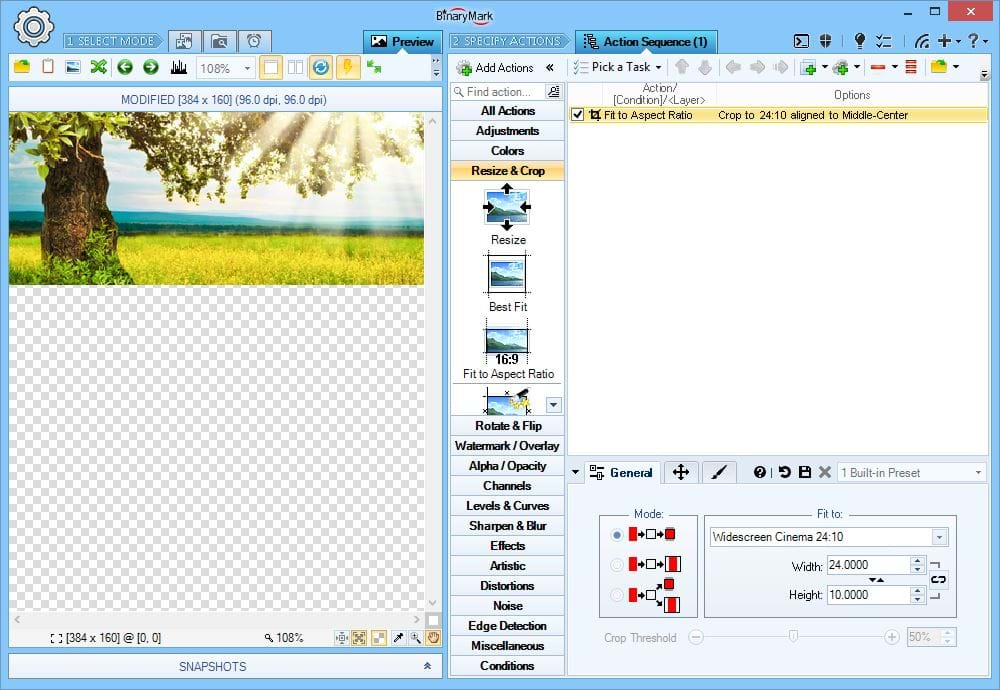
Fit to Aspect Ratio and Crop
Crop an image to match specified aspect (width:height) ratio. You can specify where the remaining image region should be located on the original image using alignment and offsets.
Fits to Width:Height Ratio Crop No Padding
Resize Images in Different Ways
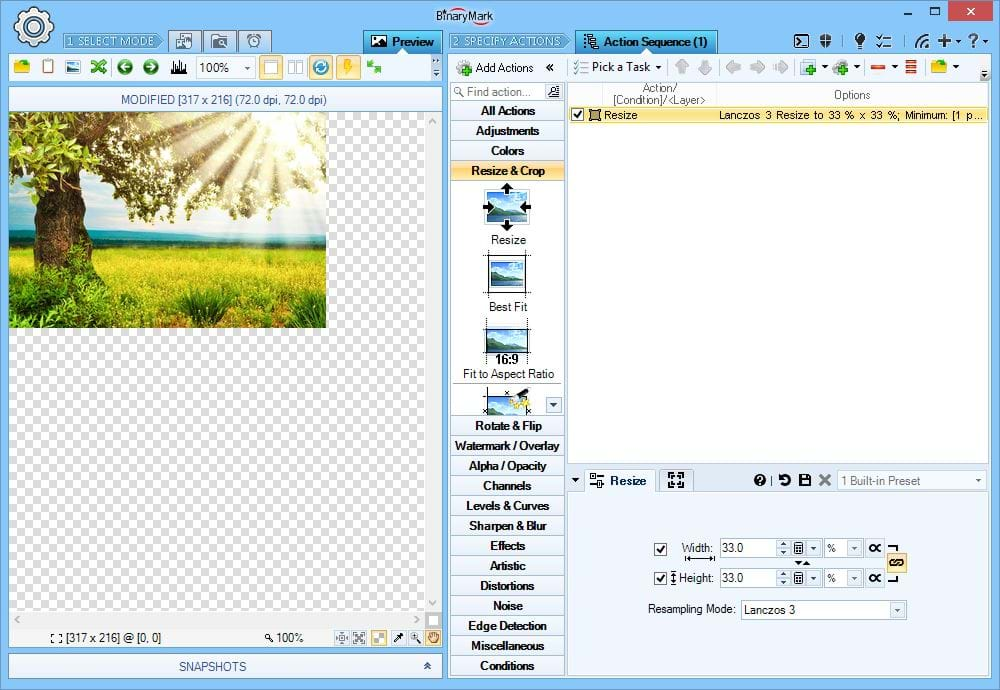
Resize by Specified Percentage %
Resize images by either downscaling (shrinking) or upscaling them by the specified percentage of original width or height.
Heads Up! You can restrict resulting image size by specifying Maximum and / or Minimum width and height in pixels.
On the Screenshot the sample image is being proportionately downscaled to just 33% of its original size.
Maintains Proportions
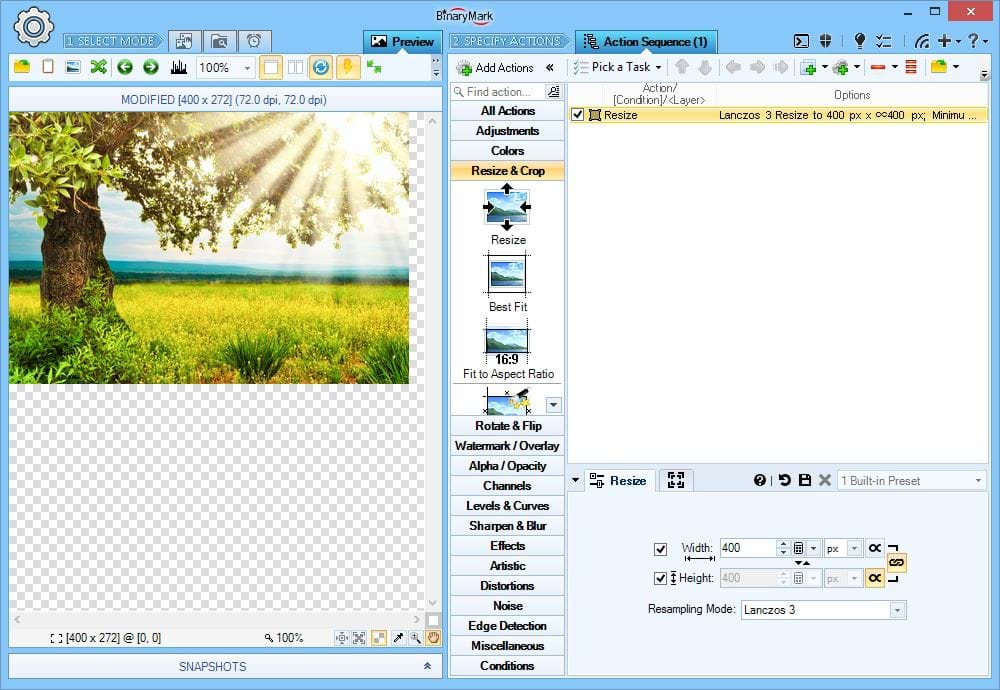
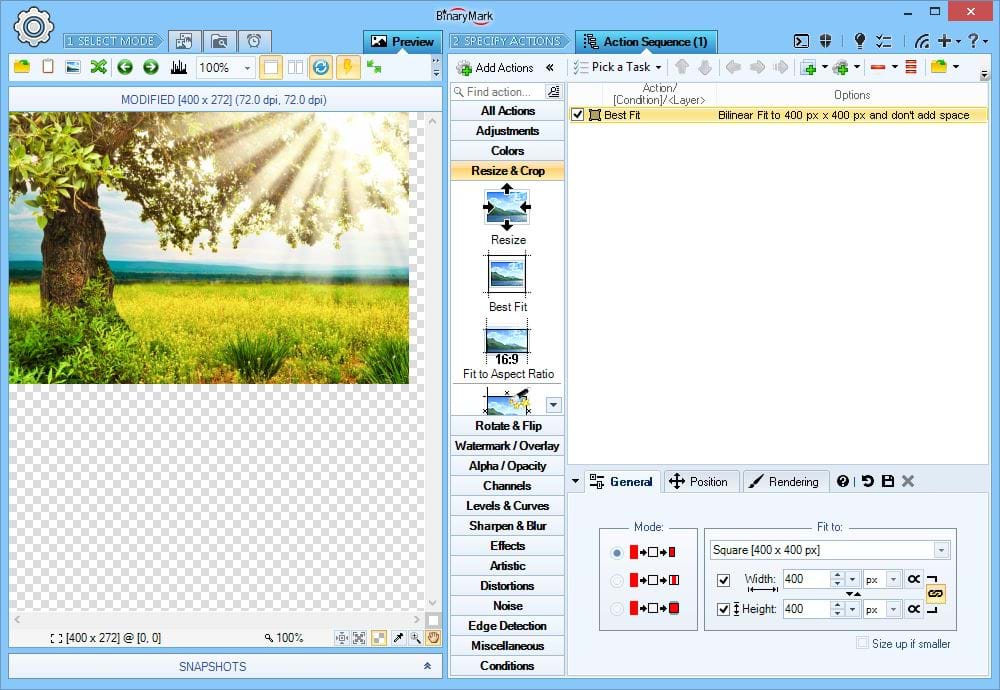
Resize to Specific Width or Height
You can also either downscale (shrink) or upscale an image until one of its sides reaches the desired absolute value in either pixels or print units.
A typical case would be to resize images so that their width is exactly 1000 pixels, with the height being dynamically calculated so that proportions are maintained.
Heads Up! You can restrict resulting image size by specifying Maximum and / or Minimum width and height in percentages (% of original).
On the Screenshot the sample image is being resized so that its width is exactly 400 pixels and the height is proportionately resize with its width.
Maintains Proportions
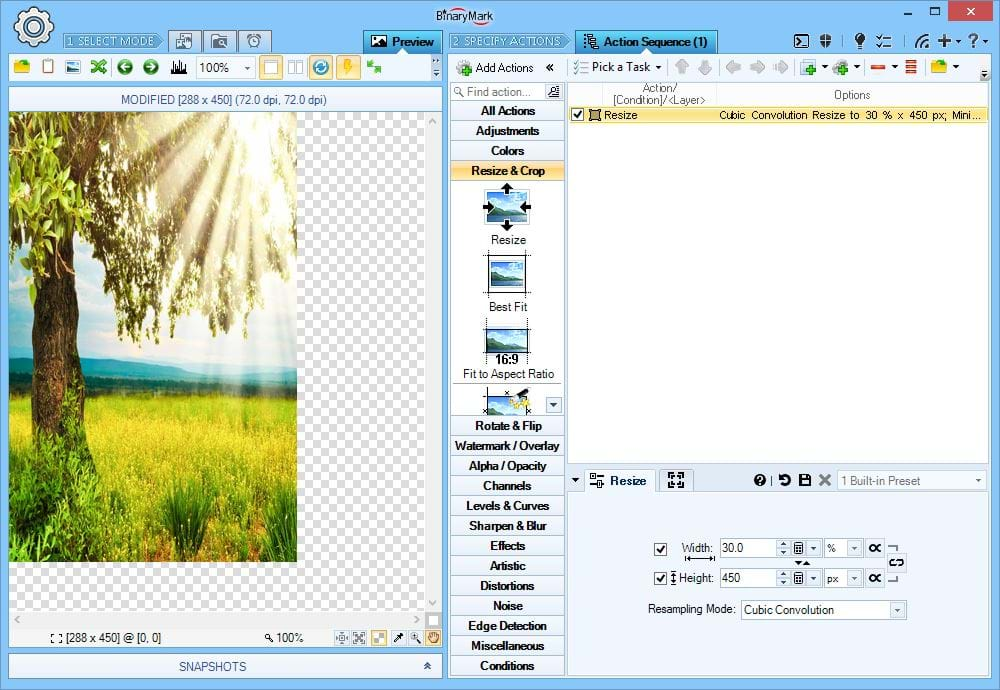
Adjust Width and Height Independently
Sometimes it may be necessary to change width and height independently of each other.
On the Screenshot the sample image's width is shrunk to only 30% of the original and its height is set to be exactly 450 pixels.
Does Not Maintain Proportions
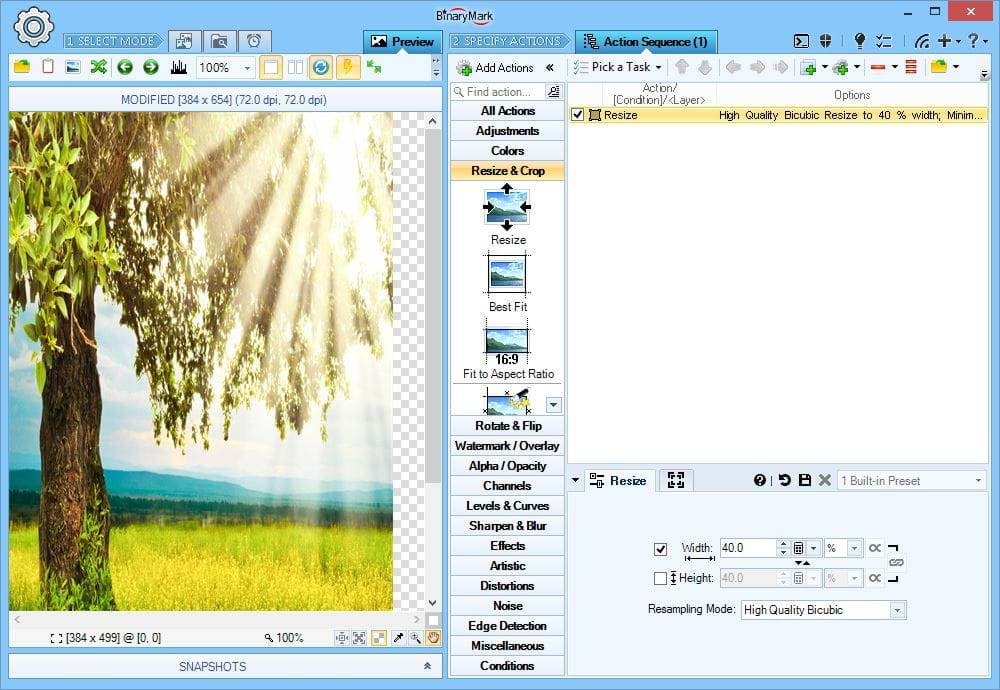
Change only Width or Height
You can also just modify either width or height only, so that if you modify width, the height will remain unchanged, and vise-versa.
On the Screenshot the sample image's width is shrunk to only 40% of the original while its height is left unchanged, resulting in the final image being stretched vertically.
Does Not Maintain Proportions
Crop & Slice Images in Different Ways
Crop to Aspect Ratio
ping to a specified aspect (width:height) ratio is useful when you need to process many images of varying sizes but need to ensure that all resulting images have the same aspect ratio and are of maximum size.
To match a desired aspect ratio, depending on the input image the program will either crop horizontally or vertically.
The alignment option determines if one or both opposing edges will be cropped. For example, if you set alignment to Middle Center, both edges will be cropped, but if you set it to Middle-Left and horizontal crop will be performed, only the right edge will be cropped.
Example In this example, the image is cropped to 4:3 aspect ratio. Because originally it had a bigger aspect ratio, only horizontal edges are trimmed. Both left and right sides are cut because the alignment is set to Center.
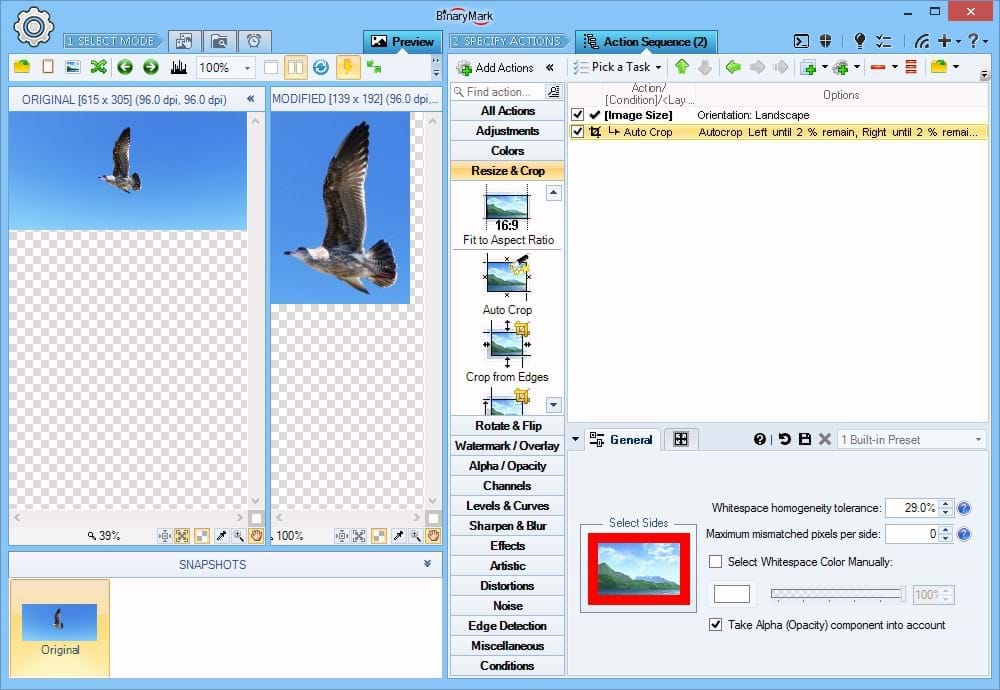
Automatically Crop Images
Automatic crop lets you trim images of excess background or padding around the main object or scene.
You can specify background color manually, or the program can automatically deduce it.
You can specify sides to cut, as well as minimum remaining padding per side.
Heads Up! Automatic crop is ideal to quickly remove extra space or padding from multiple images of different sizes having various backgrounds.
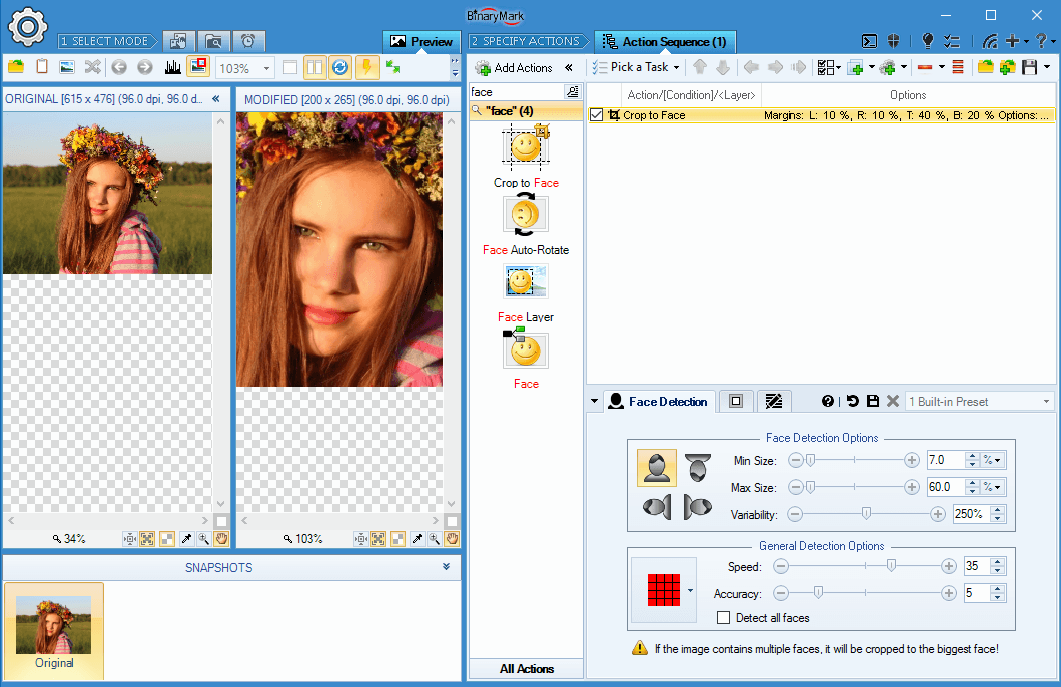
Auto-Crop to Face
Batch Image Resizer can automatically detect human faces in pictures without needing Internet access or relying on third-party services, so you can be sure of your privacy!
One of the many things it can do with detected faces is to crop photos so that only the face or faces matching desired criteria remain.
You can specify minimum required padding so that there is extra spacing left.
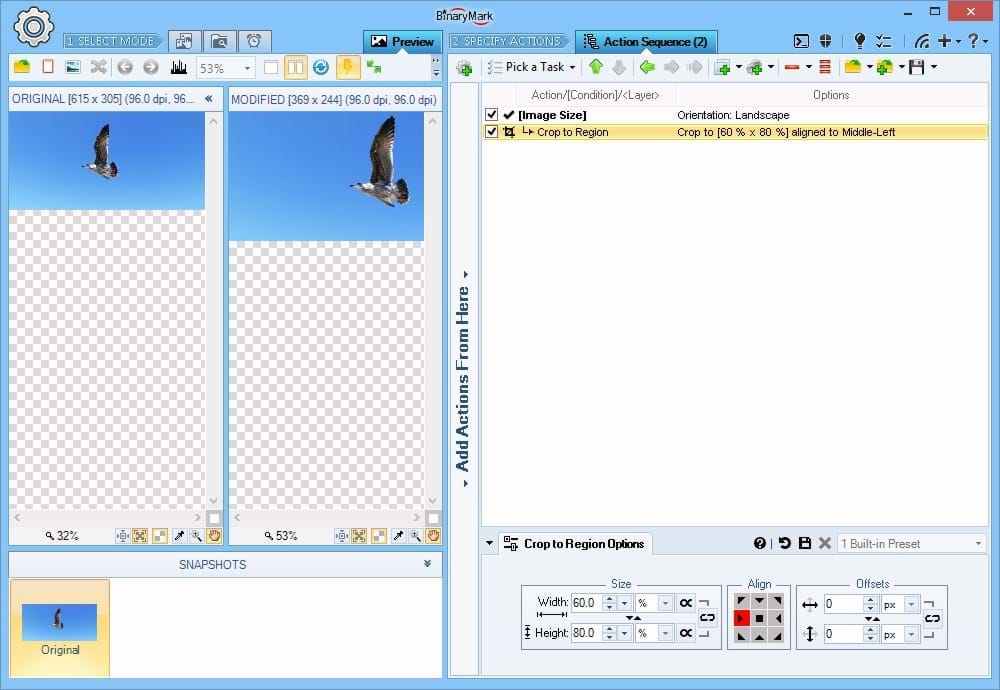
Crop to Fixed Region
To crop or clip the image to a rectangle of a fixed size you must specify the size and the alignment of the region of interest in your images.
Alignment can be set precisely using anchors and offsets.
The size can be specified using either pixels, percentages %, or print units like inches and centimeters.
Example In this example, the image is cropped to a box of 60% x 80% (60% of original width, and 80% of original height), and is aligned to the Middle Left.
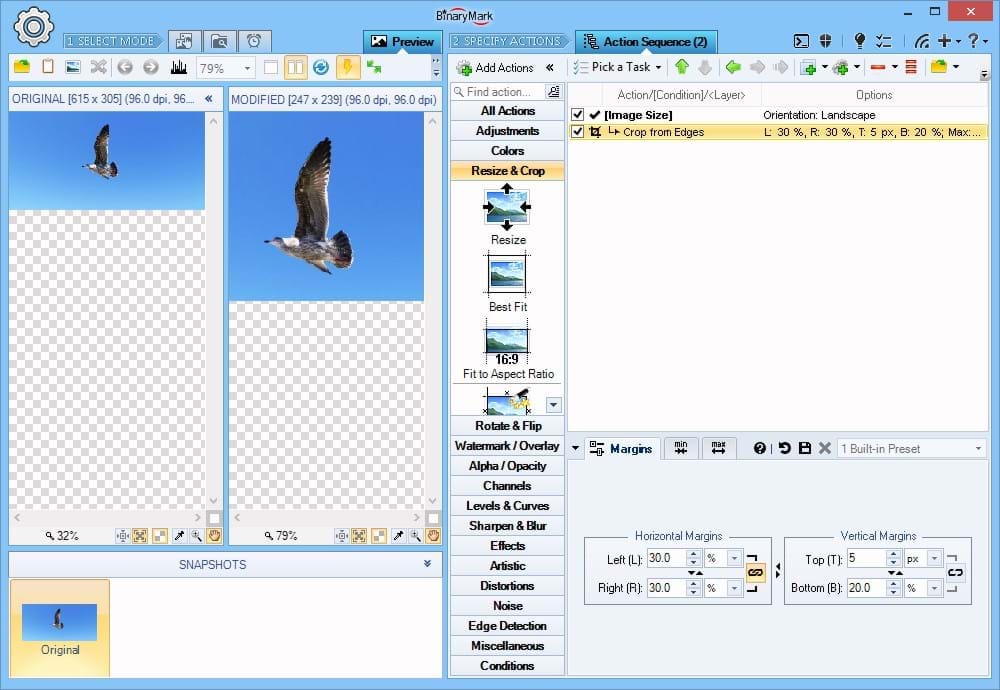
Crop from the Edges
The simplest kind of crop operation is cropping the image from the specified sides or edges.
You can specify which sides should be cropped and by what amount using pixels, percentages %, and physical units.
Heads Up! You can specify minimum margins and maximum margins using units different from the ones you used for specifying the sides to crop. This allows you to limit cropping when processing multiple images of different sizes, and thus to ensure that all resulting images have a certain minimum width and height. For example, you may set to crop Left and Right by 20% each, at the same time setting Maximum Left and Right margins at 150 pixels; this will ensure that if 20% corresponds to more than 150 pixels, only 150 pixels will be cut.
Example In this example, the image is cropped from the edges as follows: 30% from Left and Right, 20% from the Bottom, and 5 pixels from the Top. Note the different units are used for different sides!
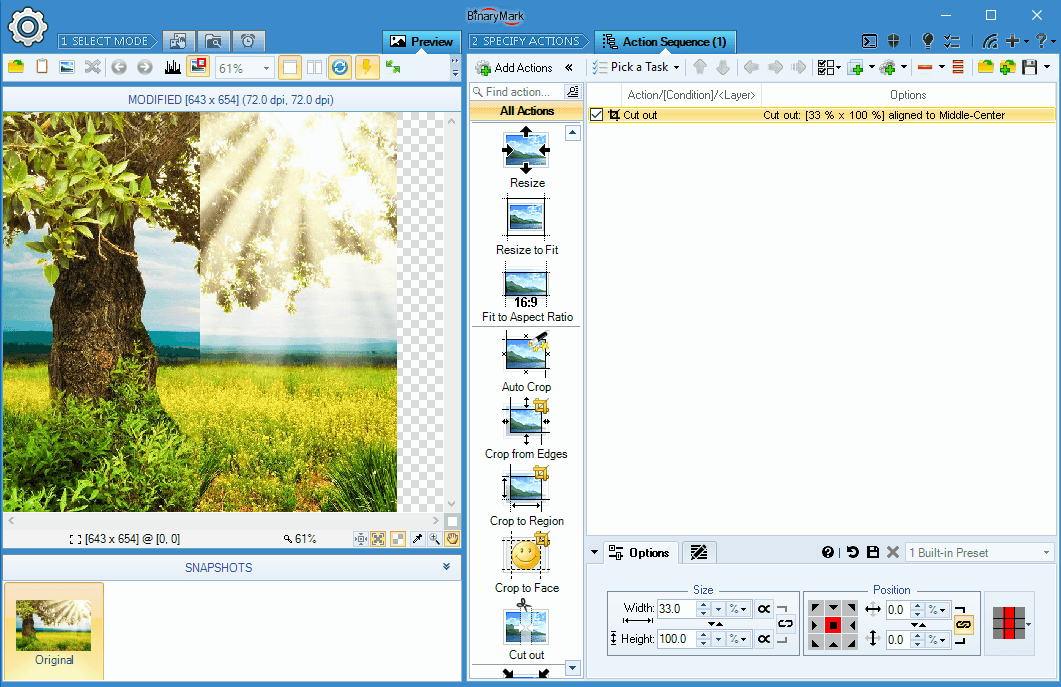
Cut-Out Mid-Section of an Image
Similar to crop, this action lets you remove the specified middle part of an image.
You can precisely control which region is going to be removed using both percentages and pixels to specify both the size of the cut region as well as vertical and horizontal margins.
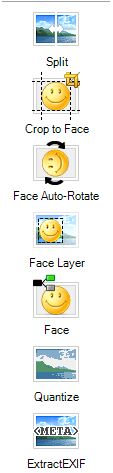
Split Images
There are 2 ways you can split Images: either into specified number of rows and columns (tiles); or into tiles of a specified fixed size.
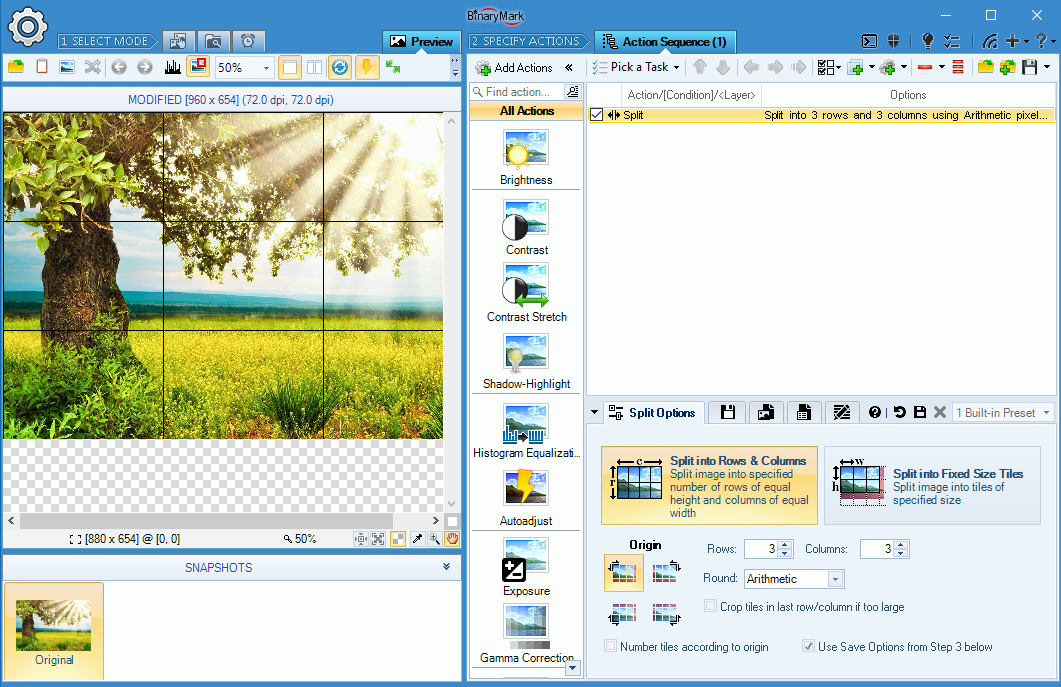
Split into Rows and Columns
When you split images into rows and columns you need to specify the desired number of rows and columns.
Generated tiles will be saved as distinct images using format and file name that you specify. File names can be dynamically generated, automatically inserting row and column number or tile number.
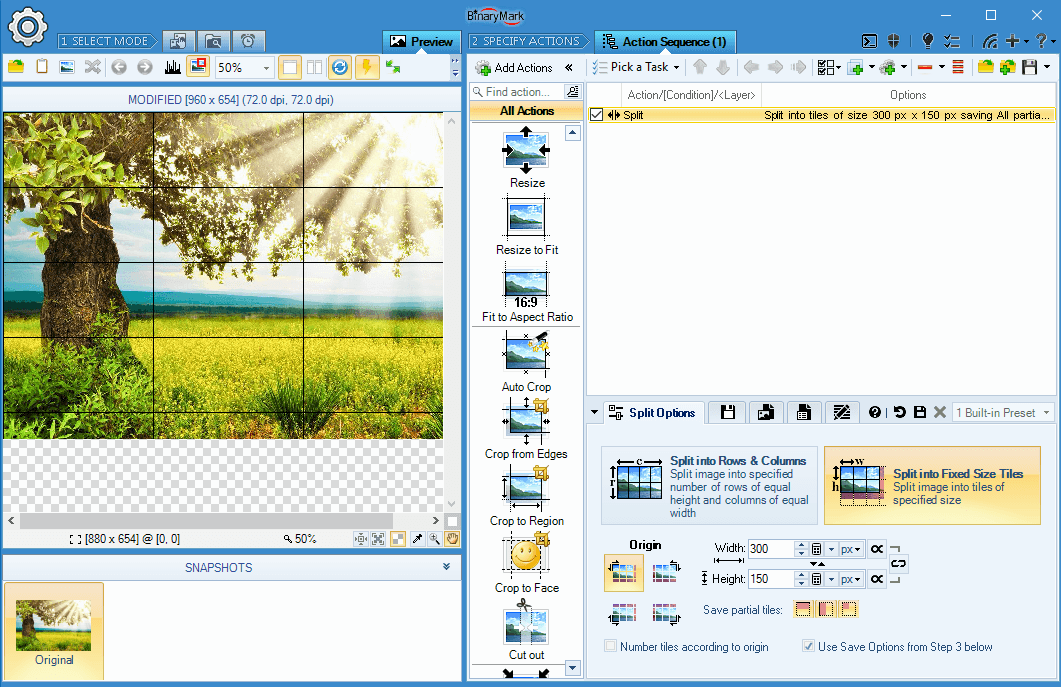
Split Images into Fixed-Size Tiles
When splitting an image into tiles of a given fixed size, you have the option to specify that size precisely using either percentages or pixels to set tile's width and height.
Generated tiles will be automatically saved as separate images using the file format and file name pattern that you specify. Row and column numbers as well as tile numbers can be used in file names for the generated images.
Affine Transforms: Rotate, Flip, Mirror, Skew
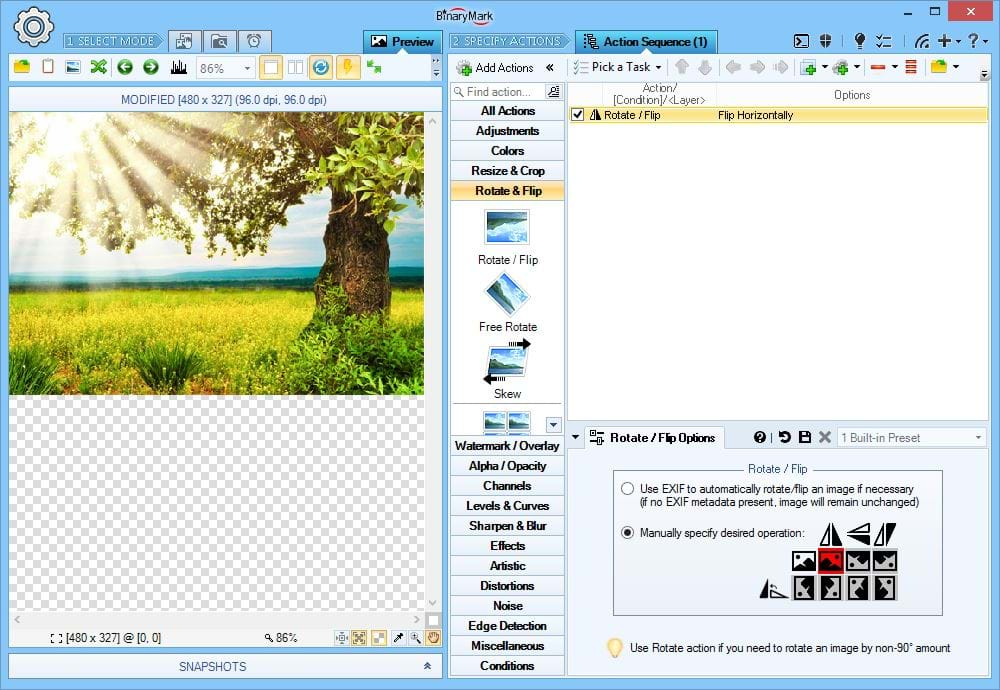
Flip & Rotate Images
You can flip images manually or according to EXIF orientation tag.
- EXIF-Based Automatic Flip: flip / rotate an image according to EXIF orientation tag
- Flip Horizontally (Mirror): flip an image around central vertical axis
- Flip Vertically (Reflect): flip an image around central horizontal axis
- Rotate by 90°: rotate an image in 90° increments clockwise or counter-clockwise
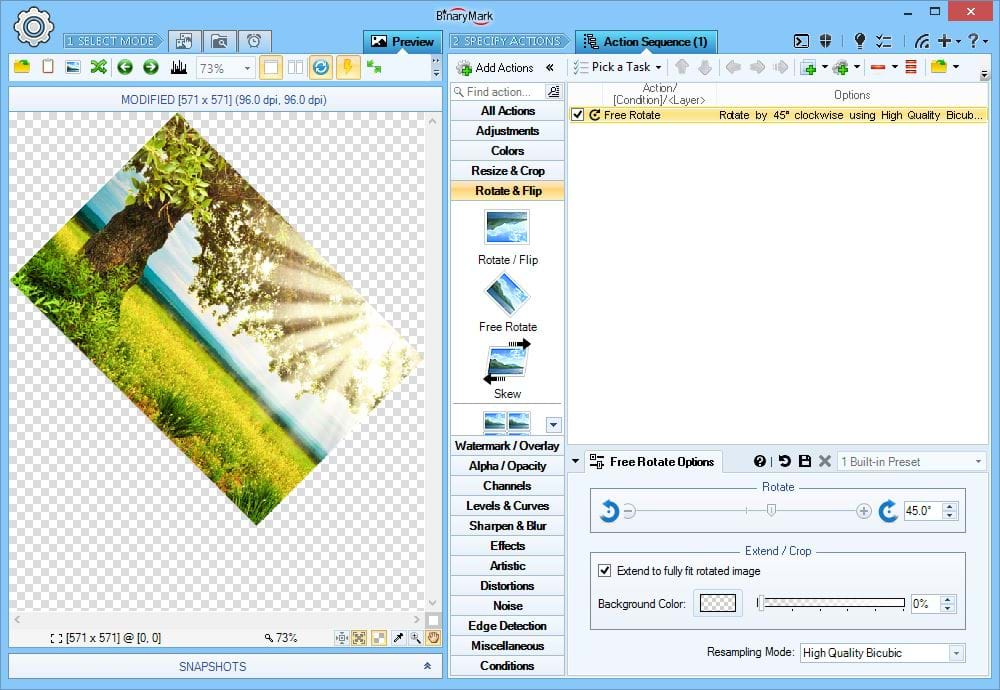
Rotate Images
You can free-rotate images clockwise and counter-clockwise by the specified amount in degrees.
Because rectangular dimensions increase with rotation, you can:
- Choose to let the canvas grow in order to fit the rotated image in its entirety and set the background color
- Crop the rotated image, so that there is no extra background
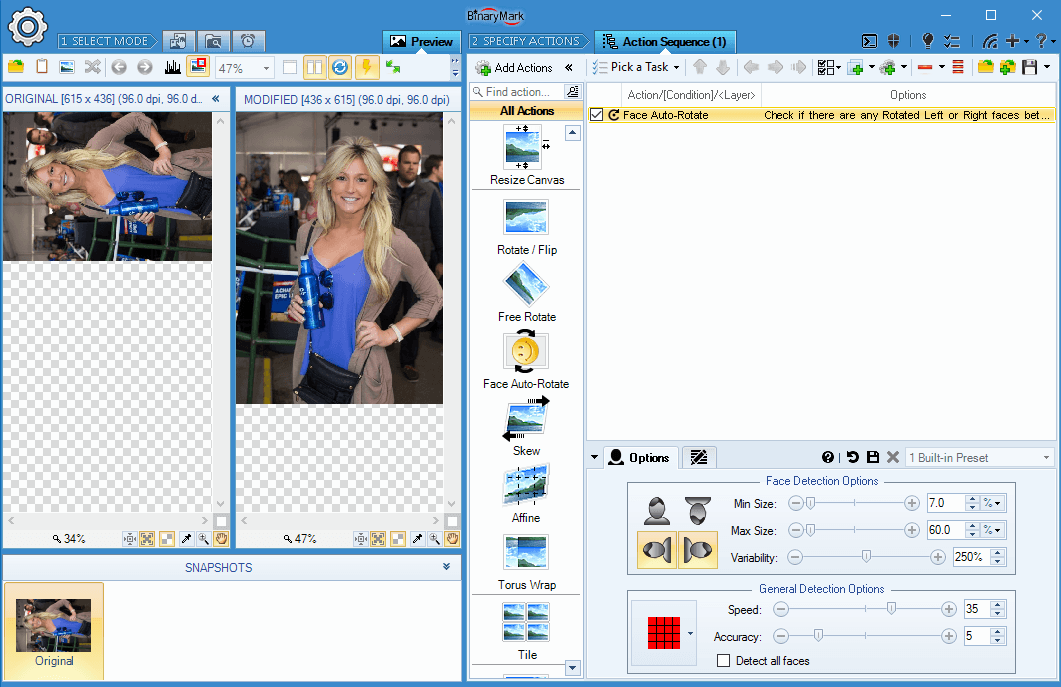
Face Auto-Rotate
Batch Image Resizer features built-in face detection with which it can automatically rotate photos into proper orientation.
This is especially useful if the images lack the needed EXIF orientation meta tags. Rotating such photos manually can be very time consuming if there are hundreds or thousands of them. Batch Image Resizer can do it automatically - and all without requiring Internet access or third-party services - just your CPU.

Skew Images
Skew images by specified amount (percentages, print units, pixels) in horizontal and/or vertical directions. This is essentially a form of shear mapping.
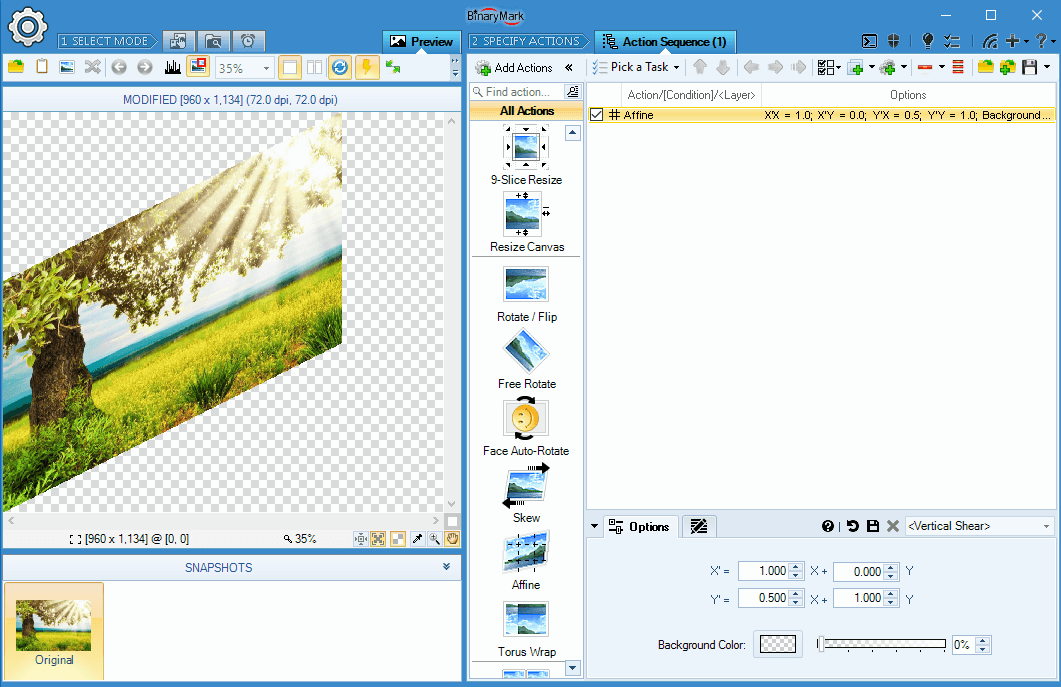
Affine Transformations with Augmented Matrix
In addition to the Resize, Skew, and Rotate actions you can perform an arbitrary affine transformation with just a single action using augmented matrix.
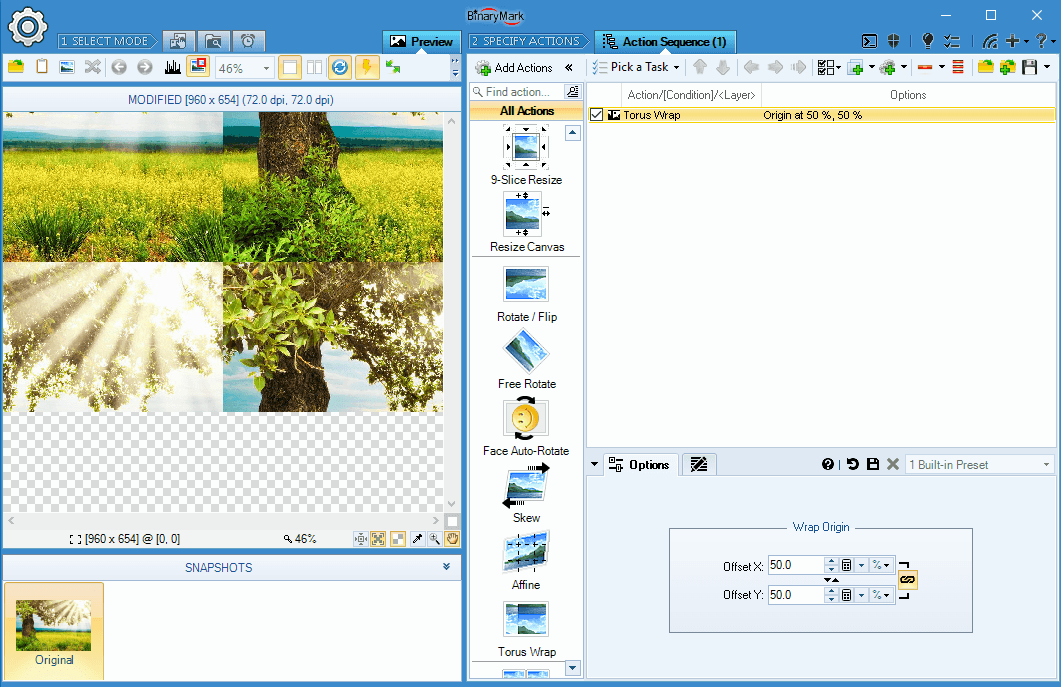
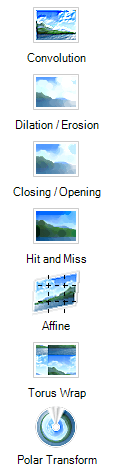
Torus Wrap
This action produces a torus wrap effect. That is, if an image was a surface of a torus (ring doughnut) and was scrolled either horizontally or vertically while the viewpoint was fixed.
Miscellaneous Resize Tools
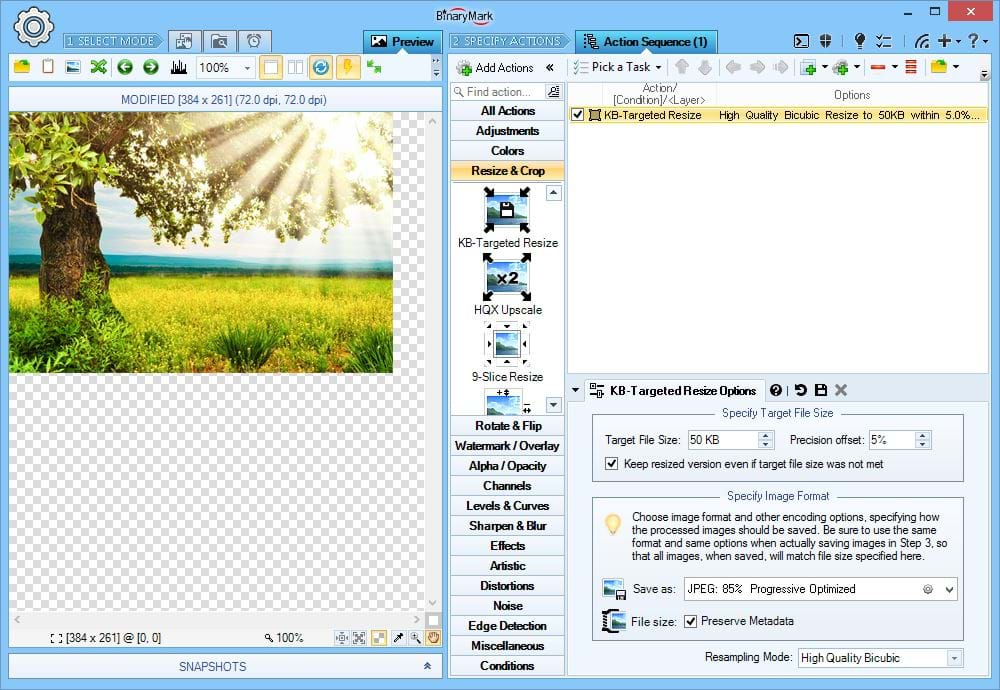
Shrink Images to Fit Specific File Size
Resize (downscale) an image maintaining proportions until it will fit inside a given file size when saved in specified image format with specified options.
On the Screenshot the sample image is proportionately shrunk so that when it is saved as JPEG file with 85% quality, progressive & optimized options it's file will be in the range 47.5 kilobytes to 52.5 kilobytes (specified size is 50 kilobytes with 5% margin of error).
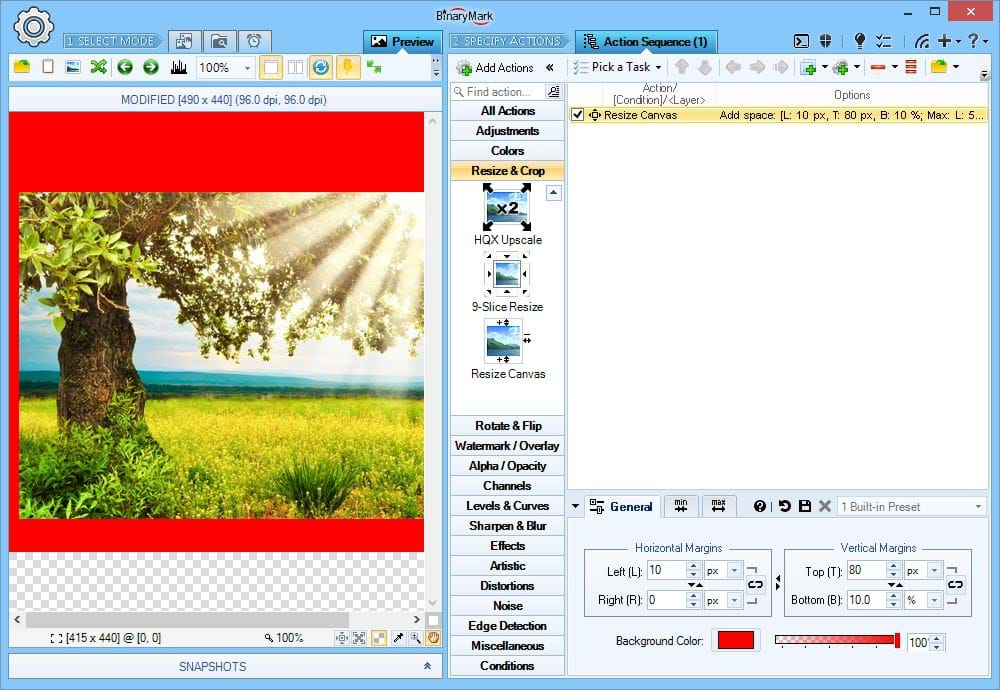
Resize Canvas / Background
This is opposite of crop action. It effectively enlarges the canvas by adding extra space (padding) around the image on specified sides.
On the Screenshot 80 pixels is added to the top side, 10 pixels to the left side, and 10% (relative to original height) are added to the bottom side.
Heads Up! You can specify Minimum and Maximum values for the extra padding. This is useful when the extra padding is specified in percentages (relative to the image's size) but must fall within a specific absolute range in pixels.
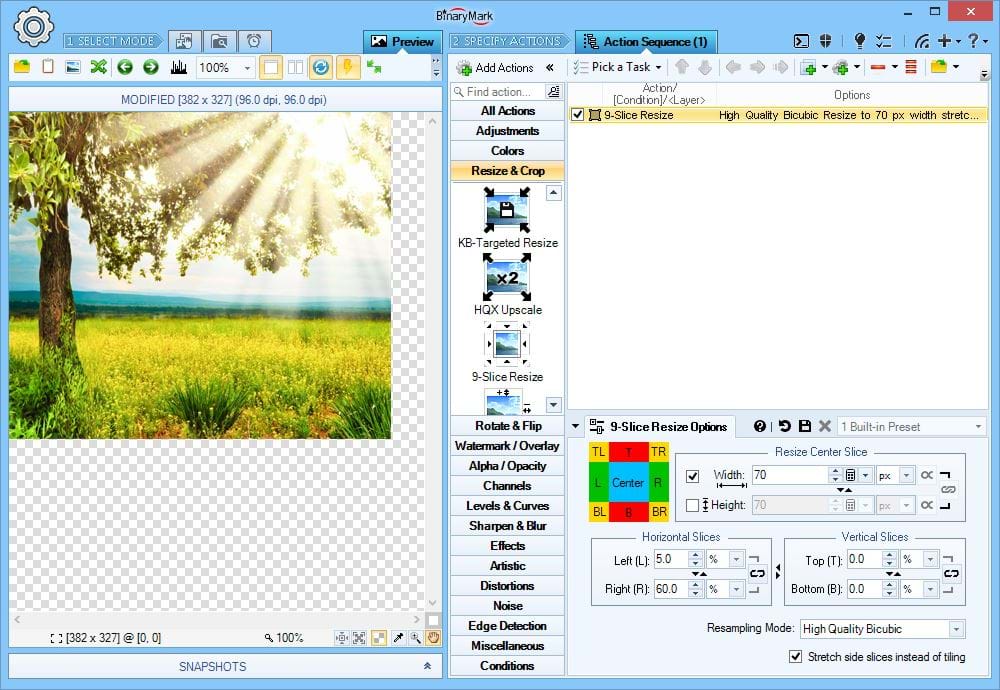
9-Slice Constrained Resize
Use this action to stretch or shrink only a specific part of an image while leaving the rest either unaffected.
- First you specify a rectangular region that you want to resize (stretch/shrink width and/or height as you like)
- If the height of the region changes, left & right sides will be either shrunk or stretched
- If the width of the region changes, top & bottom sides will be either shrunk or stretched
- Corners are never affected!
- Affected sides can be either tiled or stretched/shrunk when affected (tiling is recommended for uniform or pattern-based image regions)
On the Screenshot 35% of original image width on a 5% to 40% interval (as viewed from the left) is being shrunk to just 70 pixels; height is not affected. However because width is being selectively reduced it creates an illusion that image is being locally vertically stretched.
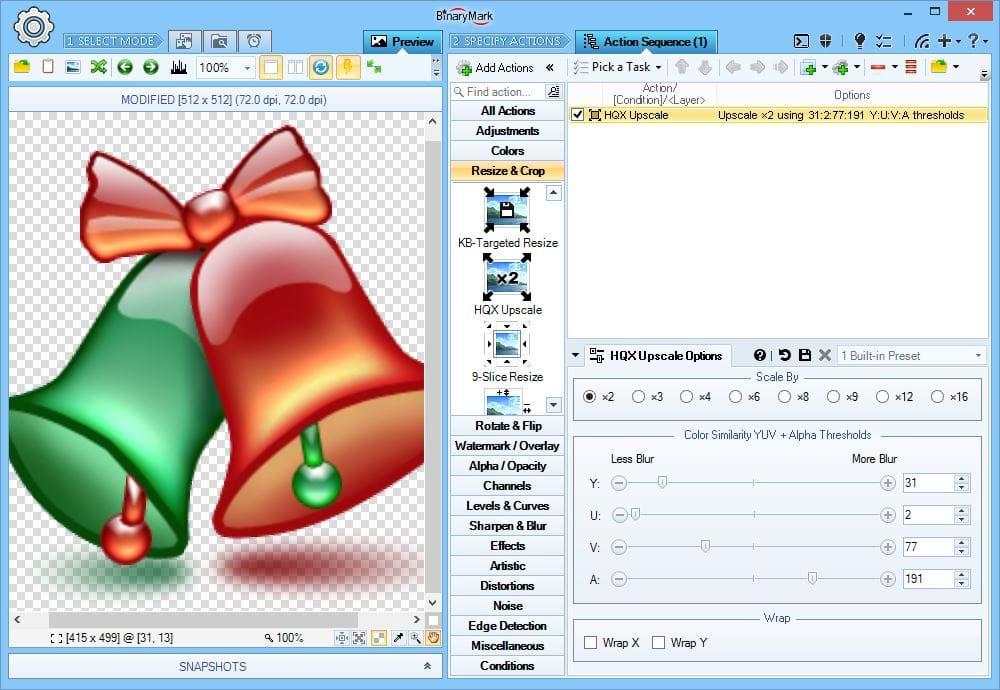
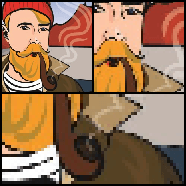
HQX Upscaling
Implements HQX upscaling algorithm that allows you to enlarge an image by an integer amount (typically by x2).
In comparison with other resizing actions that use standard resampling (upsampling) methods, this action uses a more specialized algorithm to produce sharper images while avoiding extensive pixelation.
On the Screenshot the image has been enlarged by a factor of 2. While you can see some pixelation, the image appears much smoother than if regular resampling method would have been applied.
Heads Up! This action works best on clip art type images and in conjunction with the Smooth action applied immediately afterwards (to reduce pixelation and blur even more). You can check out advanced, AI-assisted image upscaling at icons8 Upscaler website.
20 Image Scaling Modes
- Batch Image Resizer supports 20 different image scaling algorithms, also known as resampling / interpolation modes.
- Depending on whether you are upscaling or shrinking an image, as well as image type (photo vs clipart for example), you may need to select a different interpolation mode for best quality.
- Certain resampling methods are best when you need to preserve sharpness and clarity: Bicubic, Cubic Convolution, Box, Lanczos; while others maybe suited for producing smoother curves and gradients: High Quality Bilinear Interpolation, Cubic B-Spline, Bell.
- You can see how the different resampling modes perform on the left image below. It was resized to 40% of its original size. Note the closeup views of the resized image with pixels clearly visible for your convenience.


Apply Creative Watermarks and Overlays
Multiple Text and Image Watermarks
You can apply unlimited number of text and image watermarks and overlays to your images. Compose them together however you want, and apply additional actions, effects, and filters to each one independently!
The preview image in the above screenshot shows 4 different watermarks applied at once.
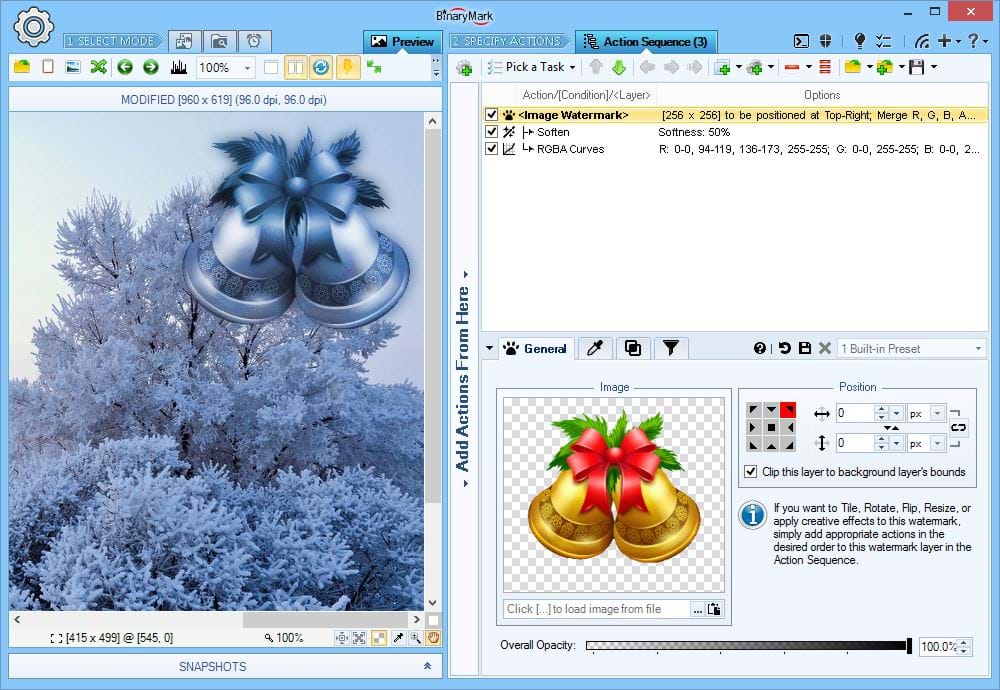
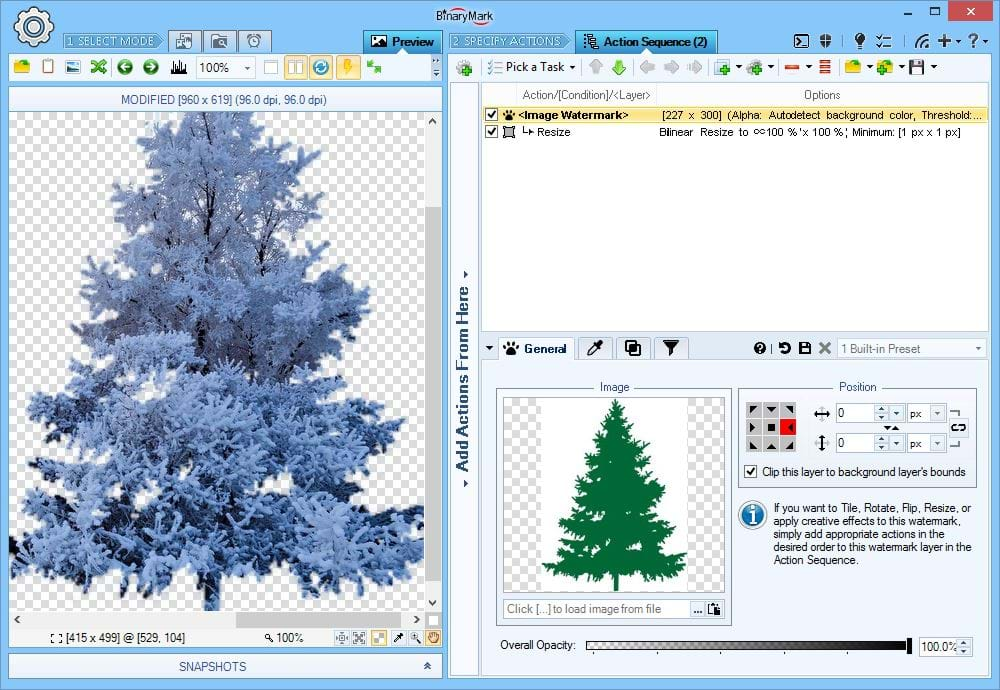
Apply Picture Watermarks
Easily add picture-based watermarks to your photos and images.
In this example you can see how the image-based watermark is first transformed using Soften effect and RGB Curves action, and then blended with the background image using one of creative blend modes (so that its color is effectively replaced by that of the background image).
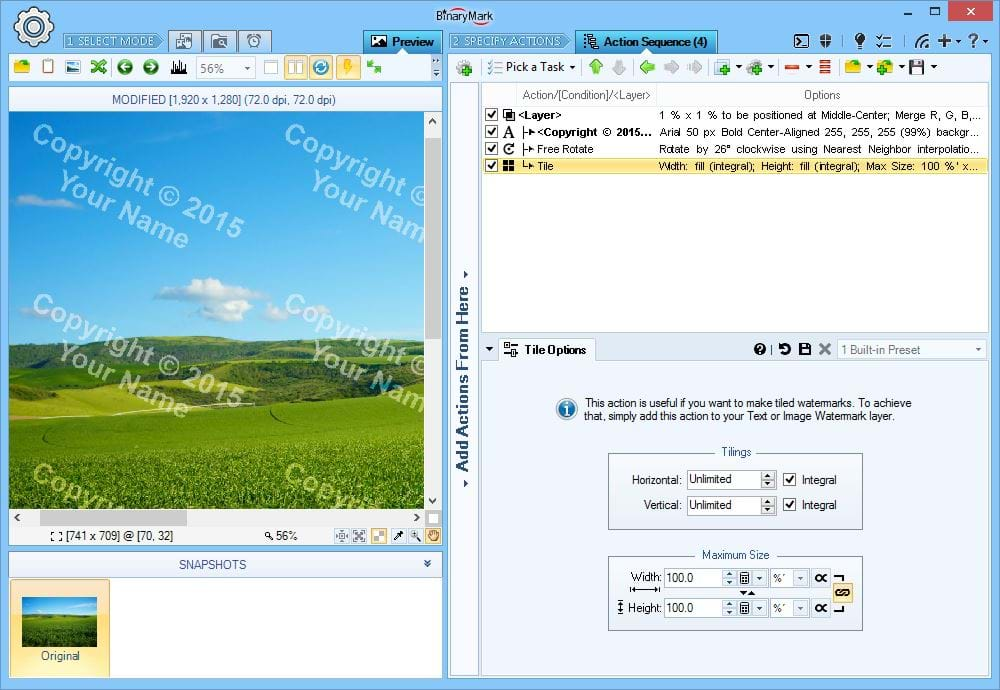
Tiled Watermarks
You can tile watermarks so that they cover entire image or a specified region.
In this example, a single text watermark is first rotated slightly, and then tiled to cover the whole image (100% x 100%).

Apply Actions & Effects to Watermarks
You can enhance and modify your text or image watermarks by selectively applying to them any and all actions just as you would with the image itself. Because these actions are applied to the watermark layer, they do not affect the underlying image and only change the watermark to which they belong.
In this example, the original image of a bug is oriented vertically. When the watermark is applied, however, the watermark picture is rotated by 90 degrees, distorted with a sphere effect, and its contrast is increased from that of the initial picture.
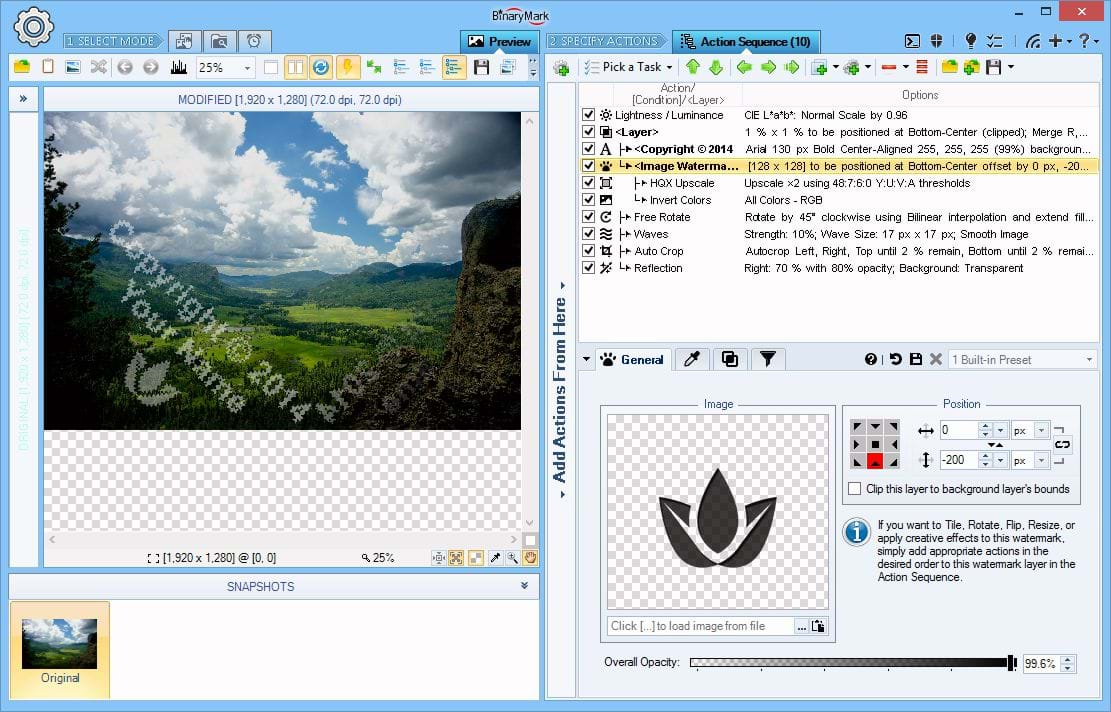
Composite Watermarks & Nested Layers
You can also nest layers within each other and intermix them with actions in-between.
In this example, a composite watermark is created using Text Watermark and Image Watermark actions that are then grouped together within a "Layer" layer, to which additional actions such as Free Rotate and Waves Effect are applied as a whole unit. The result is a creative watermark dynamically created and positioned by the program.
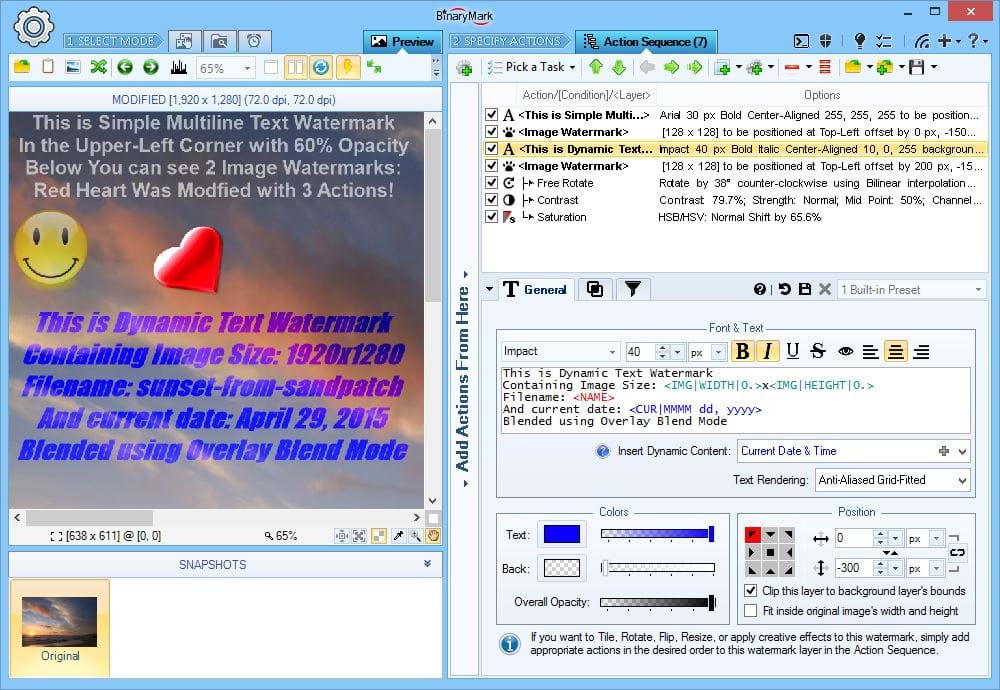
Static & Dynamically Generated Text Watermarks
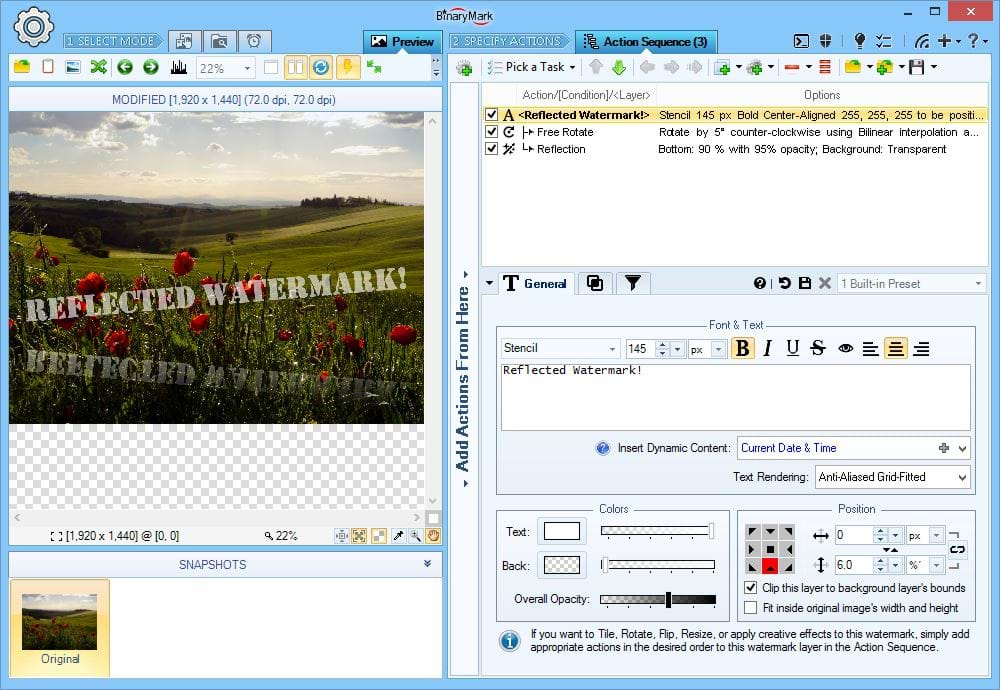
Apply Text Watermarks
One type of watermarks that you can apply to your photos is a textual watermark.Text watermarks support reach formatting options:
- Any True Type Font Face is supported
- Font Size can be specified in pixels, points, percentages, or print units
- Font Style: bold, italic, underline, strike-through
- Text Alignment: left, right, center
- Multiline text spanning any number of lines
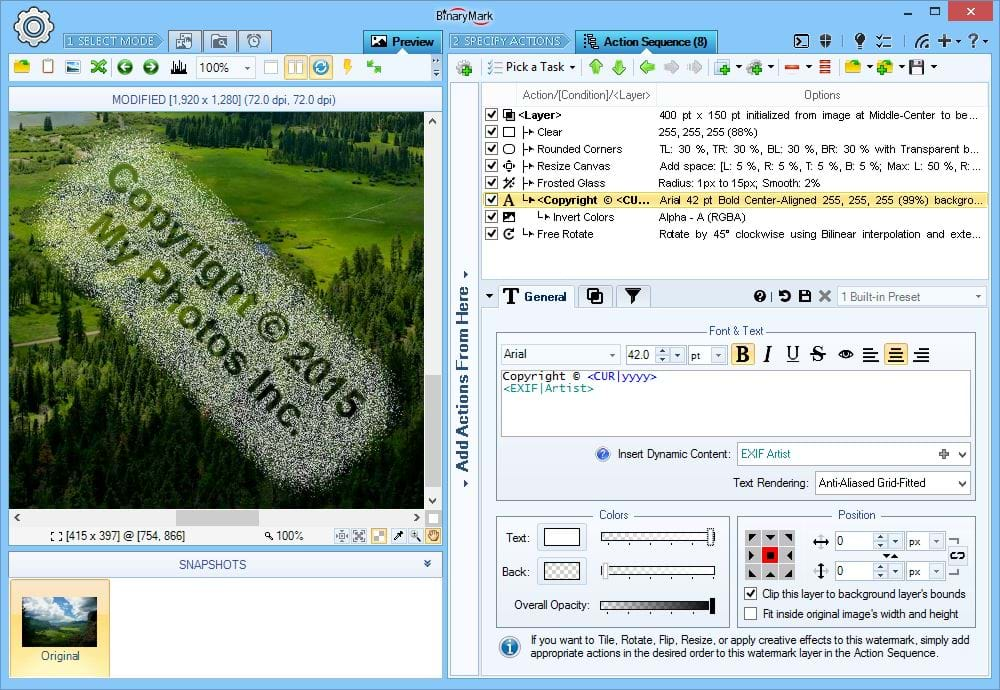
Generate Watermarks Dynamically
Text watermarks may contain not only static, predefined content, but dynamically generated content too:
- File Properties: name, size, date modified, etc.
- Image Properties: width, height, size, color count, etc.
- EXIF Metadata: author, camera model, date taken, GPS, etc.
- IPTC Metadata: author, title, copyright, etc.
- Miscellaneous data: random letters and numbers, hashes, current date and time, etc.
Additionally, you can further modify both static and dynamic data with command tags that let you change letter case, replace strings, escape strings, etc. - all done dynamically! Dynamic content can be inserted into your watermark text via a set of predefined tags available from the drop-down menu as shown on this screenshot.
Advanced Image Processing with Layers
Layers add a whole new dimension to batch image processing capabilities of Batch Image Resizer. With layers you can:
- Selectively apply actions only to the desired pixels (colors) and/or regions
- Move and Copy regions within the image
- Apply all kinds of creative effects to Text and Image Watermarks
- Freely mix layers with conditions
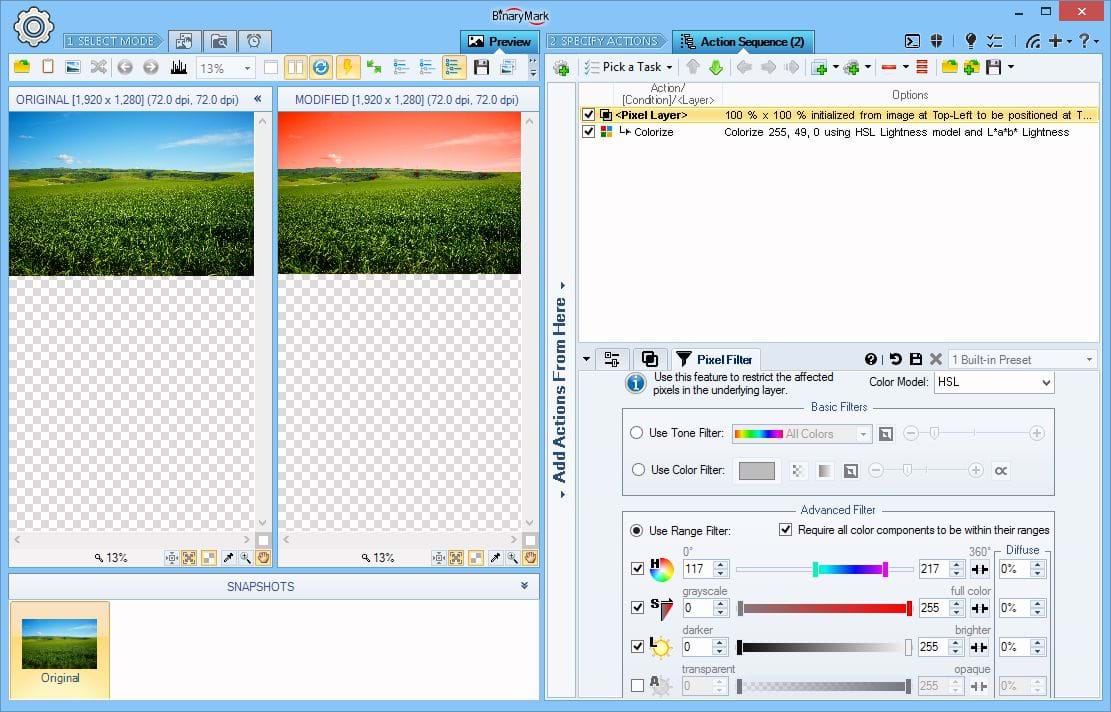
Pixel Filter Layer
With layers, you can selectively apply adjustments and/or other actions only to specific pixels instead of the whole image.
In this example, the Colorize action is applied only to the pixels with Blue hue, leaving all the other pixels unaffected, thus turning the sky from Blue to Red. This is done using Advanced Pixel Filter where allowed hues are limited to the specified range.
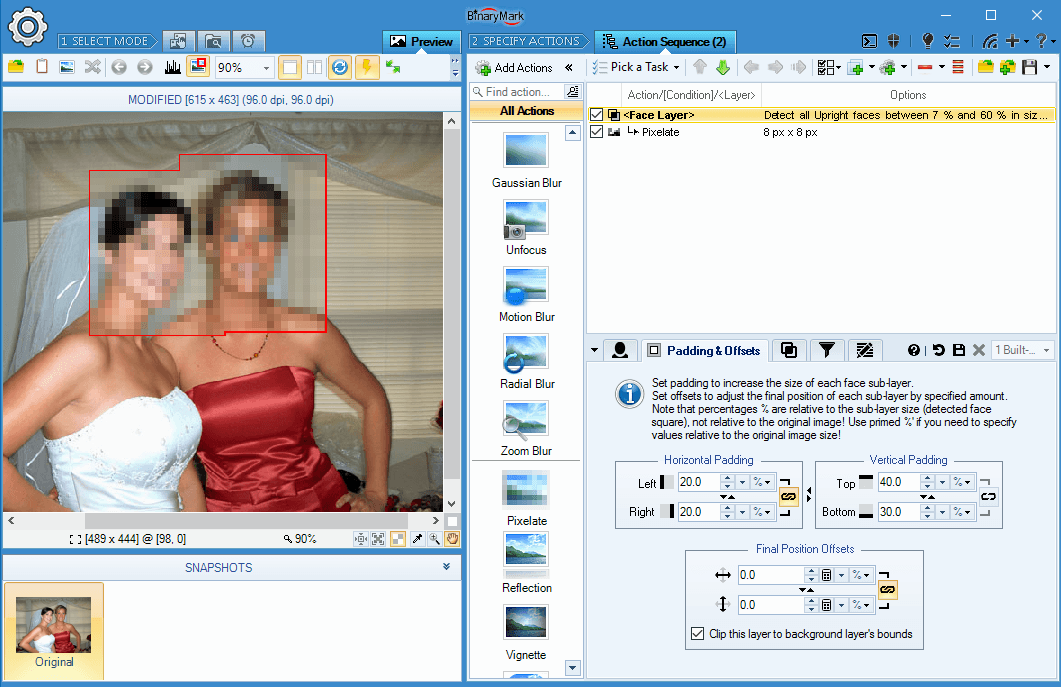
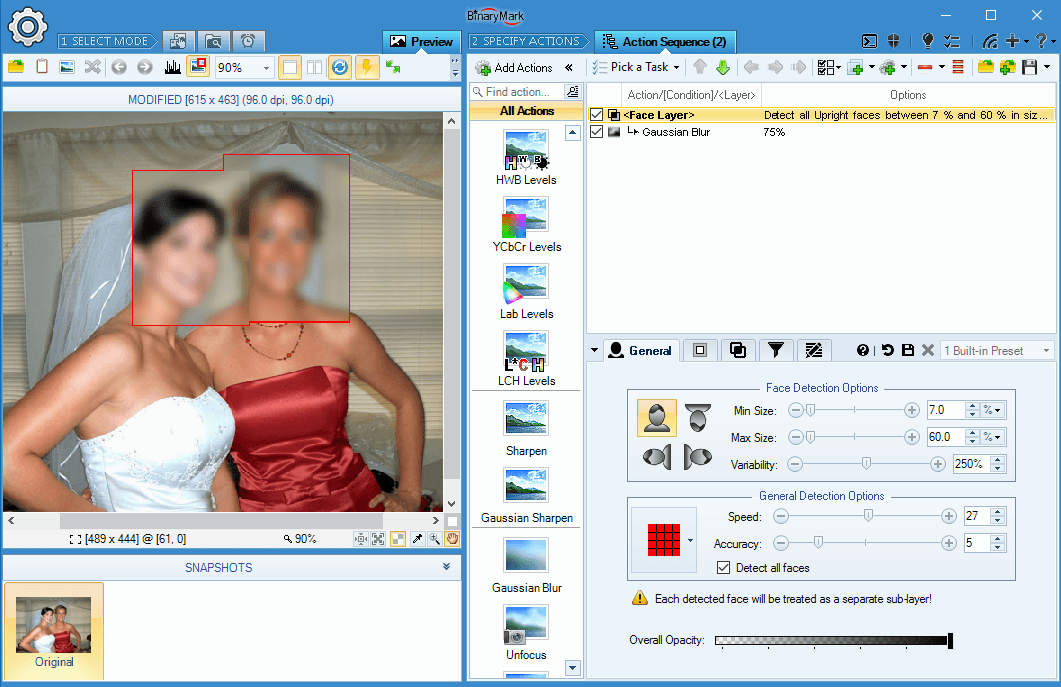
Face(s) Layer
With Batch Image Resizer's built-in face recognition you can create bitmap layers out of rectangles corresponding to the detected faces.
You can then apply various actions to this face layer, with the net effect being that only the regions containing faces will be affected by those actions.
You have full control over how a face layer is created: you can specify extra padding and/or offsets for precise size and positioning.
On the Screenshot You see that a Pixelate Filter has been applied. But because the Pixelate action is nested within a Face Layer, the affected pixels are only those corresponding to the detected faces.
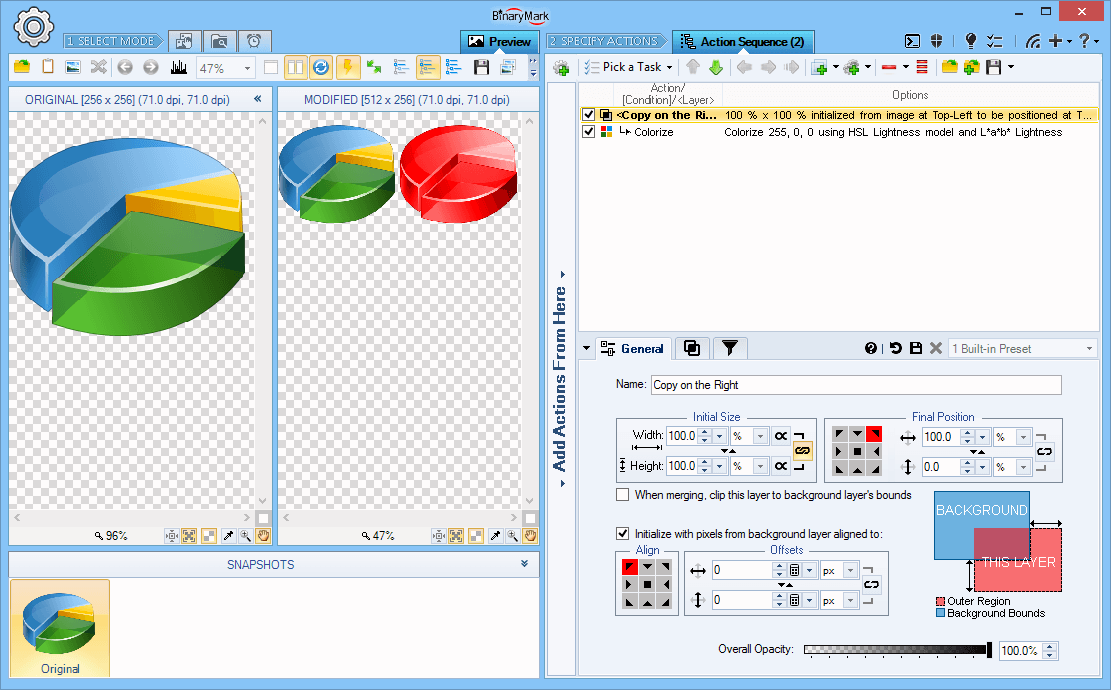
Copy Content Layer
With layers, you can move or duplicate parts of the image by specifying the initial rectangular region and destination location.
In this example, the initial rectangular region specified covers the whole image, while the destination is offset 100% to the right, and the layer is allowed to extend the original image size. This results in the original image being copied to the right side, and then the Colorize action being applied to the copy on the right.
Nested Actions within a Layer
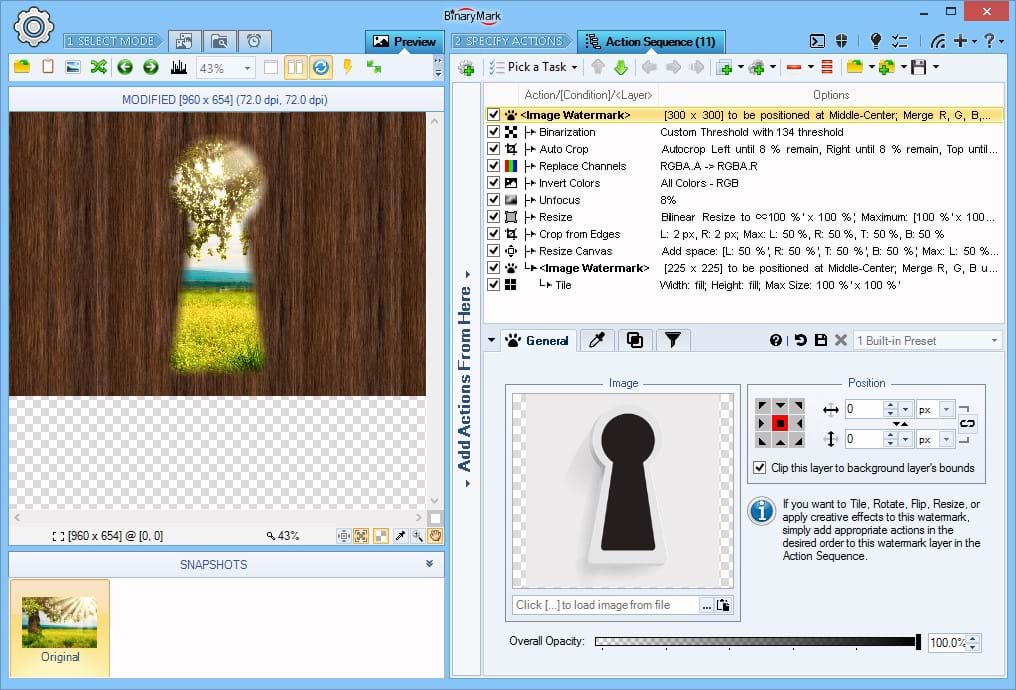
You can affect layers by nesting actions inside them. This way nested actions will be applied only to the layer and not the original image, and then the result will be merged with original image.
Because watermarks are effectively layers, you can apply all the actions present in this program to watermarks directly without them affecting the original image.
In this example, 8 actions have been applied to image watermark (layer) to turn a basic opaque image of a key hole into a transparent see-through key-hole effect when applied to the image.
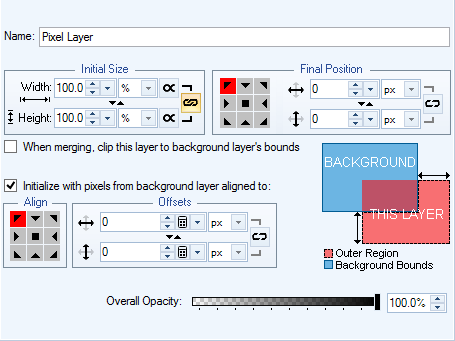
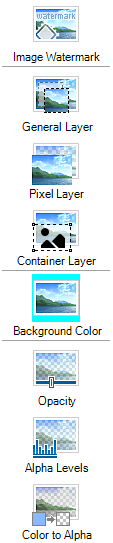
Layer Size and Positioning
Layers come in 2 varieties: pixel layers that are initialized using the original image pixels; and watermark/container layers that are initialized from a given text or image watermark or are empty altogether (used form composite watermarks).
Regardless of its type, for every layer you can specify:
- Initial Size: layer height and width in either pixels, percentages, or print units (relative to the original image or the current layer)
- Final Position: alignment together with horizontal and vertical offsets
- Clipping Behavior that controls if the layer is allowed to extend the original image if it does not fit completely inside
- Overall Opacity controlling the transparency of the merged layer
- Layer Name Opacity for reference purposes
- Initial Pixels: initialize a layer with pixels from the original (background) image that lay within a specified rectangular region (only for General and Pixel layers)
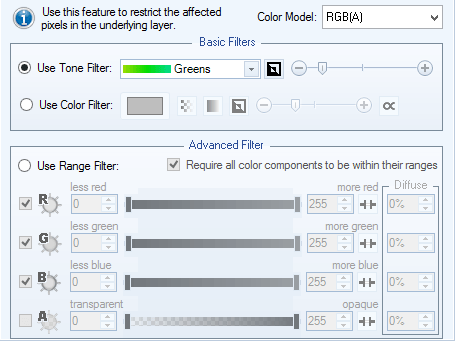
Layer Pixel Filters
Every layer comes with built-in pixel filtering functionality. This works during the merge phase of the layer. Only those pixels that are allowed by the filter (by default filter is turned off, so all pixels are allowed) will be affected by the merging operation. So, for example you can selectively change the brightness of the blueish pixels in the image and avoid all the others by setting the filter to allow only the Blueish hues.
The following 3 filters are available:
- Tone Filter lets you select from a predefined list of color tones like Greens, Reds, Grays, Skin Tone, etc. with adjustable tolerance
- Color Filter lets you pick a specific color with adjustable tolerance (only pixels that are close to the color picked will be included)
- Range Filter is a more advanced filter and lets you specify the precise ranges of the component intensities for a given color model (only mid to fully saturated colors in the HSL model for example)
Alpha-Blending & Alpha-Compositing Modes
Batch Image Resizer supports more than 40 blending modes and more than 10 alpha-compositing modes.
Advanced Compositing & Blending
Layers support extensive merging, compositing, and alpha-blending options:
- Per-channel merging for: RGBA, CMY, HSV, HSL, HSI, HWB, Lab, LCH, and YCbCr color models
- 44 Blend Modes: 3 Normal, 7 Darken, 7 Lighten, 7 Contrast, 3 Inversion, 2 Cancellation, 4 HSL, 6 Logical, 4 Quadratic, 1 Misc
- 12 Compositing Modes
- 4 Alpha-Blend Modes
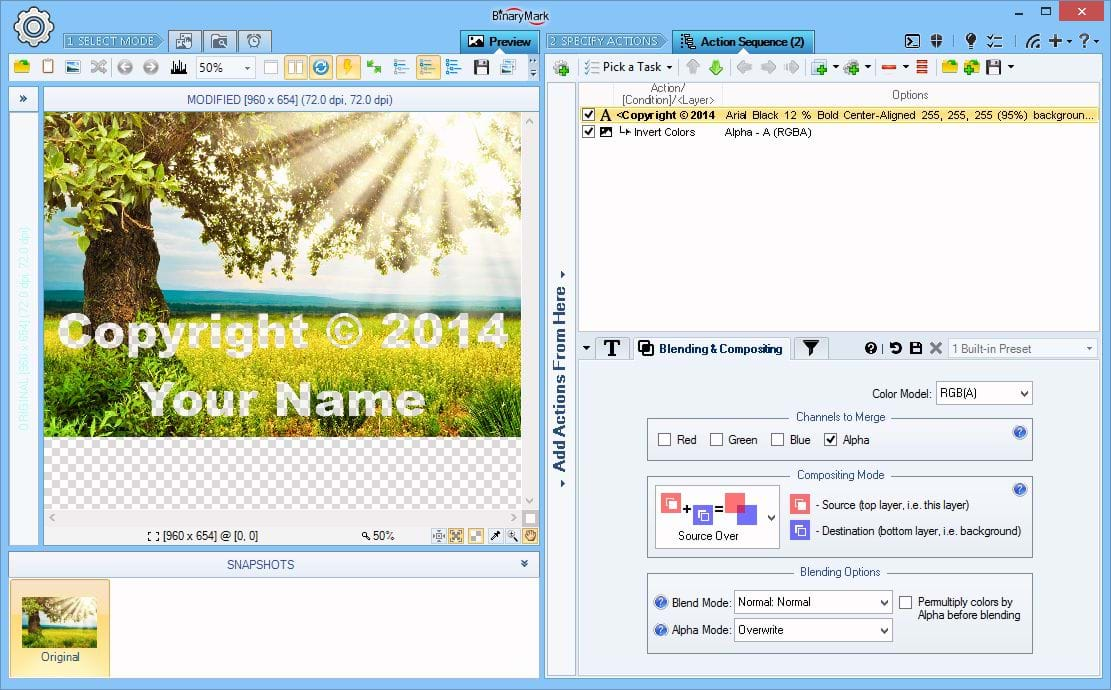
In this example, only the Alpha channel is being merged back, with the mode set to Overwrite (original alpha channel is completely replaced by that of the layer). Because the layer contains the Invert Colors action where Alpha channel is inverted, this results in transparent, see-through text watermark effect applied to the image.
Creatively Use Blending Modes & Actions
By playing with blending and compositing modes you can achieve sophisticated special effects.
In this example, the text watermark is being used as a mask on the background image, through which image's true color is exposed, while the rest of the background image is effectively made grayscale.
Note how the Replace Channels action applied to the watermark replaces Alpha Channel with Red Channel, effectively inverting watermark's Alpha values, so that only the text remains the transparent part.
Use Different Compositing Modes
You can use different compositing modes to achieve creative effects, because they make it possible for your text or image watermark to act like a mask.
In this example, Destination In compositing mode is used which results in background image being seen only through the shape defined by the watermark image.
Before being applied, the watermark itself is adjusted: white background is automatically rendered transparent (a feature available to all image watermarks), and then the watermark is resized so it fits the entire background image.
Merging and Compositing
Layers offer a lot of merging, compositing, and blending options. In this context, Merging refers to exactly which channels within a color model (like Red, Green, Blue, and Alpha of RGBA model) are to be merged with the original (background) image. Compositing refers to alpha-compositing rules that determine how the layers alpha channel should be combined with the original image.
- Control which channels will be merged with the original image once the layer is "closed" using color-model-specific per-channel settings
- Supported color models for per-component merging include: RGBA, CMY, HSV, HSL, HSI, HWB, CIE Lab, CIE LCH, and YCbCr
- 12 Compositing Modes: Source-Only, Source-Over, Destination-Over, Source-In, Source-Out, Source-Atop, Destination-In, Destination-Out, Destination-Atop, Source XOR Destination, Source Intersect Destination, Destination Intersect Source
- 4 Alpha-Blend Modes: Original, Overwrite, Alpha-Blend, Apply Blend Mode
Blending and Blend Modes
Layers offer a lot of merging, compositing, and blending options. Blending refers to the color components of the pixels: given a layer's pixel and the background pixel, how the resulting color should be determined. Batch Image Resizer includes support for 44 Blend Modes:
- 3 Normal: Normal, Average, Dissolve
- 7 Darken: Darken, Multiply, Color Burn, Linear Color Burn, Inverse Color Burn, Soft Color Burn, Darker Color
- 7 Lighten: Lighten, Screen, Color Dodge, Linear Color Dodge, Inverse Color Dodge, Soft Color Dodge, Lighter Color
- 7 Contrast: Overlay, Soft Light, Hard Light, Vivid Light, Linear Light, Pin Light , Hard Mix
- 3 Inversion: Difference, Exclusion, Negation
- 2 Cancellation: Divide, Subtract
- 4 HSL: Hue, Saturation, Color, Luminosity
- 6 Bitwise / Logical: AND, OR, XOR, Source Erase, NOT Source Erase, Merge Paint
- 5 Misc: Reflect, Glow, Freeze, Heat, Phoenix
Automatic Face Detection Features
Built-in Automatic Face Recognition
Batch Image Resizer can recognize human faces in hundreds of pictures and can then use this information to intelligently process your photos. Batch Image Resizer uses its own built-in face detection technology and does not rely on third party services or the Internet, which is great if you are concerned about privacy — all face recognition happens locally on your local computer!
Facial recognition works even with partially lit and partially shaded faces, including slightly tilted faces, faces with glasses, and rotated faces. It may not work properly if a face is rotated by 45° or is in profile/semi-profile orientation.
There are various settings that affect face detection speed and accuracy. Generally, if you want better accuracy, the detection speed will be slower, and vice-versa.
Optional Cloud-Based Face Recognition
Optionally, if you are not satisfied with the detection results, Batch Image Resizer offers you the ability to automatically upload your photos to Microsoft Face Detection Cloud-Based Service, which will usually produce more accurate face detection results.
Note You are under full control if and when photos will be uploaded to the cloud for better face recognition by choosing one of the 5 available options:
- Never upload photos
- Upload only if no faces detected
- Upload only if results are not certain
- Upload only if no faces detected or results are not certain
- Always upload photos
Note This features requires that you have your own Microsoft API Key.
Face Recognition Key Features
- Search for images with faces
- Select and process only those photos that contain faces
- Automatically rotate photos to proper orientation based on detected faces
- Automatically crop photos to the largest detected face - useful for portraits
- Blur-our faces automatically
- Apply creative effects to faces only
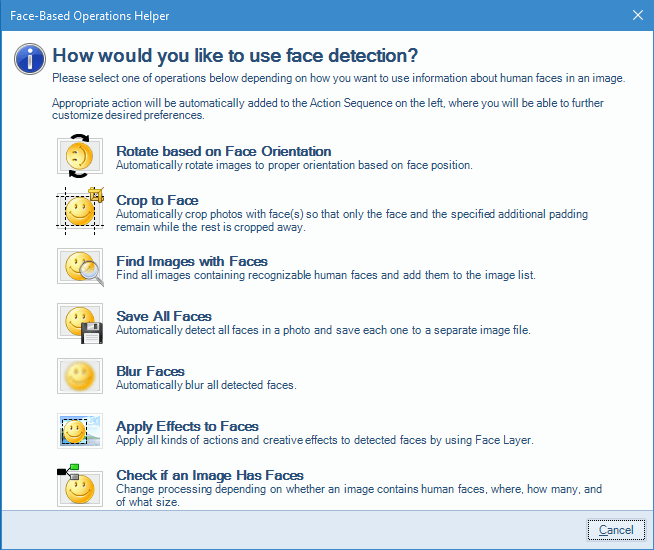
Automatic Face Detection Helper
Batch Image Resizer makes it very easy to start image processing of human faces in your photos. Built-in helper features the following quick-start scenarios:
- Auto-rotate pictures based on facial orientation
- Auto-crop photos to the larges detected face
- Find/select/filter images containing faces that match certain criteria
- Extract all faces from the images (save to individual files)
- Blur-out all faces in photos
- Detect if a given image has faces and change processing accordingly
- Apply creative effects only to the areas of the image that contain faces
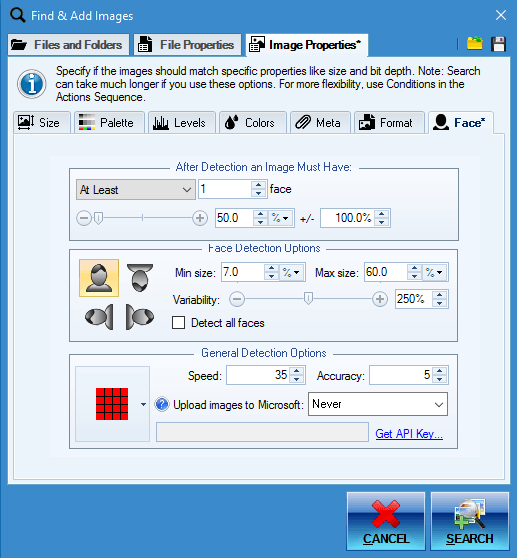
Find photos with Faces
With built-in face recognition it is possible to automatically find and add for processing only those images that have human faces in them.
You can select from various options like: face size and orientation, face count, etc.
It is possible to use an optional cloud-based face recognition provided by Microsoft if you are not satisfied with the detection results provided by built-in face recognition.
Face Auto-Rotate
Batch Image Resizer features built-in face detection with which it can automatically rotate photos into proper orientation.
This is especially useful if the images lack the needed EXIF orientation meta tags. Rotating such photos manually can be very time consuming if there are hundreds or thousands of them. Batch Image Resizer can do it automatically - and all without requiring Internet access or third-party services - just your CPU.
Auto-Crop to Face
Batch Image Resizer can automatically detect human faces in pictures without needing Internet access or relying on third-party services, so you can be sure of your privacy!
One of the many things it can do with detected faces is to crop photos so that only the face or faces matching desired criteria remain.
You can specify minimum required padding so that there is extra spacing left.
Blur-Out Faces in Your Photos
With the Face(s) Layer it is possible to apply various filters and actions only to those regions in an image that contain faces. That way you can blur only the faces in your pictures, as shown on this screenshot.
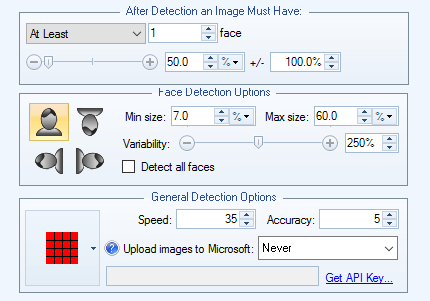
Face Detection Condition
Check if the image being processed contains any matching human faces.
- Specify required number of faces
- Specify required face size, and size variation/range
- Specify face orientation (tilt)
- Specify various accuracy settings
- Ability to select a rectangular region where faces should be looked for
- Optional ability to use cloud-based face recognition provided by Microsoft (entirely optional and should only be used if built-in face detection results are poor).
Face(s) Layer
With Batch Image Resizer's built-in face recognition you can create bitmap layers out of rectangles corresponding to the detected faces.
You can then apply various actions to this face layer, with the net effect being that only the regions containing faces will be affected by those actions.
You have full control over how a face layer is created: you can specify extra padding and/or offsets for precise size and positioning.
On the Screenshot You see that a Pixelate Filter has been applied. But because the Pixelate action is nested within a Face Layer, the affected pixels are only those corresponding to the detected faces.
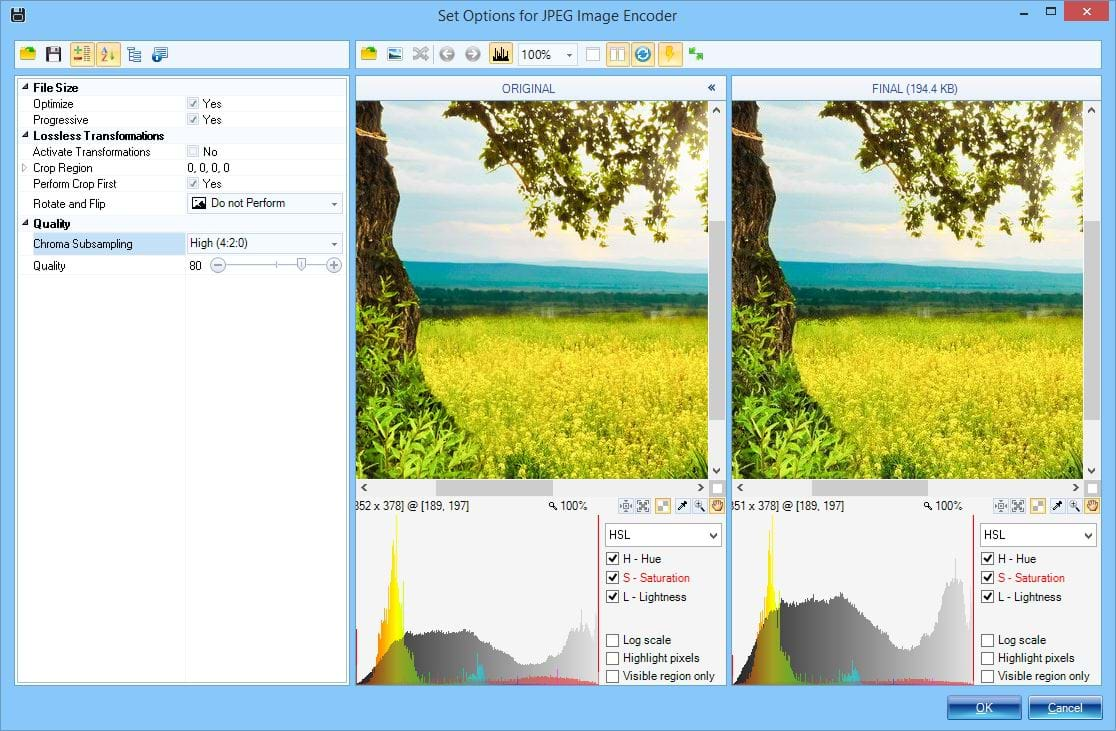
30+ Image File Formats
New Formats upon Request! Even if the image format you were looking for is not listed above, or it lacks write-support, we can add it for you - just send us a short message!
Advanced Options
Access image-format-specific options that affect output image quality and file size.
- Optimizations: JPEG, PNG
- Bit-Depth: PNG, GIF, BMP, TIFF
- Dithering: GIF, PNG, BMP, TIFF, PNM
- Palettes: GIF, PNG, BMP, TIFF
- Transparency / Opacity: GIF, PNG
- Quality: JPEG, J2K, JP2
- Transformations: JPG
- Compression: BMP, PNG, TIFF, TGA
- Interlacing / Progressive Display: PNG, JPG
- Misc. Settings
As you change various options, the resulting image output is immediately reflected in the preview area, so you instantly know how various settings affect output image quality.
Built-in Image Conversion Helper
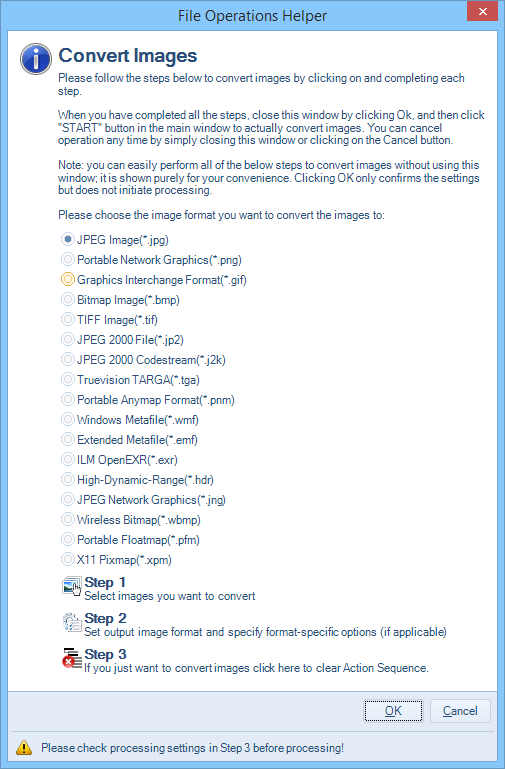
Image conversion helper lets you get started much faster. It will automatically setup the proper output settings depending on the options you specify.
- Choose image format to convert your images to
- Add images for conversion
- Specify image format-specific options
Saving Processed Images
Specify File Name, Output Folder, and Image Format
At the bottom of the main window you can specify:
- Destination file name pattern (or use original image file name)
- Destination folder/directory (or use original folder)
- Image file format like JPEG, PNG, etc. (or save using original format if supported)
- Metadata inclusion option - whether or not output images will contain original / modified metadata like EXIF, IPTC, etc.
- Option to shrink image width and height proportionately until output matches desired file size

Specify Processing Options
At the bottom of the main window you can also specify additional processing options:
- Whether or not to backup original files if they are to be overwritten
- Whether or not to delete original images
- Whether or not to "save" images that have not been changed (when saving to a new location and/or under a new file name or format)
- Logging options
- Error behavior
- Specify file system attributes and dates

Metadata Support: EXIF, IPTC, GPS, XMP
Batch Image Resizer lets you work with image meta-data in the following ways:
- Use metadata values in file names
- Dynamically include metadata content in text watermarks
- Remove metadata
- Copy metadata to processed images
- Find images based on specific metadata
- Process images based on specific metadata
- Rotate images according to EXIF orientation tag
- Extract all EXIF and other metadata tags to a text file for each image or for all images in a batch
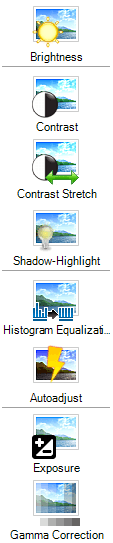
Contrast, Shadows & Highlights
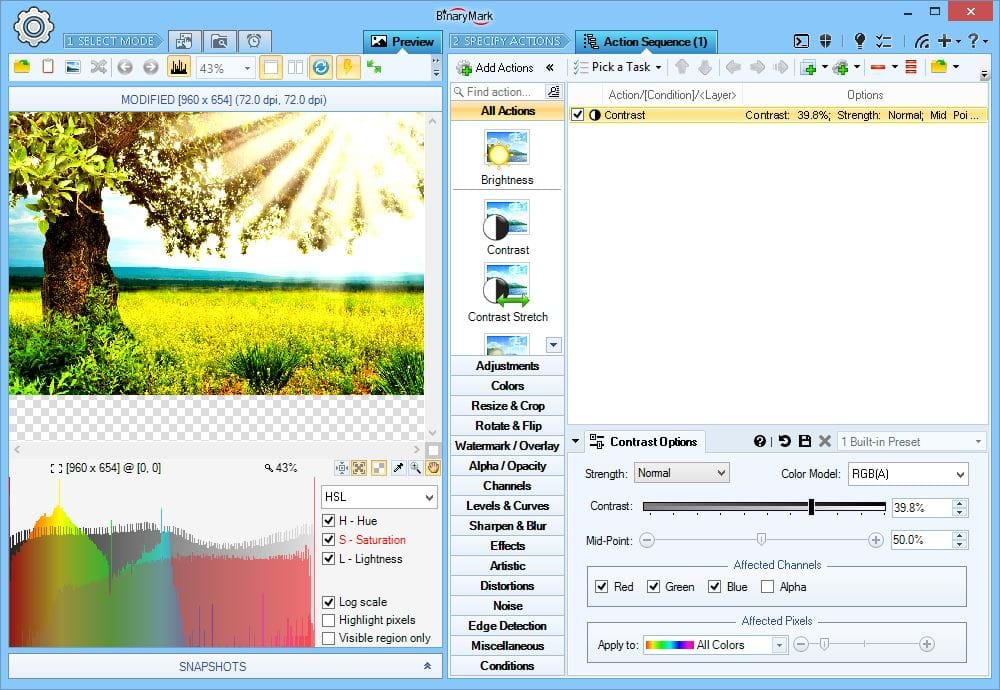
Adjust Contrast
Increase of decrease contrast in your images.
What's unique about it? Only Batch Image Resizer lets you perform per-channel contrast adjustments in any of the 9 supported color models, not just RGB! You can also tweak the mid-point, thus affecting what is considered light and what is considered dark.
Examples For example, you can increase saturation contrast using HSL model, leaving hue and lightness unaffected. Similarly you can, for example, reduce luminosity contrast using CIE Lab color model, leaving a and b channels unaffected.
RGB(A) HSB/HSV HSL HSI HWB YCbCr CIE Lab CIE LCH
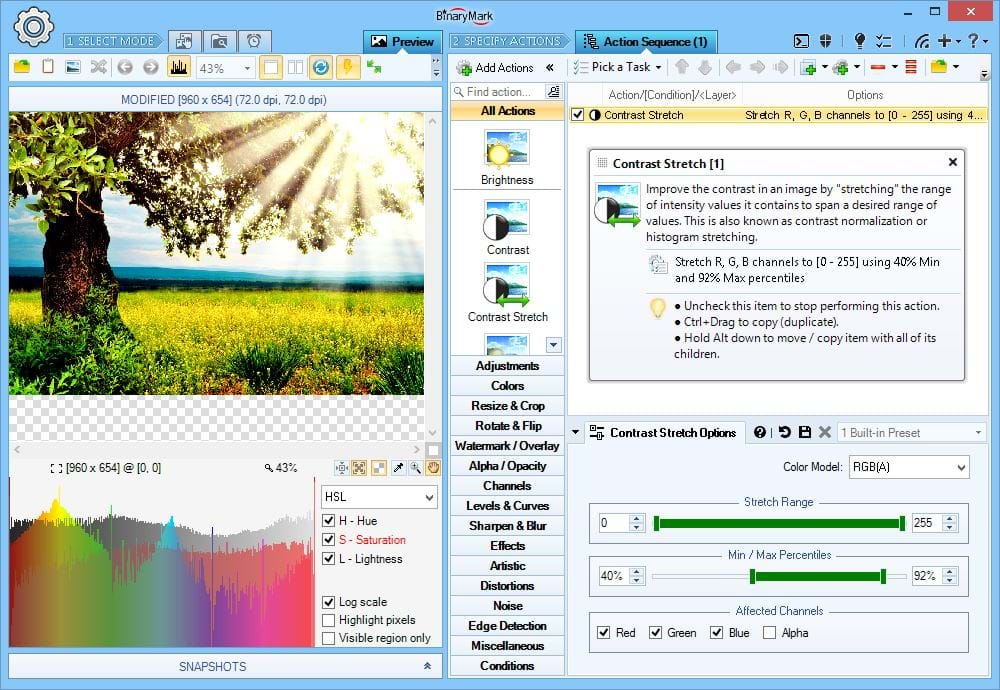
Contrast Stretch a.k.a. Contrast Normalization
Contrast stretching (also called contrast normalization or histogram stretching) improves the contrast in your images by stretching the range of intensity values they contain to span a desired range of values.
What's unique about it? Only Batch Image Resizer lets you perform per-channel contrast adjustments in any of the 9 supported color models, not just RGB!
RGB(A) HSB/HSV HSL HSI HWB YCbCr CIE Lab CIE LCH
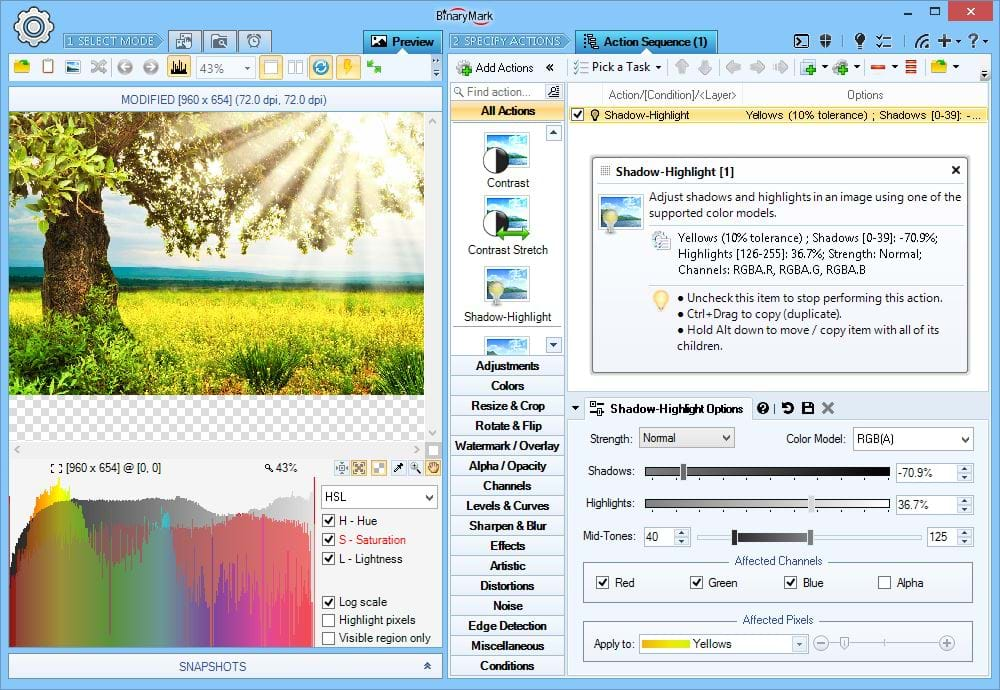
Shadows & Highlights
Increase/decrease shadows (darks) and highlights (lights) in your images.
What's unique about it? Only Batch Image Resizer lets you perform per-channel shadow & highlight adjustments in any of the 9 supported color models, not just RGB! You can also tweak the mid-tones, thus affecting what is considered a "highlight" and what is considered a "shadow".
RGB(A) HSB/HSV HSL HSI HWB YCbCr CIE Lab CIE LCH
Brightness, Luminosity, Intensity, Gamma, Exposure, Luma
Batch Image Resizer can adjust brightness, luminosity, lightness, luminance, luma, intensity, gamma, and exposure of your images. All of these affect perceived brightness, however all the terms mean slightly different things.
Heads Up! All adjustments operate in 2 modes: shifting and scaling. Shifting shifts all pixel values by (adds or subtracts) the specified amount, preserving the difference between different pixels. Scaling multiplies all pixel values by the specified factor, either amplifying (factor > 1) or reducing (factor < 1) absolute difference between different pixels thus affecting the contrast.
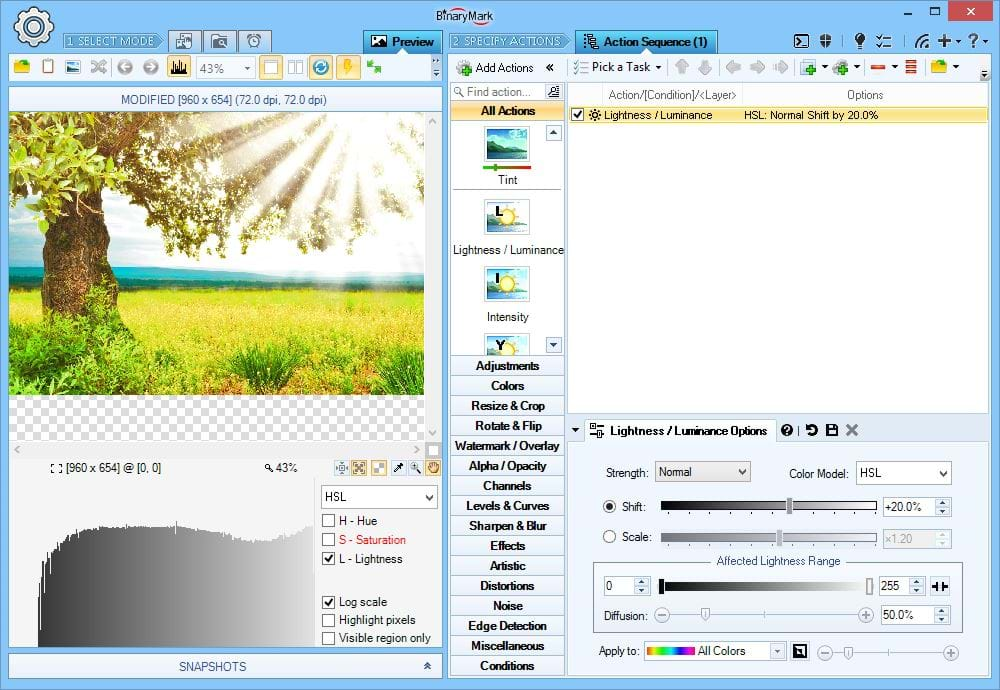
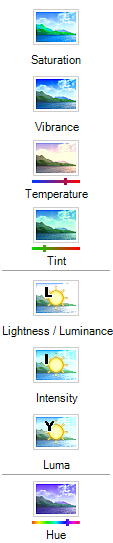
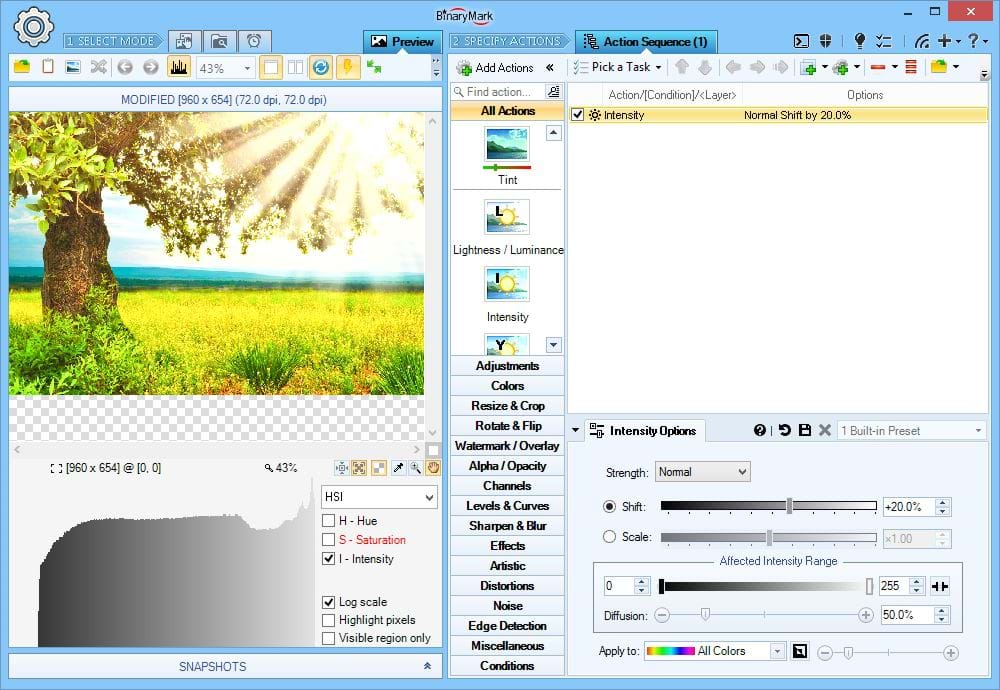
Shift Lightness / Luminosity / Luminance
Adjust lightness / luminosity / luminance in your images by shifting its values.
Shifting shifts all pixel values by (adds or subtracts) the specified amount, preserving the difference between different pixels.
On the Screenshot HSL lightness is increased by 20% uniformly everywhere, as can be clearly seen on the histogram underneath the preview.
RGB(A) HSB/HSV HSL HSI HWB YCbCr CIE Lab CIE LCH
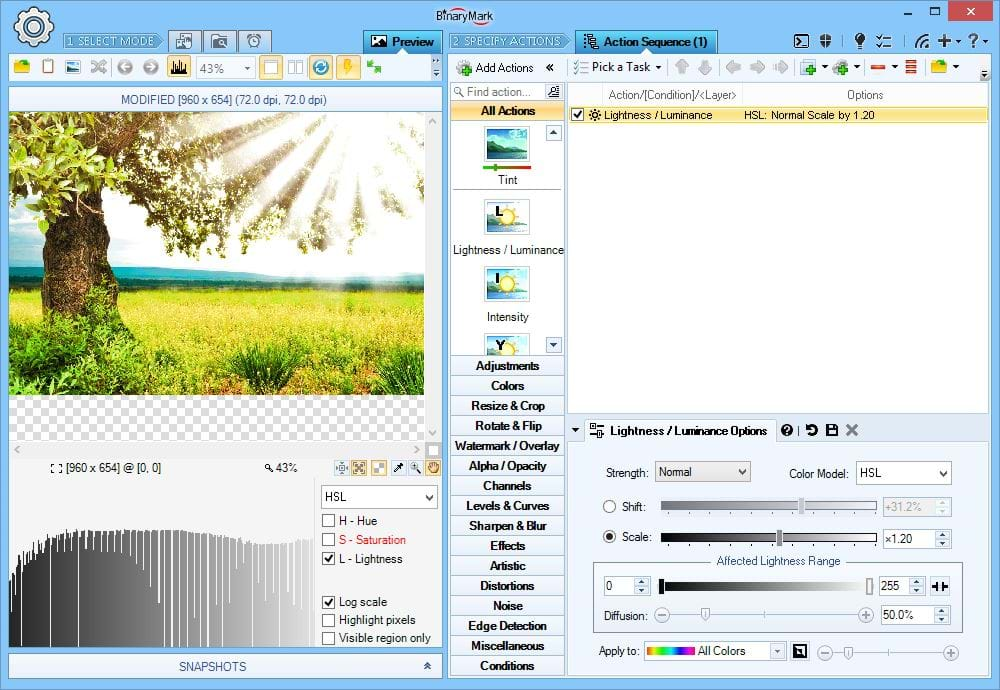
Scale Lightness / Luminosity / Luminance
Adjust lightness / luminosity / luminance in your images by scaling its values.
Scaling multiplies all pixel values by the specified factor, either amplifying (factor > 1) or reducing (factor < 1) absolute difference between different pixels thus affecting the contrast.
On the Screenshot HSL lightness is scaled by a factor of 1.2, resulting in amplification of the differences in lightness of individual pixels and bigger contrast as can be clearly seen in the preview.
RGB(A) HSB/HSV HSL HSI HWB YCbCr CIE Lab CIE LCH
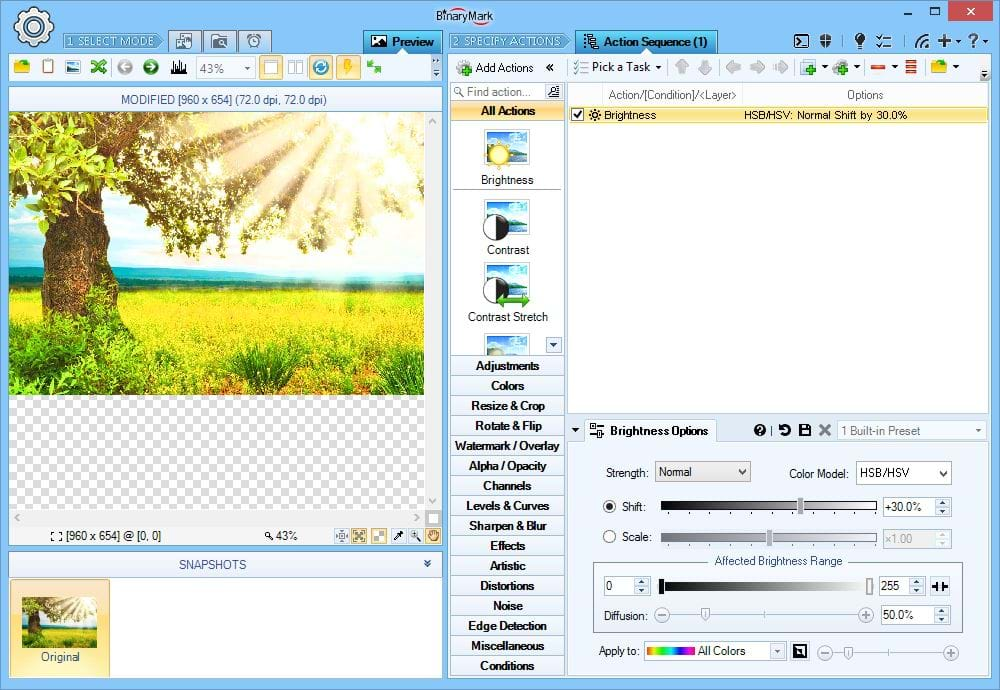
Shift Brightness
Adjust overall brightness of your images by either shifting or scaling brightness values.
RGB(A) HSB/HSV HSL HSI HWB YCbCr CIE Lab CIE LCH
Change Intensity
Adjust HSI Intensity of the selected pixels in your images.
RGB(A) HSB/HSV HSL HSI HWB YCbCr CIE Lab CIE LCH
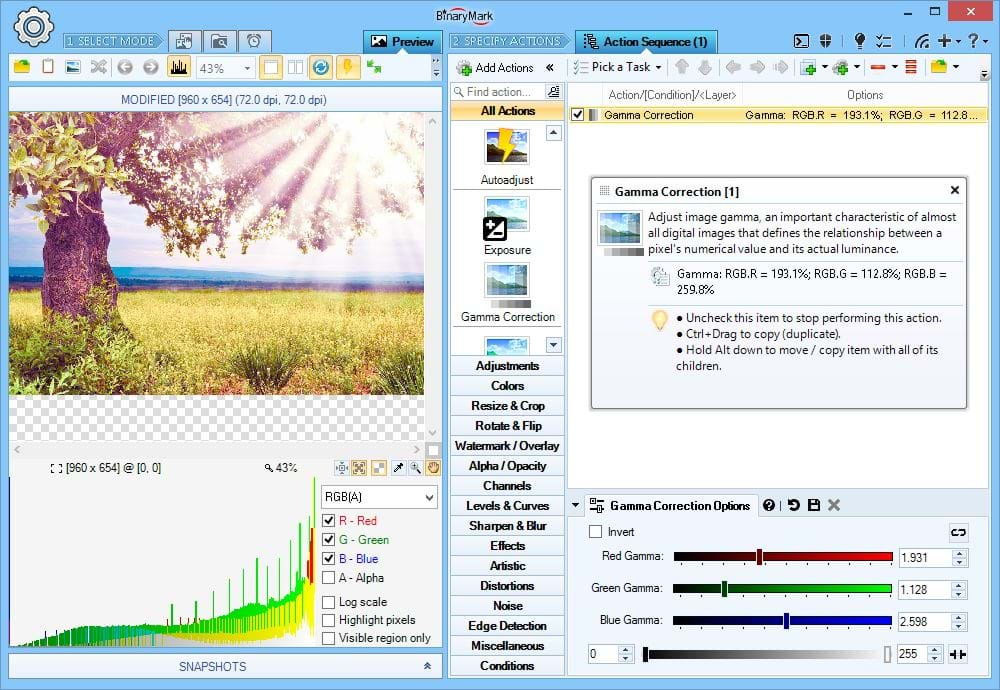
Gamma Correction
Perform gamma correction on your images.
What's unique about it? Unlike other software programs Batch Image Resizer lets you adjust gamma on a per-channel basis: you can separately modify Red, Green, and Blue gamma.
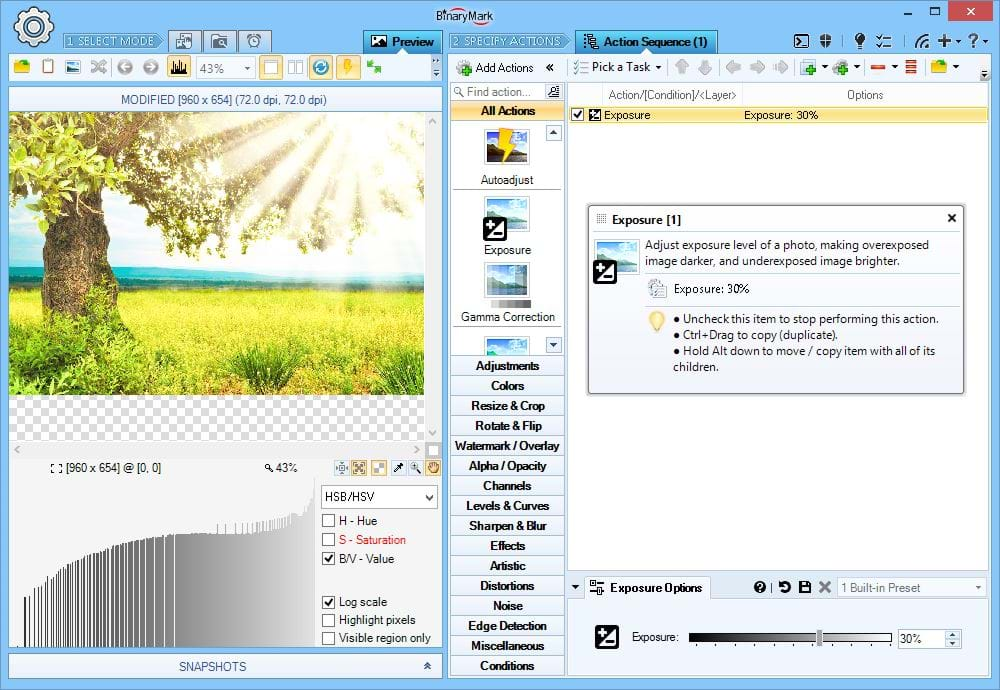
Adjust Exposure
To compensate for poor lighting conditions during photo shoots, use adjust exposure feature. It can either brighten dark areas, or darken bright areas, making your photos look natural.
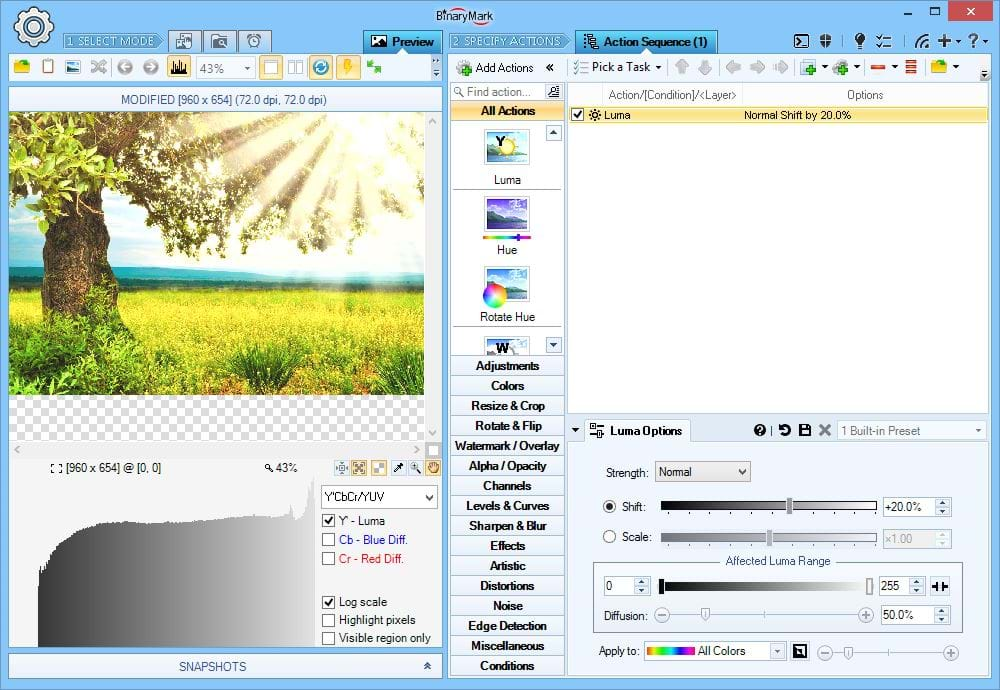
Adjust Luma
Adjust YCbCr Luma values of specified pixels in your images.
RGB(A) HSB/HSV HSL HSI HWB YCbCr CIE Lab CIE LCH
Various Color Adjustments
Batch Image Resizer can adjust saturation, chroma, hue, temperature, tint, and some other color-related components.
Heads Up! All adjustments operate in 2 modes: shifting and scaling. Shifting shifts all pixel values by (adds or subtracts) the specified amount, preserving the difference between different pixels. Scaling multiplies all pixel values by the specified factor, either amplifying (factor > 1) or reducing (factor < 1) absolute difference between different pixels thus affecting the contrast.
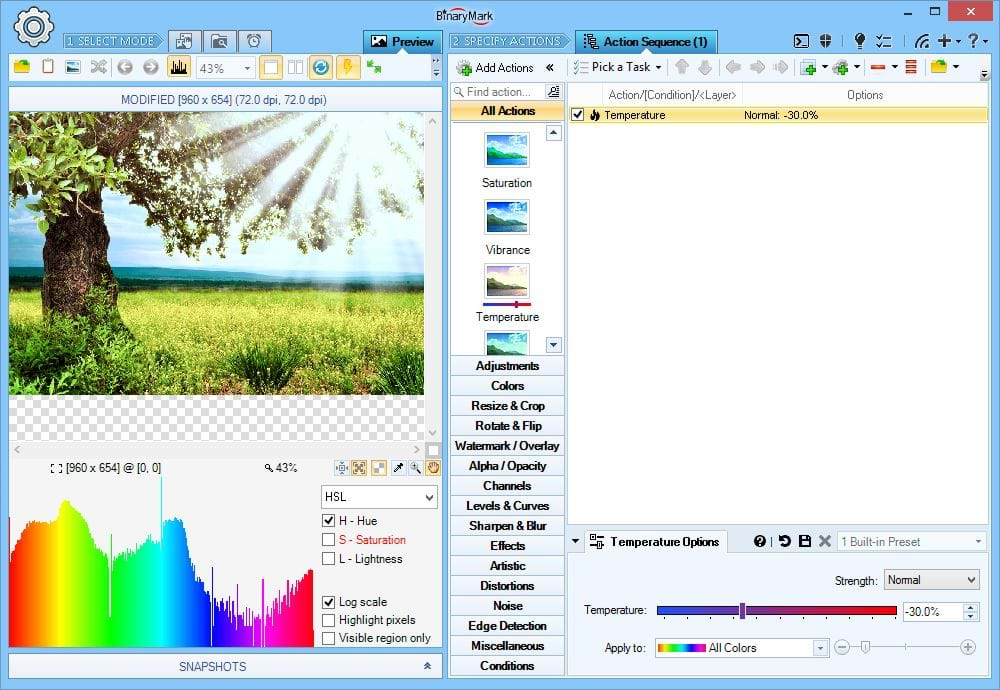
Adjust Color Temperature
Change temperature of the colors in your images: from warm - reddish, to cold - blueish.
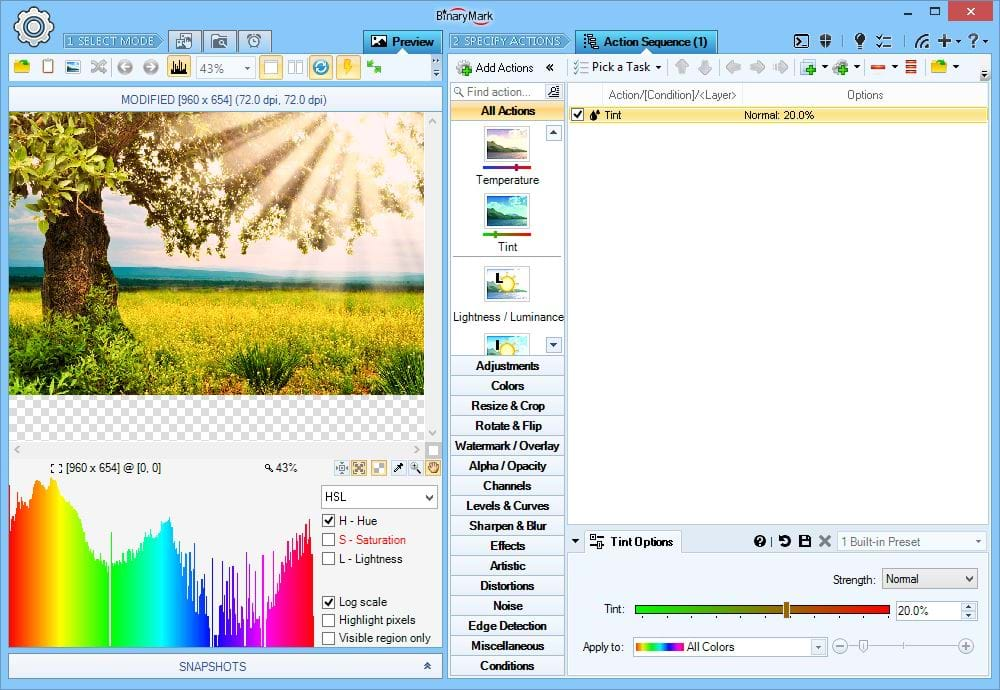
Adjust Color Tint
Change tint of the colors in your images: from reddish, to greenish.
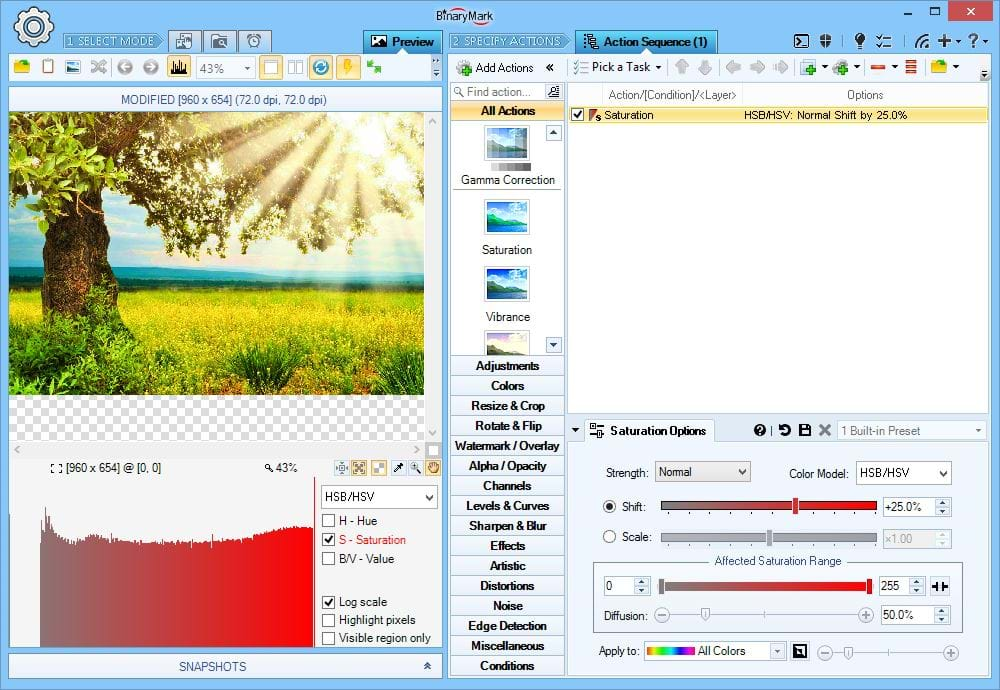
Adjust Saturation
Adjust saturation or chroma in either RGB, HSV/HSB, HSL, HSI, or LCH color models.
RGB(A) HSB/HSV HSL HSI HWB YCbCr CIE Lab CIE LCH
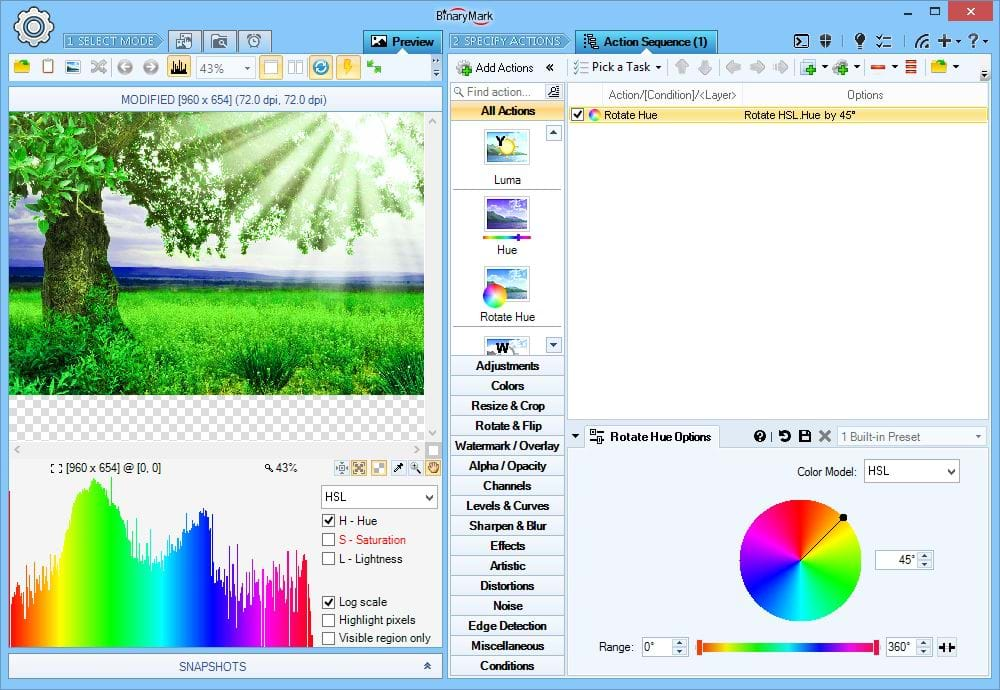
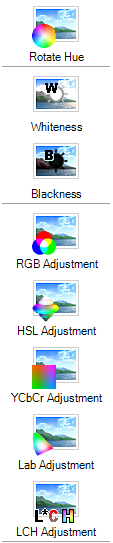
Rotate Hue
Rotate (shift) the hue of all pixels by the specified angle.
RGB(A) HSB/HSV HSL HSI HWB YCbCr CIE Lab CIE LCH
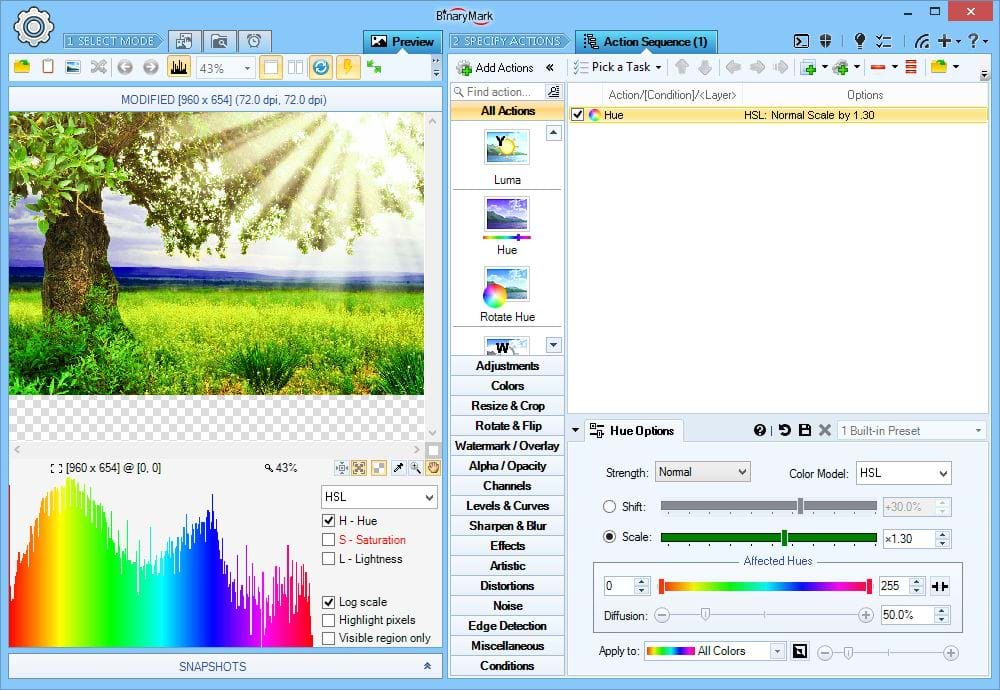
Scale Hue
Scale Hue component of pixels in your images.
RGB(A) HSB/HSV HSL HSI HWB YCbCr CIE Lab CIE LCH
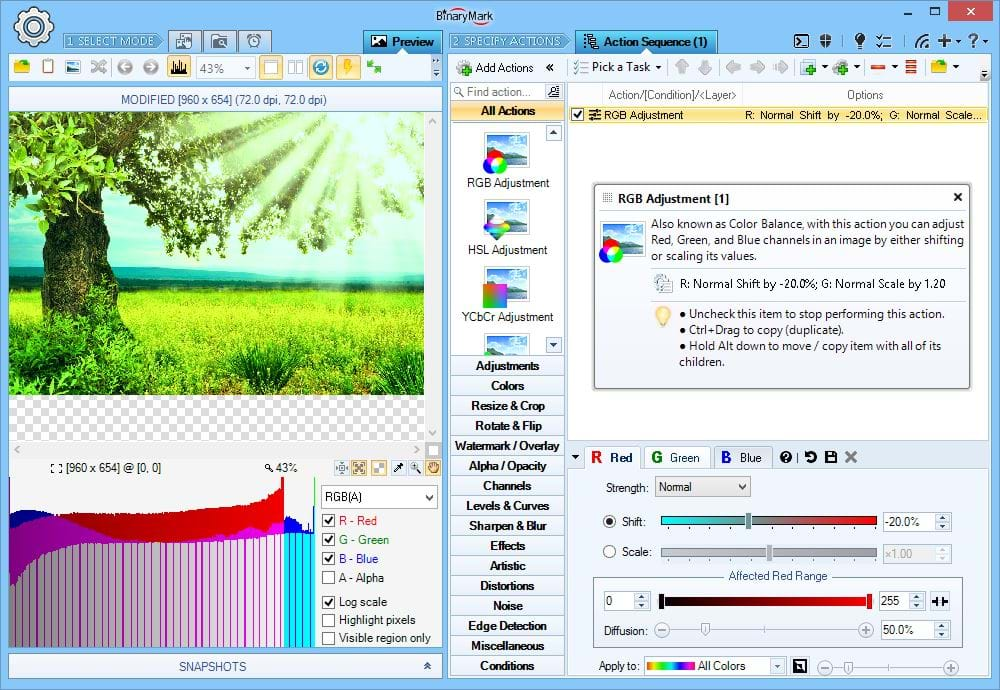
RGB Adjustments
Change Red, Green, and Blue components of pixels in your images using RGB color model.
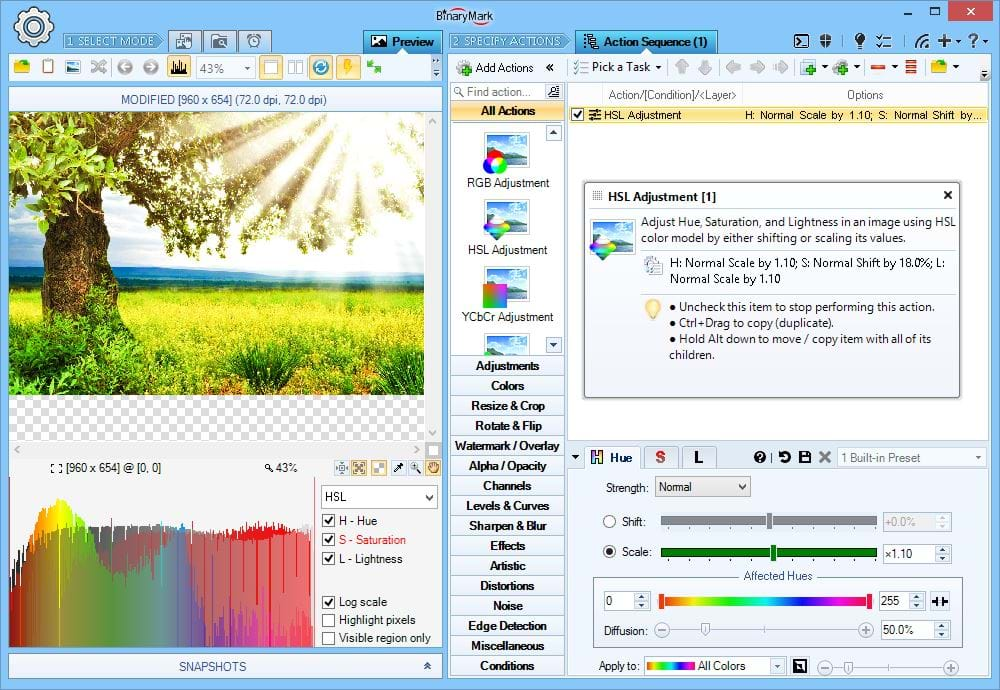
HSL Adjustments
Change Hue, Saturation, and Lightness components of pixels in your images using HSL color model.

Adjust HWB Whiteness
Modify the Whiteness channel / components of chosen pixels in your images using HWB color model.
RGB(A) HSB/HSV HSL HSI HWB YCbCr CIE Lab CIE LCH
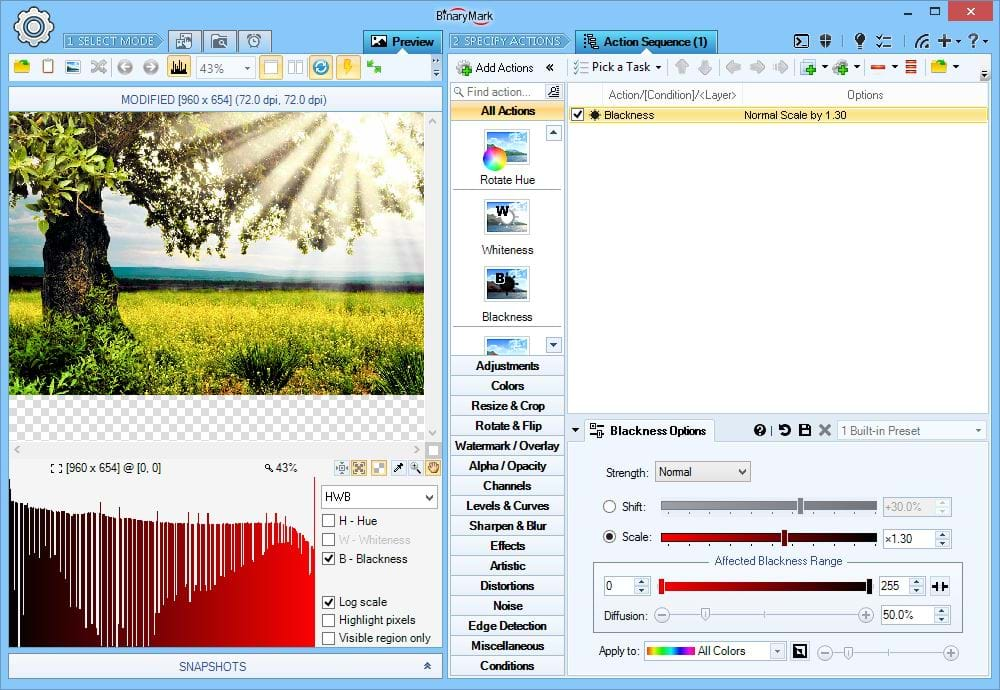
Adjust HWB Blackness
Modify the Blackness channel / components of chosen pixels in your images using HWB color model.
RGB(A) HSB/HSV HSL HSI HWB YCbCr CIE Lab CIE LCH
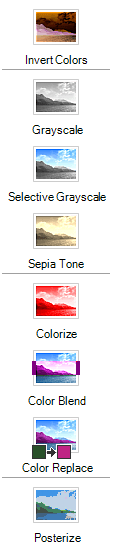
Work with Colors
Batch Image Resizer offers various color-related filters and effects: Color Replace, Invert, Convert to Grayscale, Selective Grayscale Filter, Sepia Tone, Colorize, Posterize, Color Blend, Black & White Binarization, and many others.
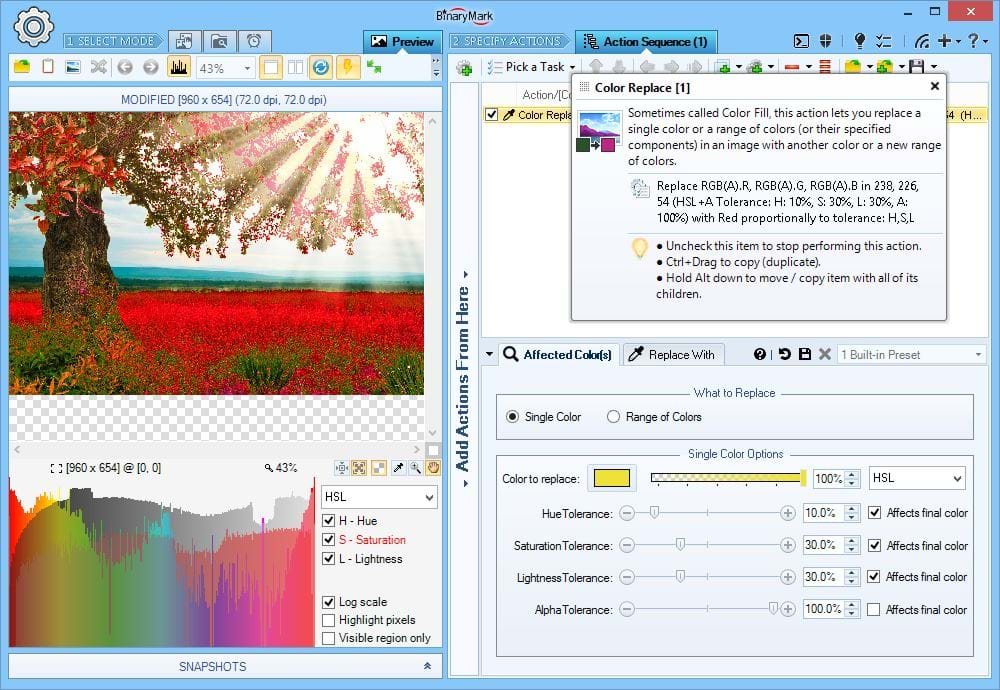
Replace Colors
You can replace a single color or a whole range of colors in your images.
You can use tolerance sliders to replace not just a specific single color, but all colors that are "close" to the one specified. This is especially useful in JPEG images, where due to chroma subsampling what was once one color can turn into many different very close colors.
RGB(A) HSB/HSV HSL HSI HWB YCbCr CIE Lab CIE LCH
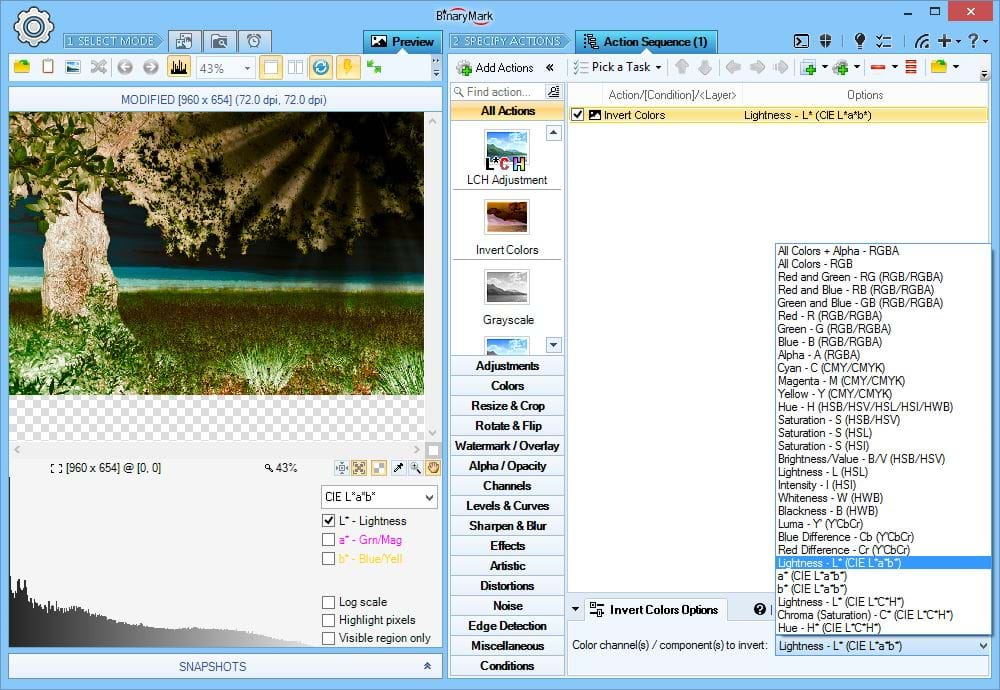
Invert Colors or Channels
You can invert either all colors in the whole image, or only specific channels. In addition, you are not limited to just RGB, you can invert non-RGB channels too: saturation, lightness, etc. This action supports all color models.
RGB(A) HSB/HSV HSL HSI HWB YCbCr CIE Lab CIE LCH

Sepia Tone Effect
Apply customizable Sepia filter to make your images look like old photos.
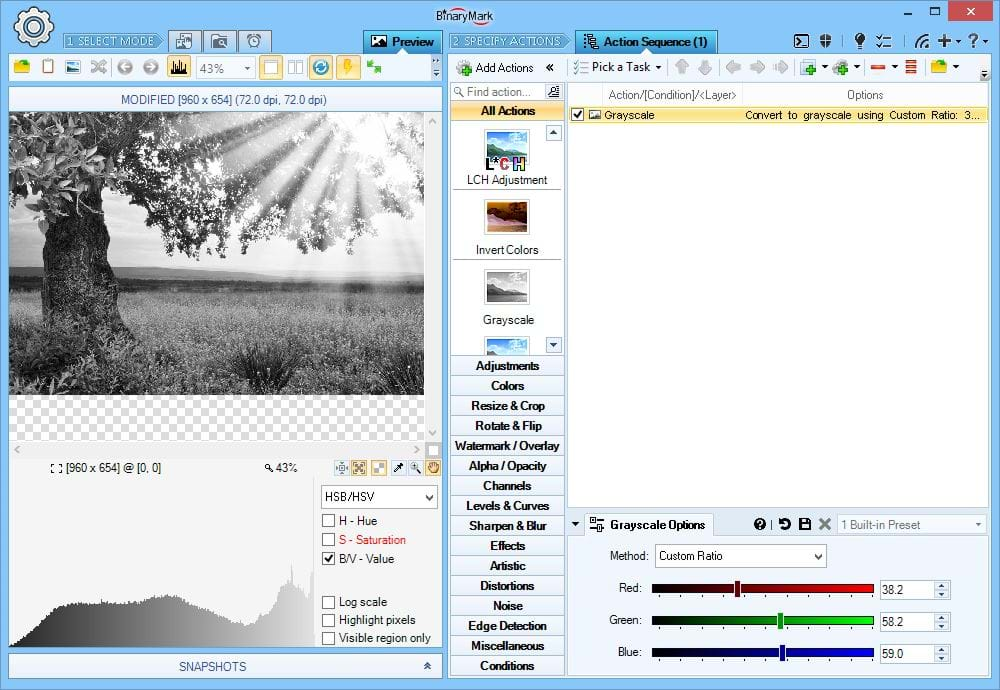
Convert to Grayscale
Convert images to greyscale tone using any of the following methods:
- BT709 R:G:B Ratio
- RMY R:G:B Ratio
- Custom R:G:B Ratio
- HSB Brightness Channel
- HSL Lightness Channel
- HSI Intensity Channel
- YCbCr Luma Channel
- CIE Lab Lightness Channel
RGB(A) HSB/HSV HSL HSI HWB YCbCr CIE Lab CIE LCH

Selective Grayscale
Selectively apply grayscale filter only to colors that fall within a defined range.
Per-channel color tolerance sliders can be used to precisely define the range of affected colors.
RGB(A) HSB/HSV HSL HSI HWB YCbCr CIE Lab CIE LCH
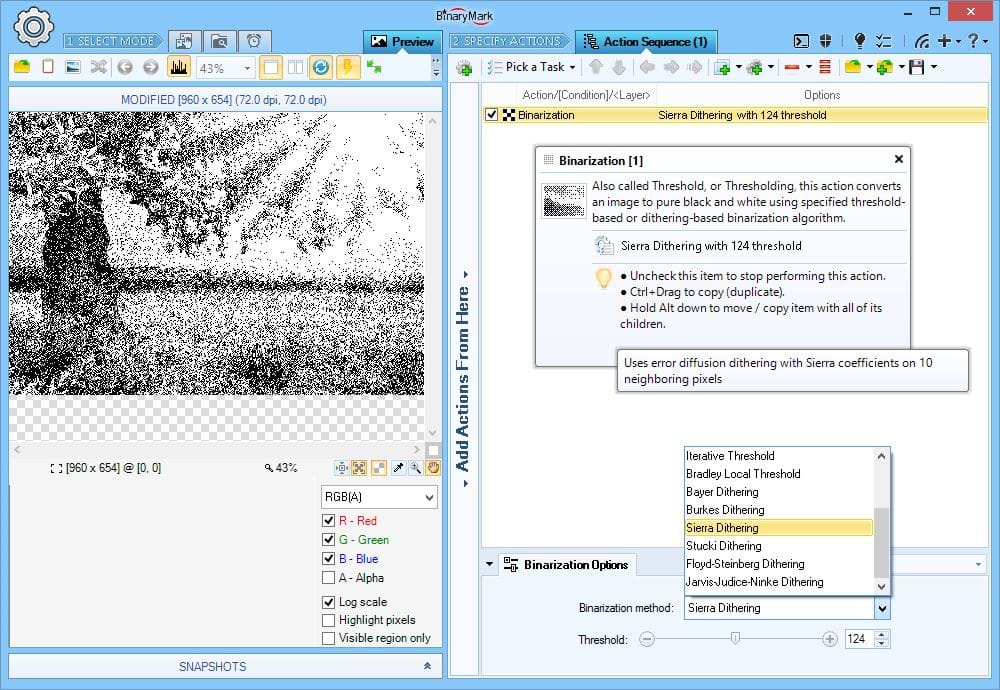
Binarization Filter
Binarization is a process of turning a color or grayscale image into strictly 2-color image - typically black & white.
Batch Image Resizer offers several binarization techniques: threshold-based, dithering based, or a combination of the two.
Threshold-based binarization works as follows: colors lighter than a threshold are rendered white, and colors darker than a threshold are rendered black. Some threshold-based methods include: Simple, Otsu, Custom, Iterative, Bradley Local, Threshold with Carry.
Dithering-based binarization works by applying either a default or a custom threshold much like threshold-based binarization, but then dithers the result, mixing it with surrounding pixels. The following dithering methods are supported: Bayer, Burkes, Sierra, Stucki, Floyd-Steinberg, Jarvis-Judice-Ninke.
Tip Use Color Replace action to replace black and white colors to any other colors to create a 2-color image which is not black and white.
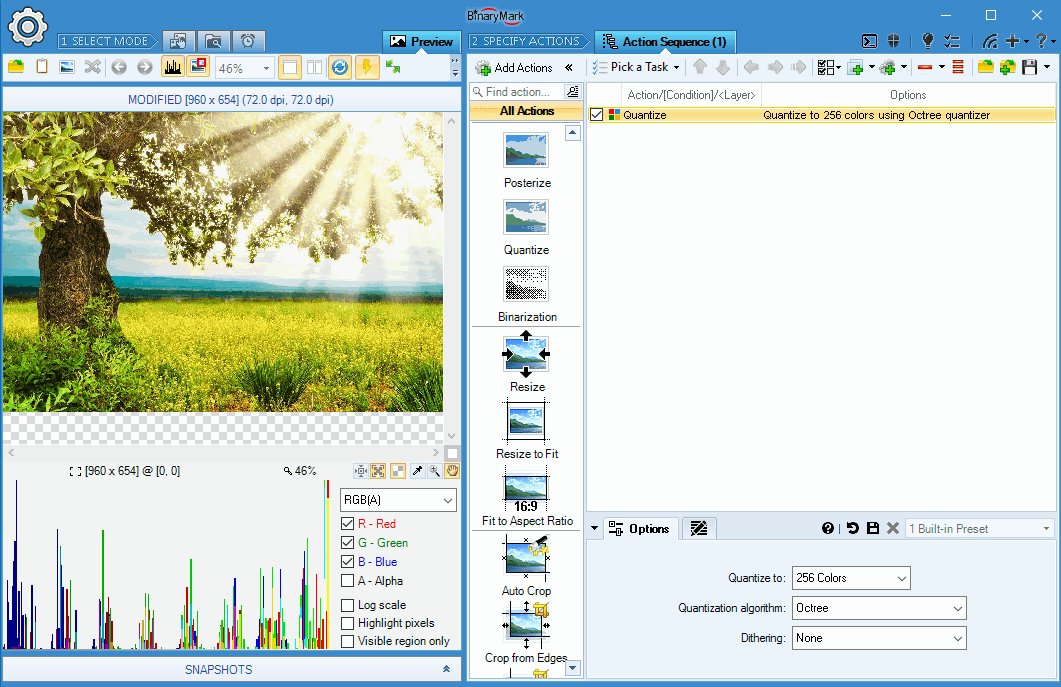
Image Palette Color Quantization
You can reduce the number of distinct image colors to 4, 8, 16, 32, 64, 128, or 256. Batch Image Resizer supports the following color quantization algorithms:
- Popularity - Adaptive palette of very good quality using Popularity-Algorithm-Based Quantizer
- Optimal - Optimal palette of acceptable quality.
- Median Cut - Adaptive palette of high quality, using Median Cut Quantizer.
- Octree - Good quality adaptive palette using Octree Quantizer.
- Uniform - Adaptive palette using Uniform Color Quantizer.
- Neu Quant - Produces a high quality, adaptive palette using NeuQuant Neural-Net image quantization algorithm.
- HSL Distinct Selection - Adaptive palette of high quality based on HSL color selection.
- Windows - Very quickly produces a semi-adaptive palette of low quality.
- Xiaolin Wu - Produces an adaptive palette of very good quality.
- Grayscale - Produces a grayscale palette.
Various dithering methods are supported by some of the above color quantizers.
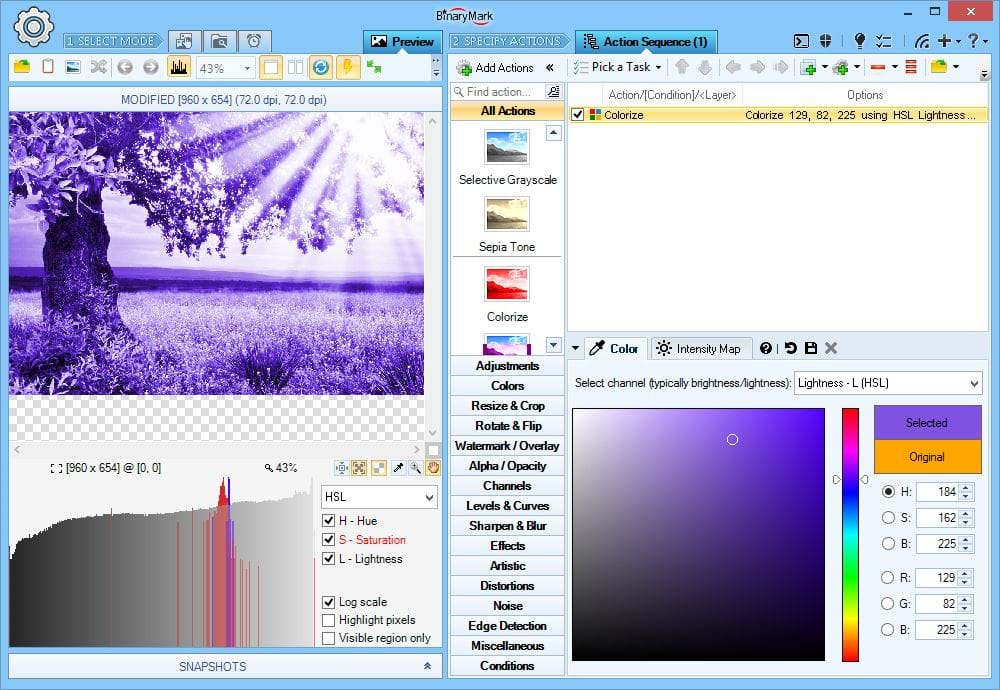
Colorize Effect
Apply colorize filter. This is similar to grayscale filter, except that the image consists of different shades of a specified color instead of gray.
RGB(A) HSB/HSV HSL HSI HWB YCbCr CIE Lab CIE LCH
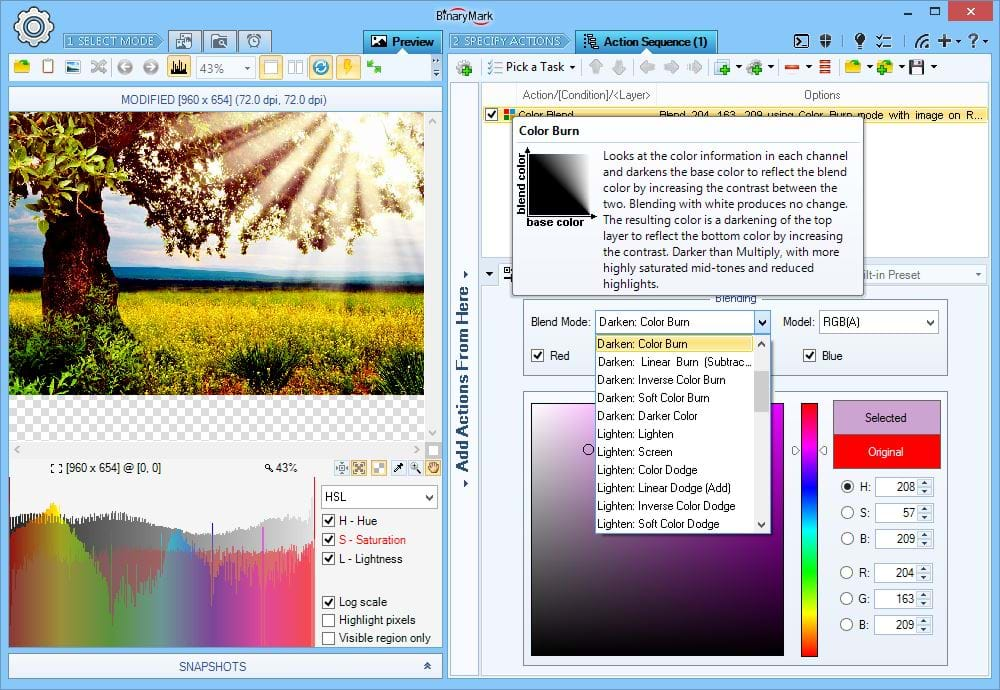
Color Blend Filter
Overlays a specified color on top of the image using one of the 40+ blend modes.
RGB(A) HSB/HSV HSL HSI HWB YCbCr CIE Lab CIE LCH
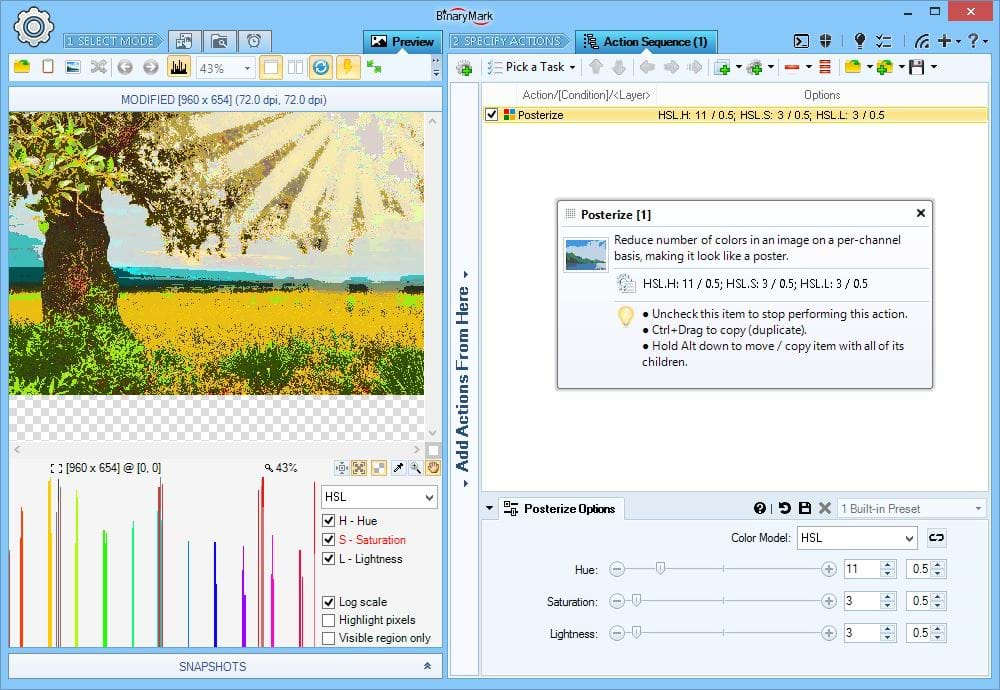
Posterize Effect
With posterize effect you can easily make photos look like more like posters. It works by reducing number of used colors, resulting in sharper color transitions, which in turn creates a poster-like effect.
What's unique about it? Unlike in other software packages, the posterize effect offered by Batch Image Resizer lets you select color model used to reduce number of colors (other programs simply use RGB). This allows you much greater flexibility, as you can, for example, reduce lightness levels to just 5, however keep the number of hue and saturation levels at 15 when using HSL model.
RGB(A) HSB/HSV HSL HSI HWB YCbCr CIE Lab CIE LCH
Histograms, Levels, and Curves

Histogram Equalization
Histogram equalization increases local contrast by better distributing pixel intensities in image histograms, making them more uniformly distributed.
What's unique about it? Unlike other programs, Batch Image Resizer lets you perform histogram equalization on a per-channel basis (instead of on all channels at once) and using color model of your choice! Furthermore you can control equalization strength.
RGB(A) HSB/HSV HSL HSI HWB YCbCr CIE Lab CIE LCH
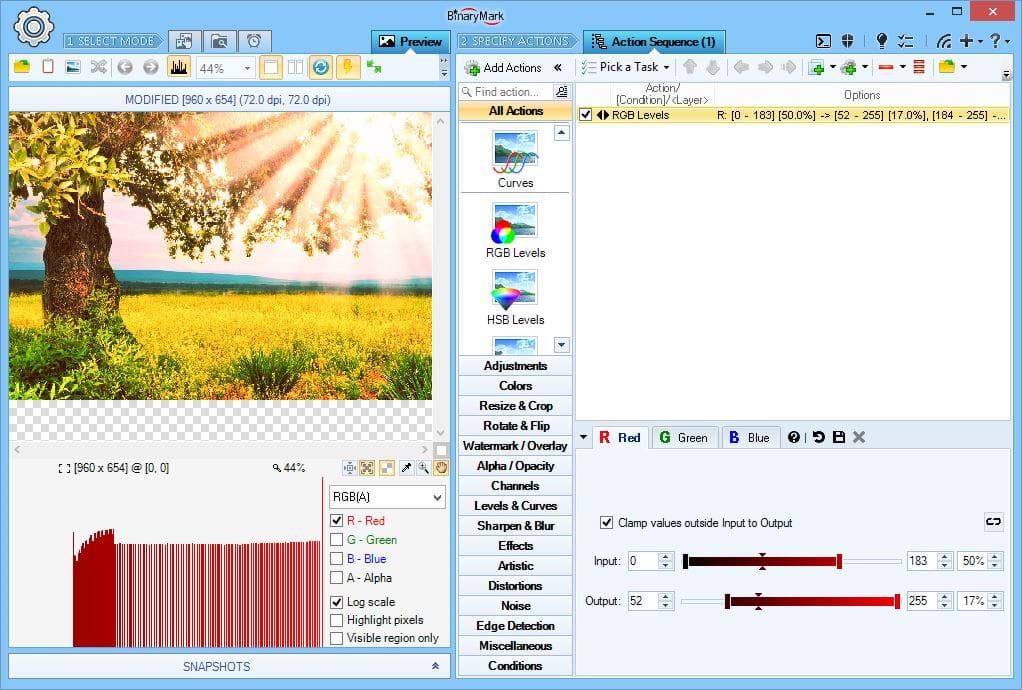
Levels Tool
Levels Tool lets you move, stretch, or compress the intensity levels of your images color channels. Depending on the color model you can adjust brightness, contrast, saturation, hue, tonal range, and other characteristics.
All pixels whose intensity values fall within the specified input range are proportionately "mapped" onto the output range. You can adjust both the minima and the maxima of input and output ranges, as well as their respective mid-points. This works in exactly the same way as Adobe Photoshop Levels tool except applied to the channel(s) of your choice instead of just RGB.
What's unique about it? There are 8 levels tools: one for each supported color model. In addition, you can adjust levels on a per-channel basis (most programs typically only let you adjust all channels together).
RGB(A) HSB/HSV HSL HSI HWB YCbCr CIE Lab CIE LCH
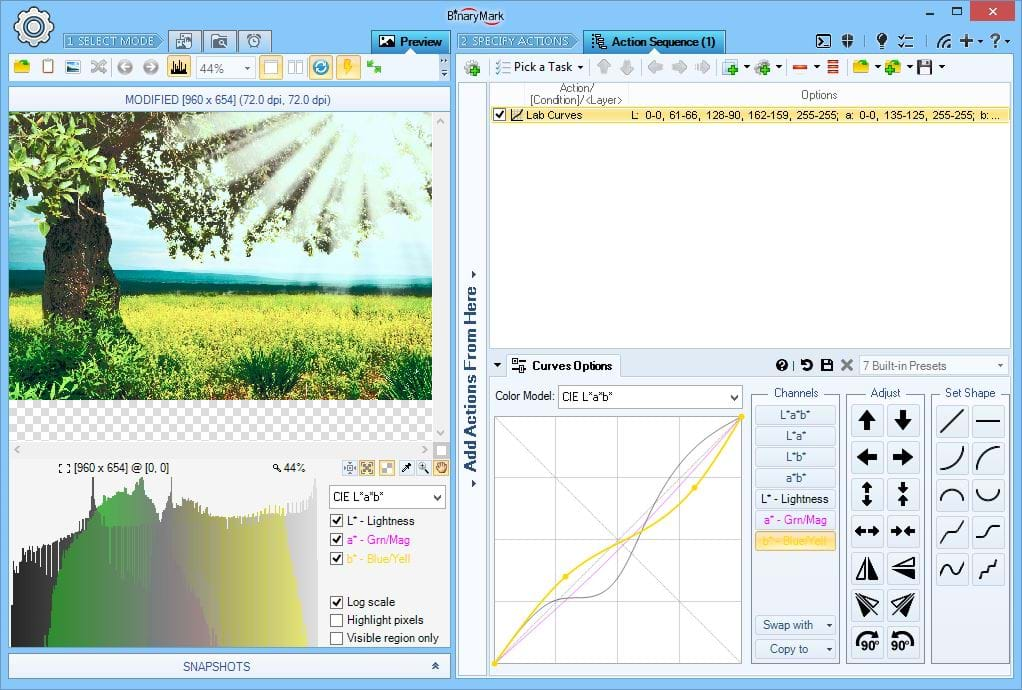
Curves Tool
Similar to levels, the curves tool can take input intensities and selectively stretch or compress them. Unlike levels however, which only has minimum, maximum and midpoint controls, a curve is controlled using any number of anchor points which gives greater flexibility. In effect, curves tool lets you re-map channel's input values onto a different set of output values, making it very similar to Remap Channel action.
What's unique about it? Predefined curve shapes and templates as well as built-in controls make it very easy to come up with the right curve quickly. Unlike other programs, Batch Image Resizer Curves Tool support all color models and channels - not just RGB!
RGB(A) HSB/HSV HSL HSI HWB YCbCr CIE Lab CIE LCH
Alpha Channel, Opacity & Transparency
Batch Image Resizer fully supports working with transparent images as well as adding alpha transparency to otherwise non-transparent images.
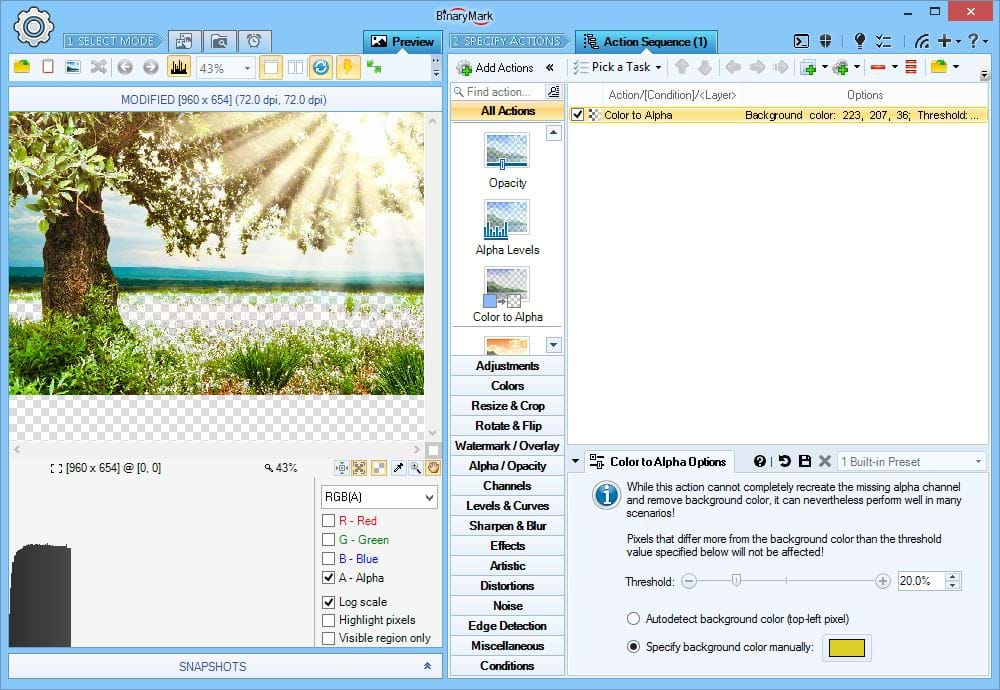
Color to Alpha
Easily make background color of your images transparent with Color to Alpha action.
- Detects background color automatically
- You can specify background color manually
- Tolerance slider allows for non-uniform backgrounds
On the Screenshot The Yellowish color is manually set to be treated as transparent color. The results can be seen in the preview.
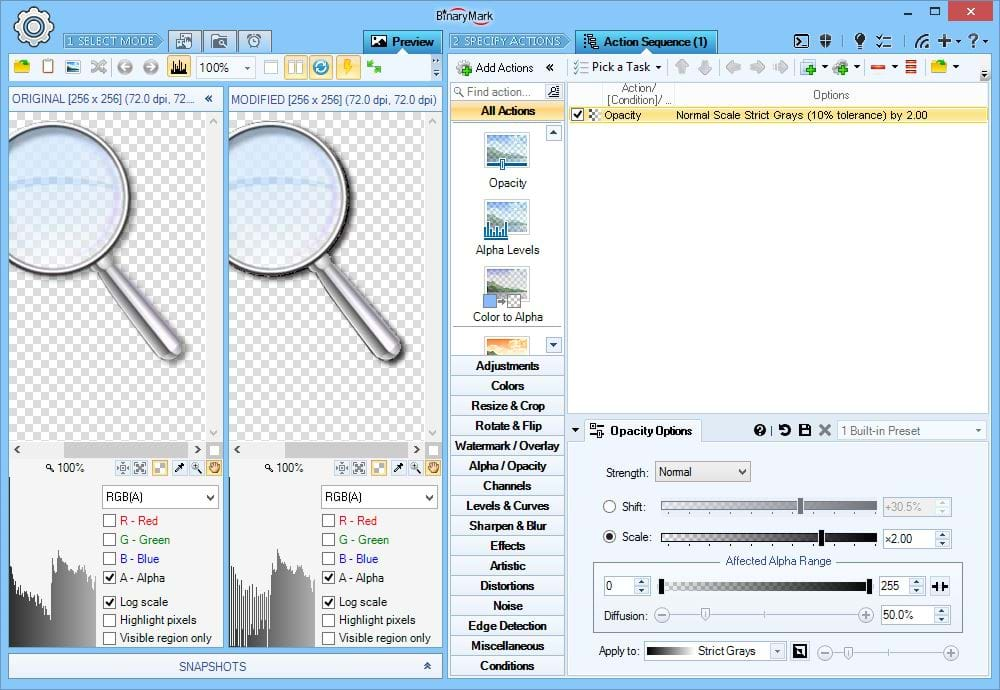
Adjust Opacity
You can decrease or increase the opacity (transparency) of the desired pixels.
On the Screenshot You can see how only the grayish pixels have been made twice as opaque while the blueish pixels' opacity was left unchanged.
Heads Up! All adjustments operate in 2 modes: shifting and scaling. Shifting shifts all pixel values by (adds or subtracts) the specified amount, preserving the difference between different pixels. Scaling multiplies all pixel values by the specified factor, either amplifying (factor > 1) or reducing (factor < 1) absolute difference between different pixels thus affecting the contrast.
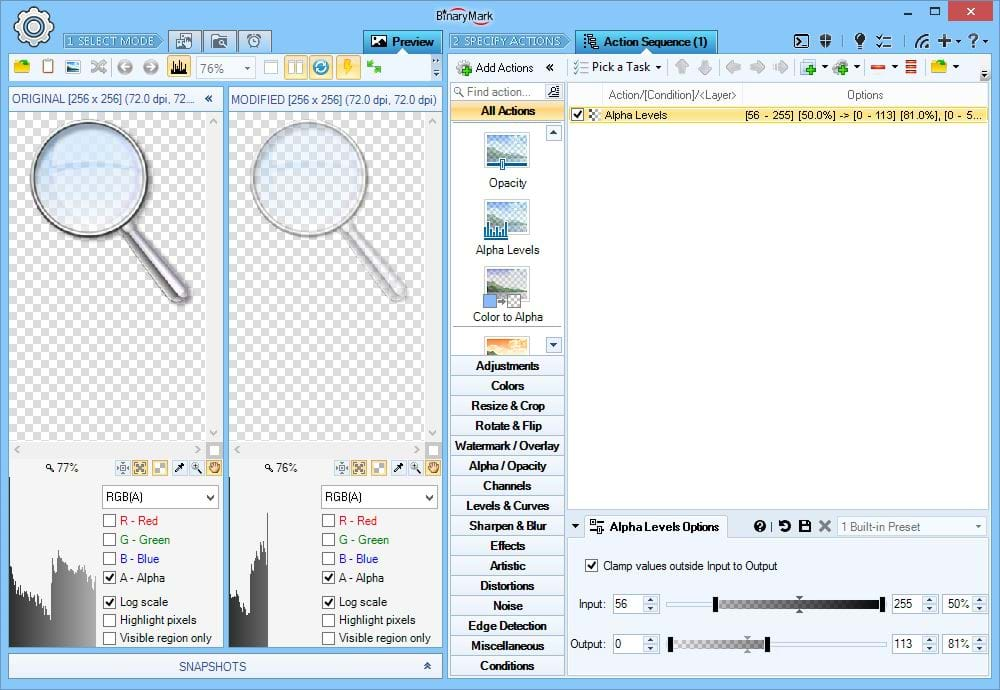
Alpha Channel Levels
Another way to adjust opacity of your images is using levels correction as shown here.
All pixels whose intensity values fall within the specified input range are proportionately "mapped" onto the output range. You can adjust both the minima and the maxima of input and output ranges, as well as their respective mid-points. This works in exactly the same way as Adobe Photoshop Levels tool except applied to Alpha channel.
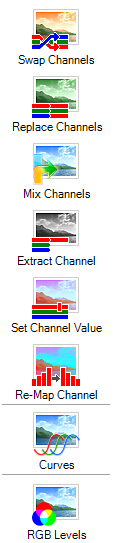
Color Color Channels
Batch Image Resizer lets you work with individual color channels (components) in your images. You can swap, replace, mix, extract, remap, and adjust color channels. Moreover, the program supports not just RGB(A) Red, Green, Blue, and Alpha channels, but also components of all other color models like Hue, Saturation, and Brightness. With Batch Image Resizer you can mix and match all channels however you want!
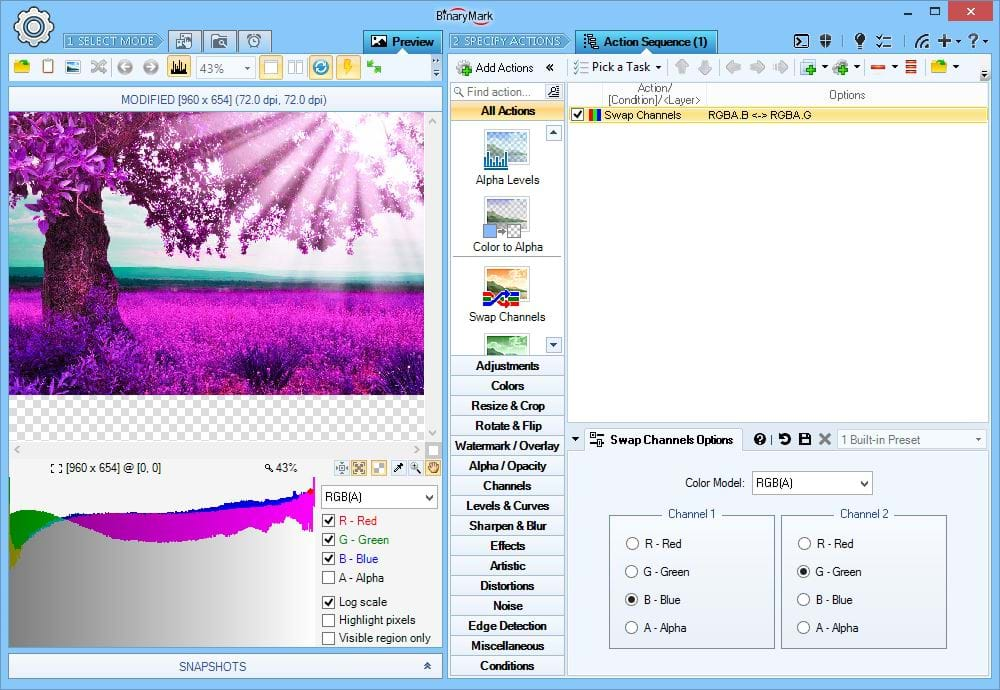
Swap Color Channels
When you swap 2 channels, you replace one by the other, and the other by the one.
On the Screenshot Green and Blue channels of the RGB color model are swapped. Because original image had more greens than blues, the resulting image after channel swapping is the opposite - this is why leaves and grass look violet.
RGB(A) HSB/HSV HSL HSI HWB YCbCr CIE Lab CIE LCH
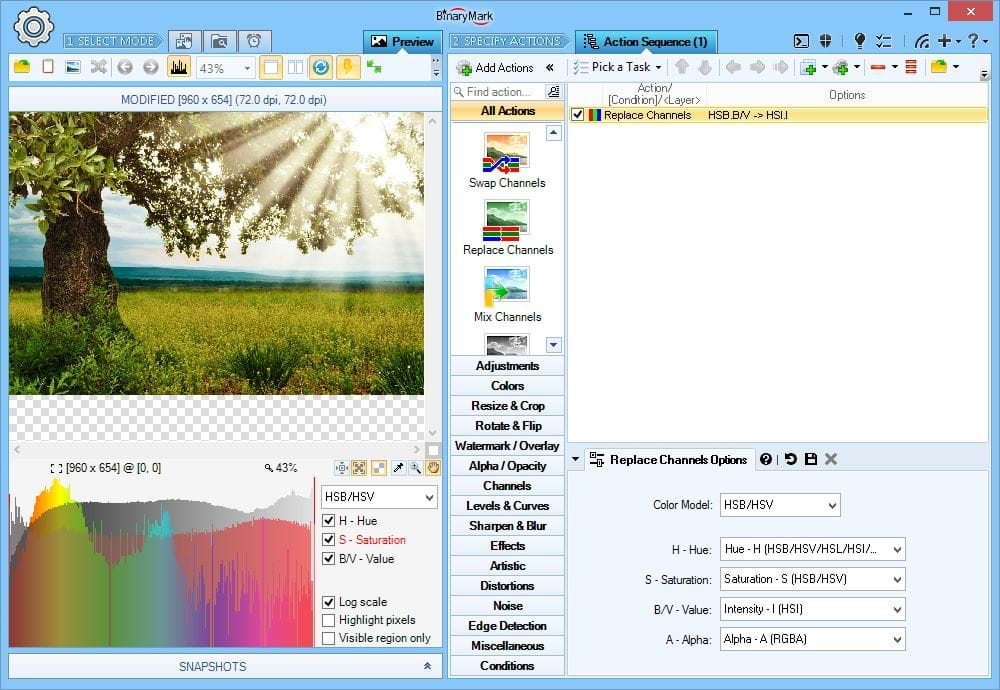
Replace Color Channel(s)
You can replace one channel of one color model by the other channel of the same or different color model.
On the Screenshot The Brightness (Value) channel / component of the HSB/HSV color model is replaced by the Intensity channel of the HSI color model, producing a more pastel-like image.
RGB HSL: Color Model Mixing Allowed
RGB(A) HSB/HSV HSL HSI HWB YCbCr CIE Lab CIE LCH
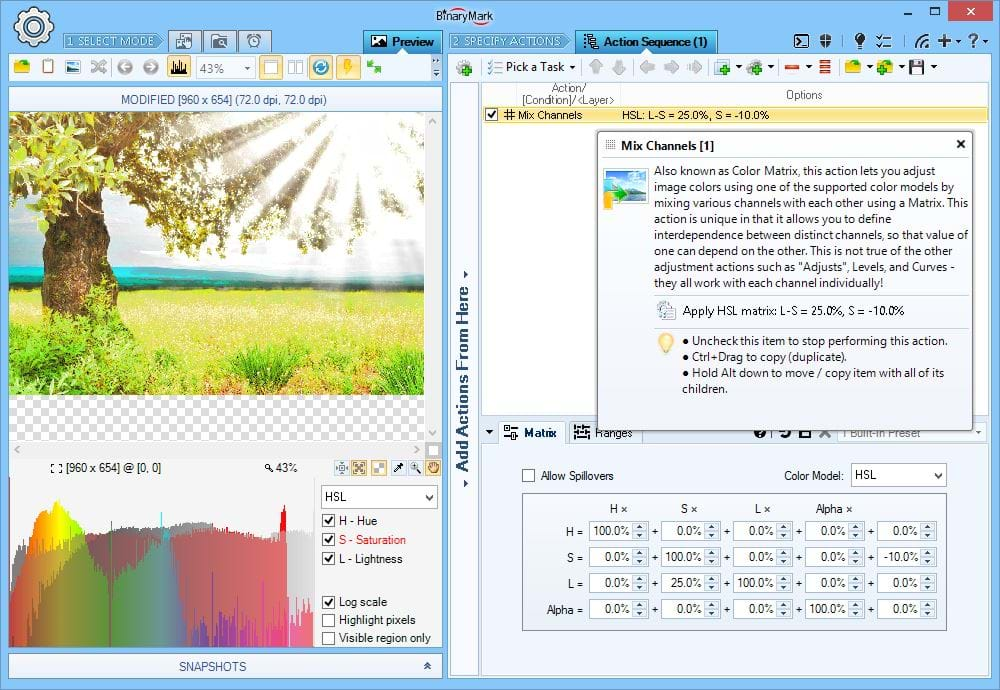
Mix Color Channels
Channel mixing allows you to tune the intensities of one channel using intensities of the other channels within the same color model.
On the Screenshot Saturation is reduced by 10% uniformly everywhere. Lightness is increased by 25% of Saturation: the more saturated a given pixel is, the more its Lightness will be increased (but only 25% of Saturation value will be used).
RGB(A) HSB/HSV HSL HSI HWB YCbCr CIE Lab CIE LCH
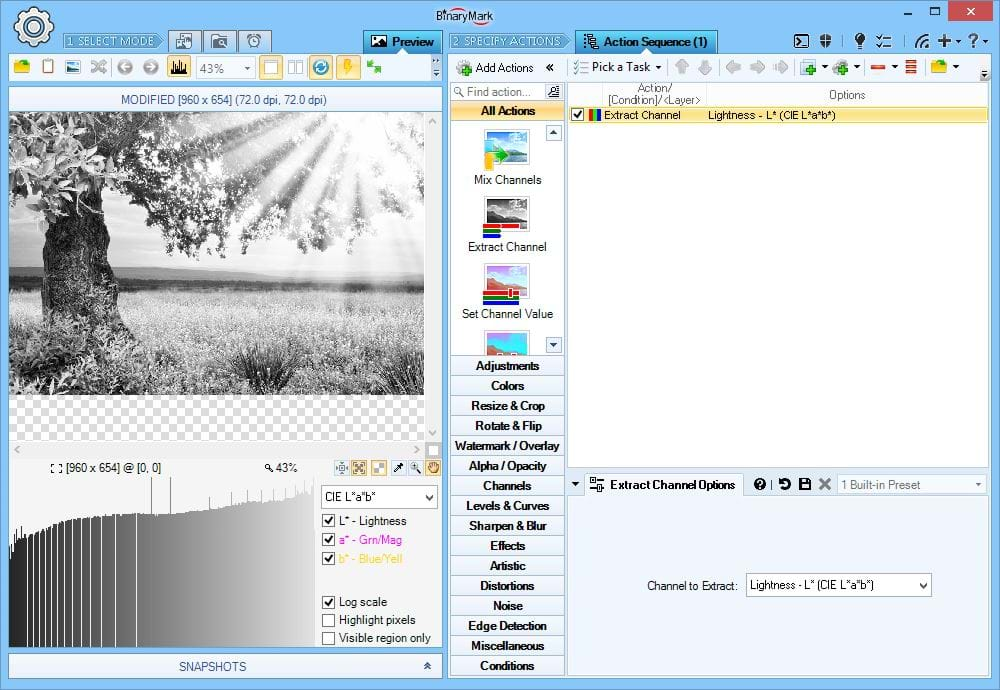
Extract Color Channel
Extracting a color channel produces a grayscale image that represents the pixel values (intensities) within that channel.
RGB(A) HSB/HSV HSL HSI HWB YCbCr CIE Lab CIE LCH
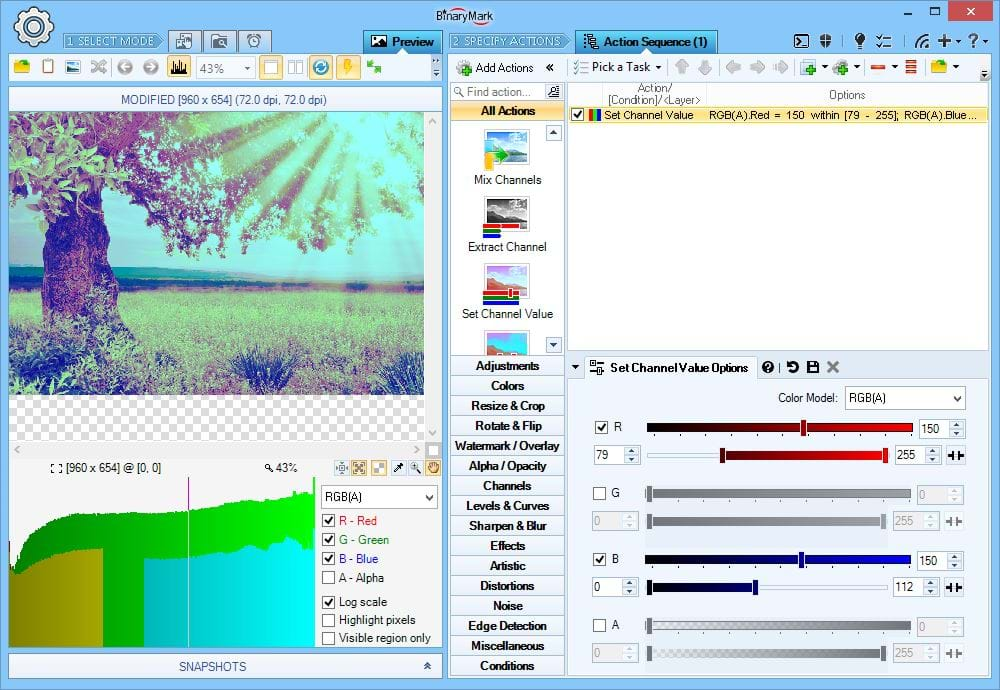
Set Color Channel Value
You can set all pixel values within a given range that belong to a specified channel to just a single value.
On the Screenshot All Red intensities > 79 are set to 150. All Blue intensities < 112 are set to 150. You can clearly see the result of this on the histogram below the preview image.
RGB(A) HSB/HSV HSL HSI HWB YCbCr CIE Lab CIE LCH
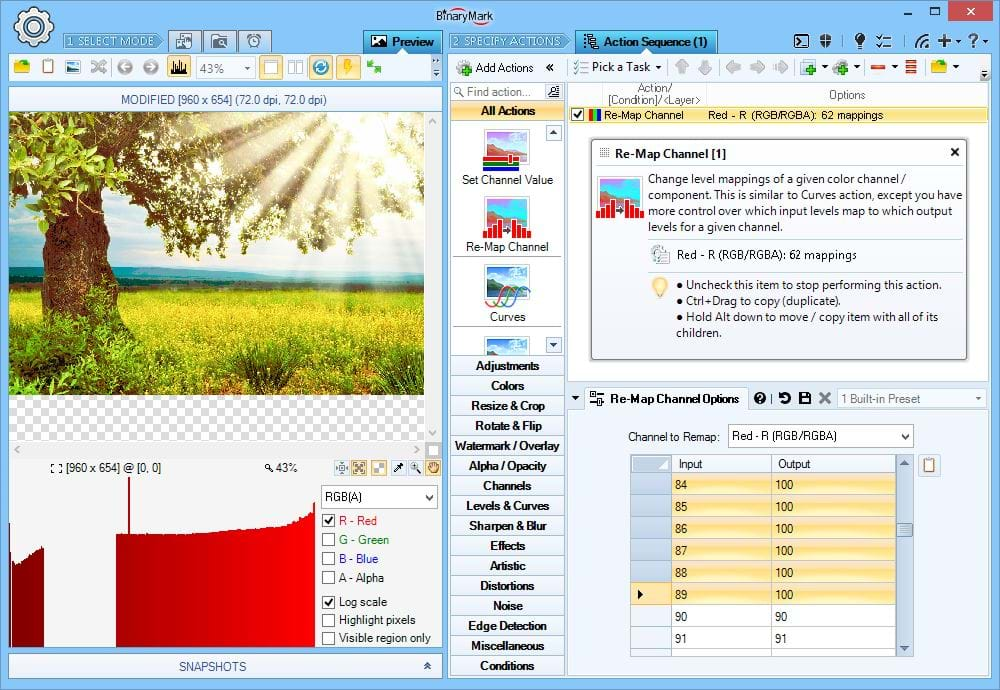
Remap Color Channel
You can manually re-map all values (intensities) within a channel to a different set of values (intensities).
Example If you map 0 to 255, 1 to 254, 2 to 253, etc. on the Red channel, it will be the same as inverting the Red channel. With re-map action however, you can have arbitrary re-mappings.
On the Screenshot Red intensities > 27 and < 90 have been re-mapped to 100. Result can be clearly seen on the histogram below the preview image. Incidentally the same effect can be achieved with the Set Color Channel Value action mentioned on the previous slide.
RGB(A) HSB/HSV HSL HSI HWB YCbCr CIE Lab CIE LCH
9 Supported Color Models / Color Spaces
The following table lists support of different color models by some common features. The list is not exhaustive.
Heads Up! RGB / RGBA is supported by (almost) all program features!
Heads Up! Click on the link in table headers to learn more about individual color spaces / color models on Wikipedia.
Heads Up! In the feature description below channel should also be taken to mean component of a color in a given color space or model; for example S in HSL is referred to as Saturation channel.
| Feature | RGB(A) | CMY(K) | HSB/HSV | HSL | HSI | HWB | CIE Lab | CIE LCH | YCbCr |
|---|---|---|---|---|---|---|---|---|---|
| Adjust Brightness | |||||||||
| Luminosity / Lightness | |||||||||
| Adjust Intensity | |||||||||
| Adjust Luma | |||||||||
| Adjust Contrast | |||||||||
| Adjust Saturation | |||||||||
| Adjust Hue | |||||||||
| Convert to Grayscale | |||||||||
| Adjust Ind. Component | |||||||||
| Set In/Out Levels | |||||||||
| Adjust Curves | |||||||||
| Invert Channel | |||||||||
| Swap Channels | |||||||||
| Replace Channel(s) | |||||||||
| Mix Channels | |||||||||
| Set Channel Value | |||||||||
| Extract Channel | |||||||||
| Remap Channel(s) |
Apply Creative Effects & Filters
Batch Image Resizer comes with many built-in creative filters and effects, some of which are showcased below:
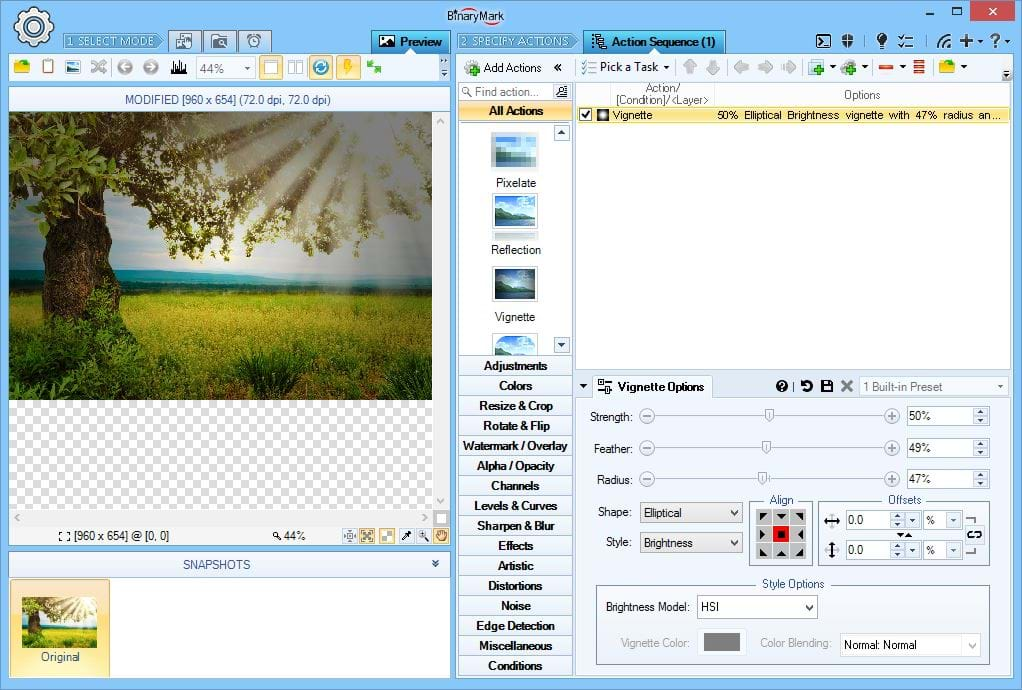
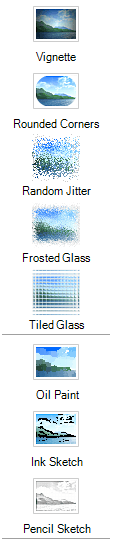
Vignette Filter
Applies vignette effect to your images.
What's unique about it? You can achieve vignette effect in 3 distinct ways: by overlaying specified color, by decreasing brightness (intensity) using specified color model's "brightness" channel, or by decreasing alpha-transparency. Choose whichever best fits your needs!
Pixelate Filter
Applies pixelation effect to your images using specified pixel width and height, and can optionally add borders to produced "pixels".
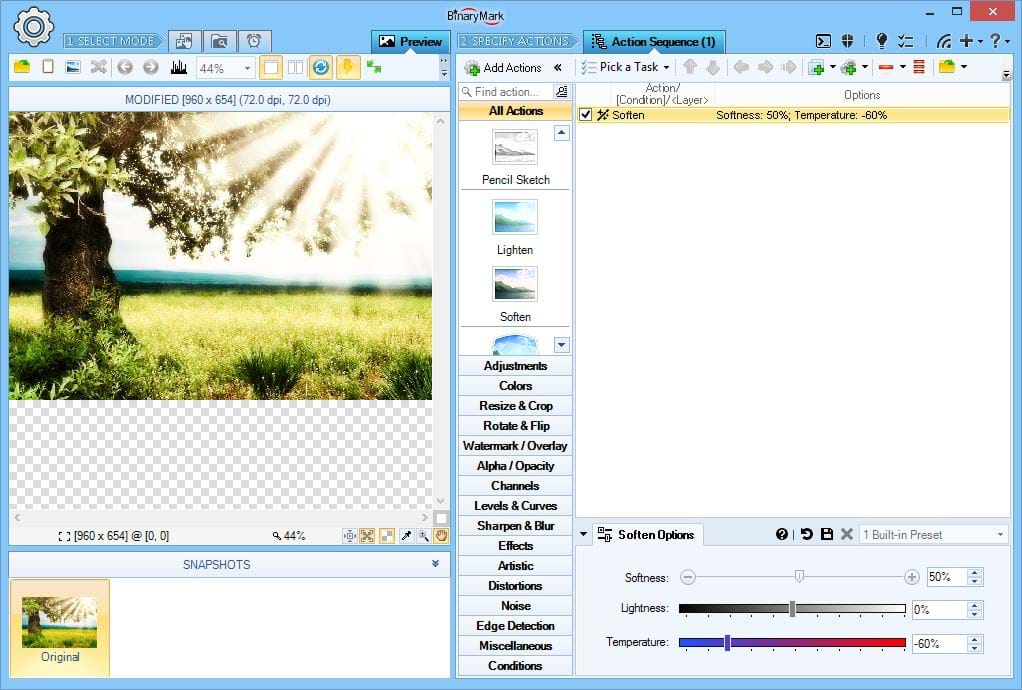
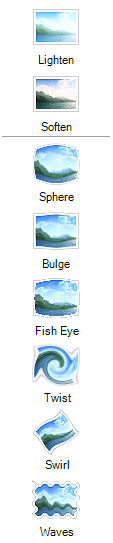
Soften Effect
Soften your images by applying Sepia-styled glow effect.
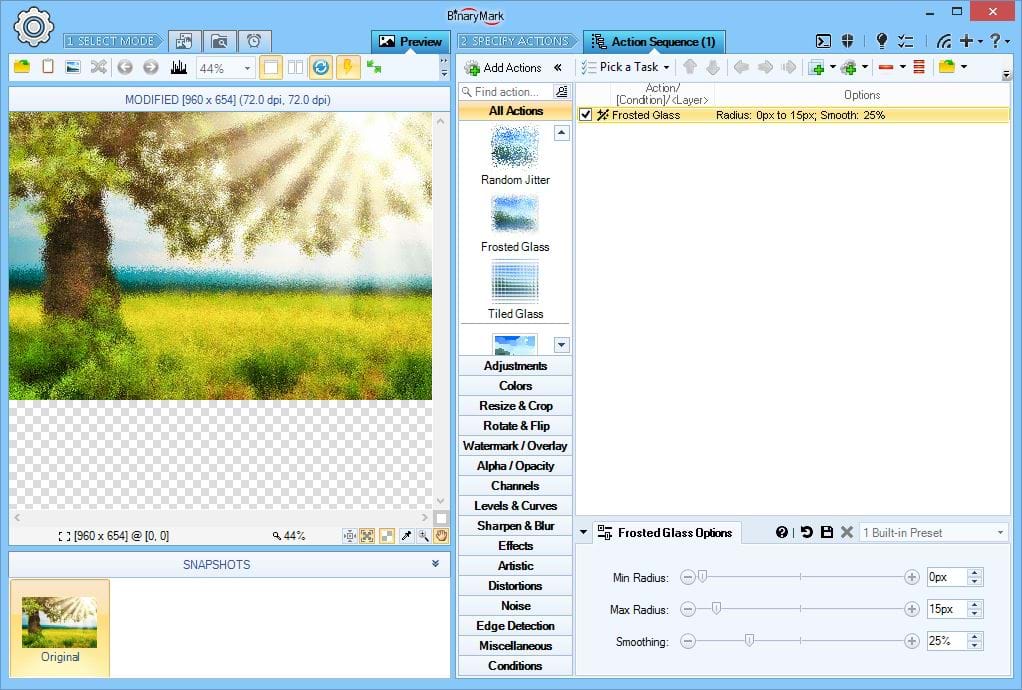
Frosted Glass Effect
Make your images as if seen through a frosted glass window.
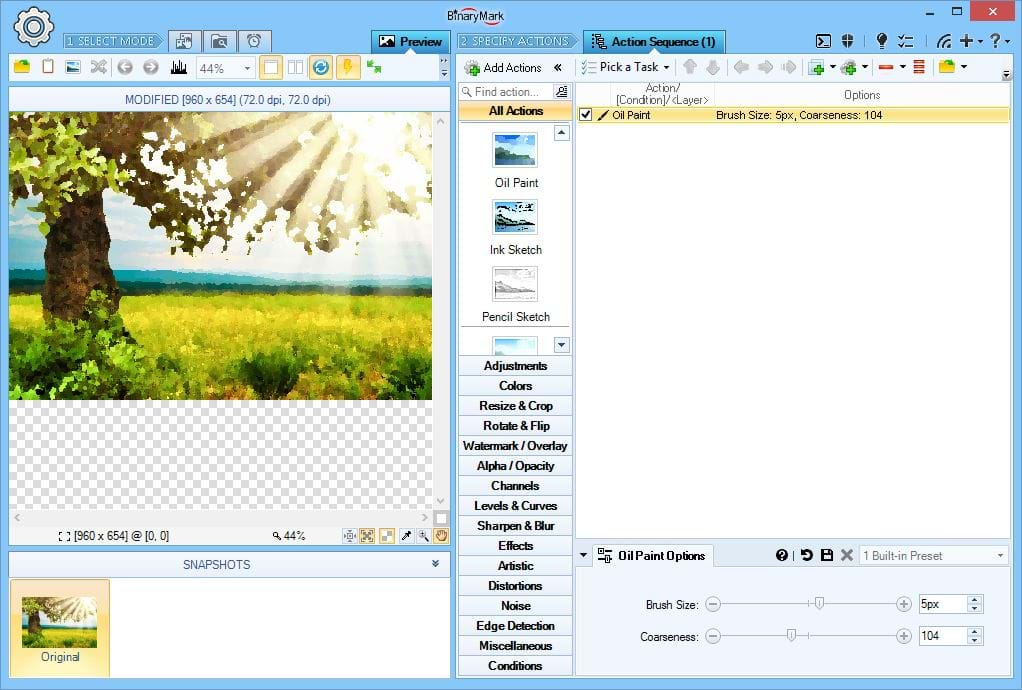
Oil Paint Effect
Make your images look like oil paintings by applying artistic Oil Paint effect.
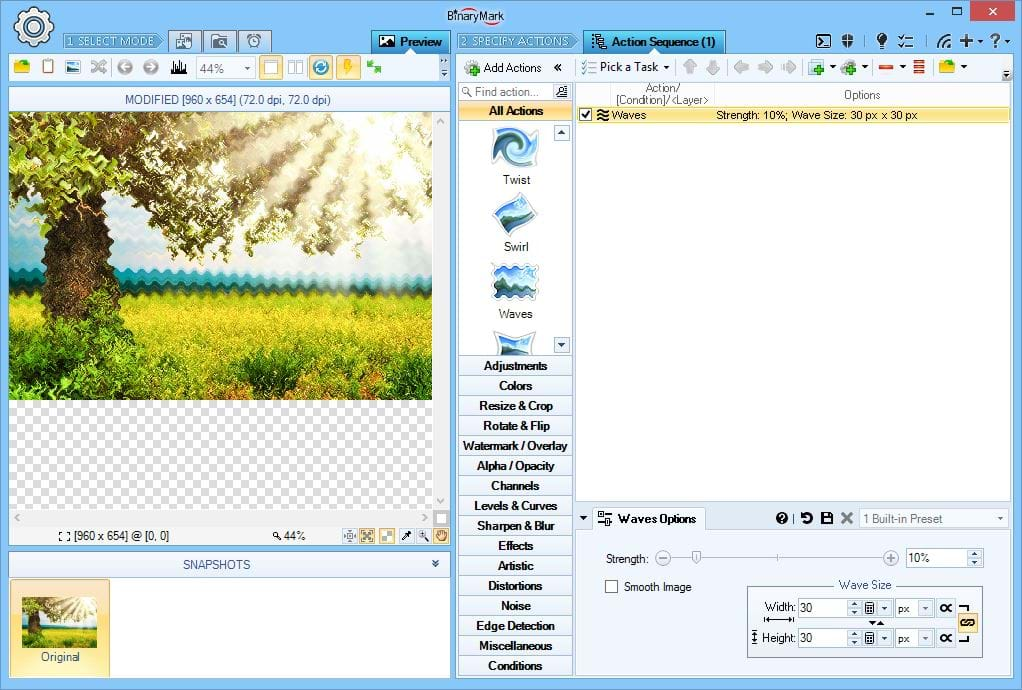
Image Distortion Effects
Batch Image Resizer offers various image distortion effects:
- Waves Effect
- Time Warp Effect
- Moire Pattern Generator
- Swirl / Vortex Effect
- Twist Effect
- Fish Eye Lens Effect
- Sphere Effect
- Bulge Effect
On the Screenshot Wave Effect makes your images look wavy. You can control wave's with, height, and strength.
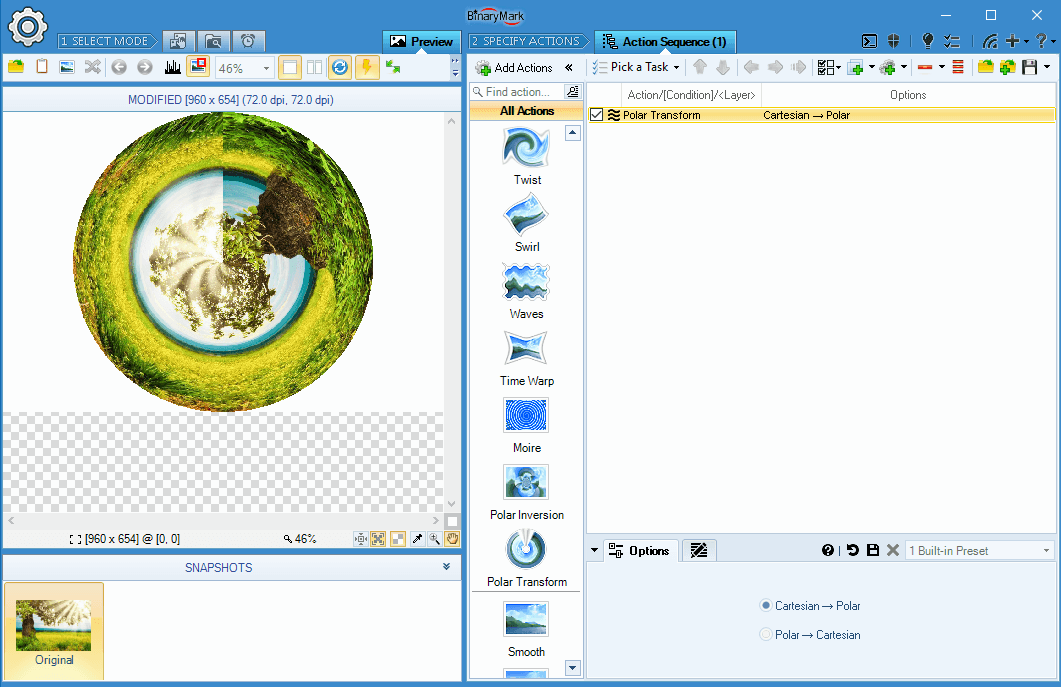
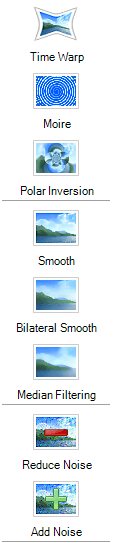
Polar Transformation Effects
Batch Image Resizer has several polar-transforming effects:
- Polar Transform Effect
- Polar Inversion Effect
On the Screenshot Polar Transform Effect can transform images to and from polar coordinates.
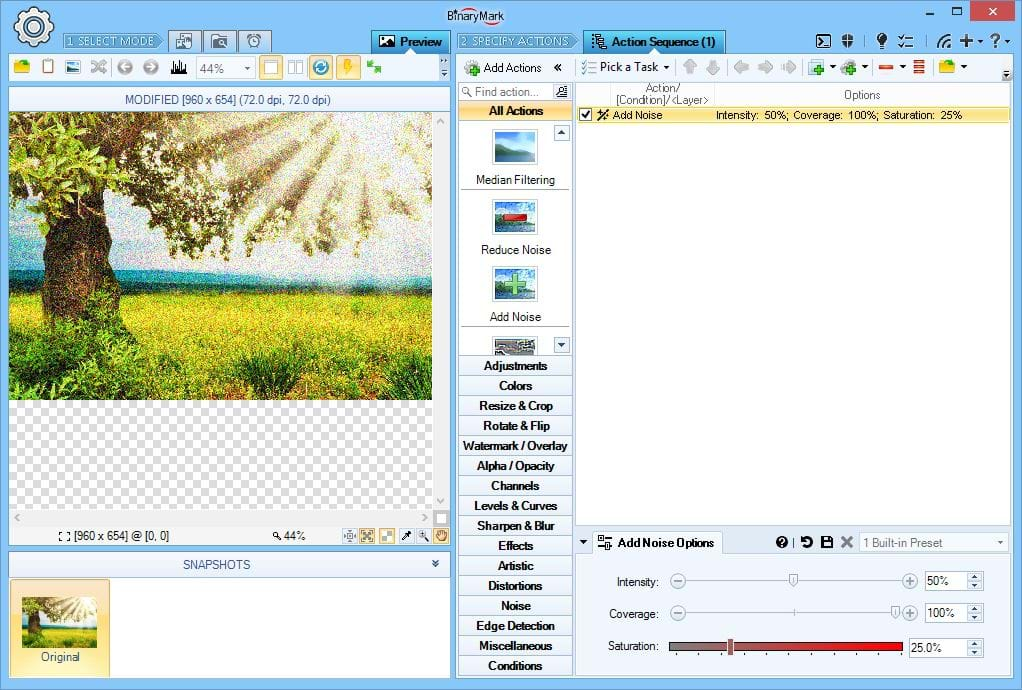
Add Noise Filter
Adds noise to your images. You can control noise intensity (brightness), noise coverage (amount), and noise saturation.
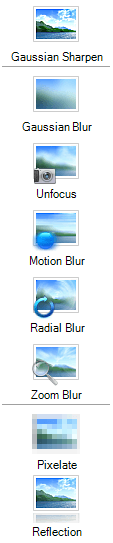
Sharpen, Blur, and Smooth
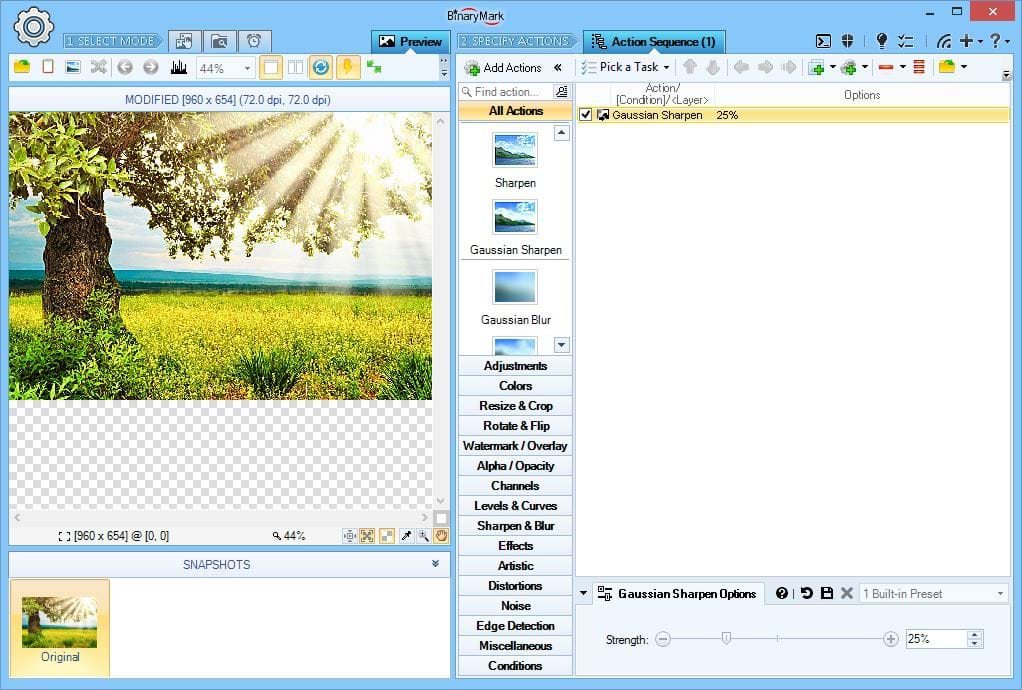
Sharpen Filter
Sharpens images by applying a Gaussian sharpen filter.
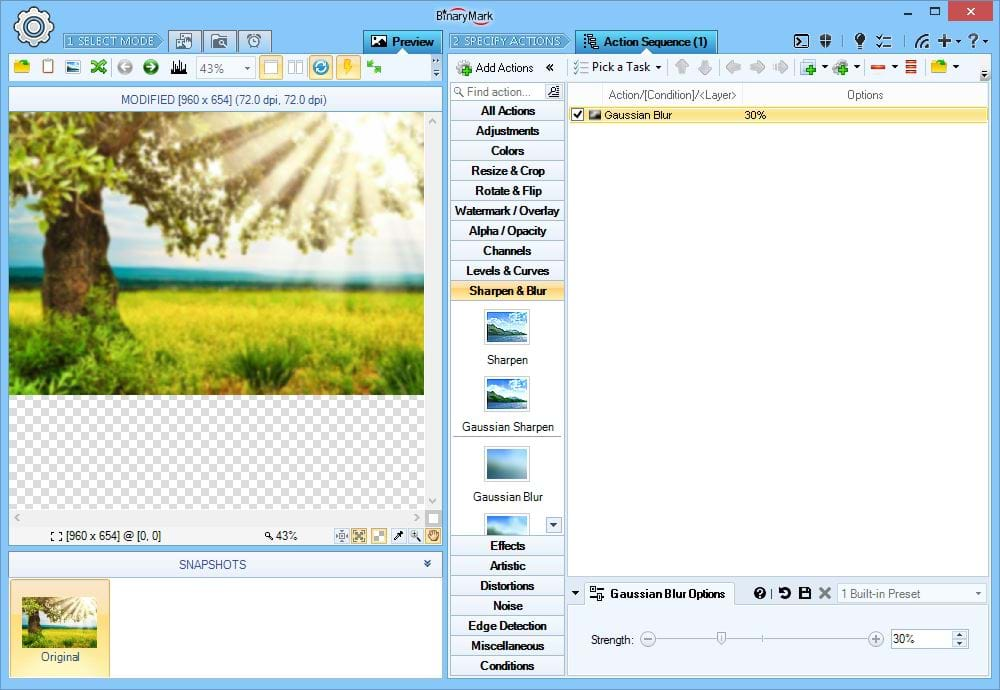
Gaussian Blur
Applies Gaussian blur effect to images.
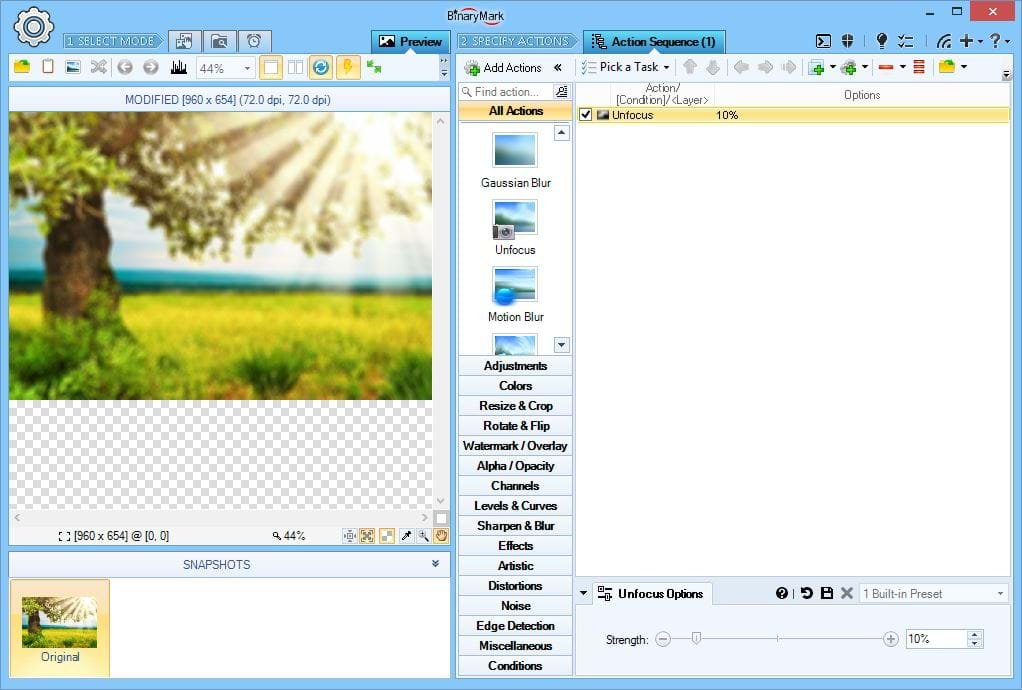
Unfocus Effect
Produces a similar effect to that which is seen when a lens is out of focus when a photo is taken.

Reduce Noise Filter
If your photos have significant amount of noise in them due to high ISO setting, use this filter to reduce the amount of noise present.
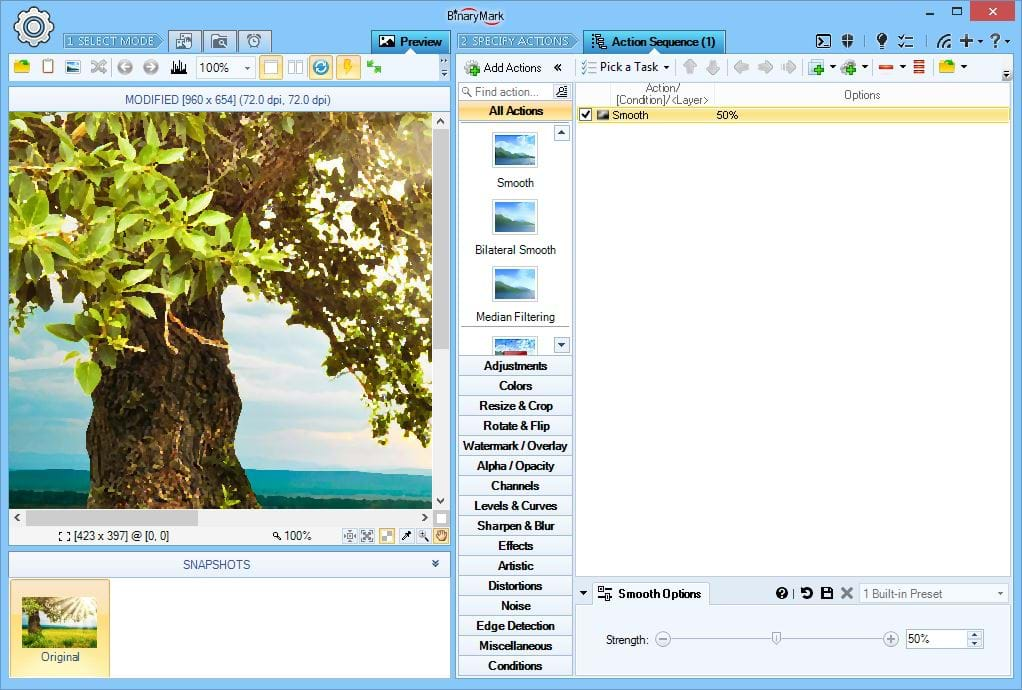
Smooth Filter
Smooths images by making jagged edges more rounded.
Tip Smoothing is not the same as blurring! Blurring diffuses pixels and does not preserve edges. Smoothing, on the other hand preserves edges and only removes jaggedness and sharpness; it does not diffuse pixels.
Image Convolution & Morphology
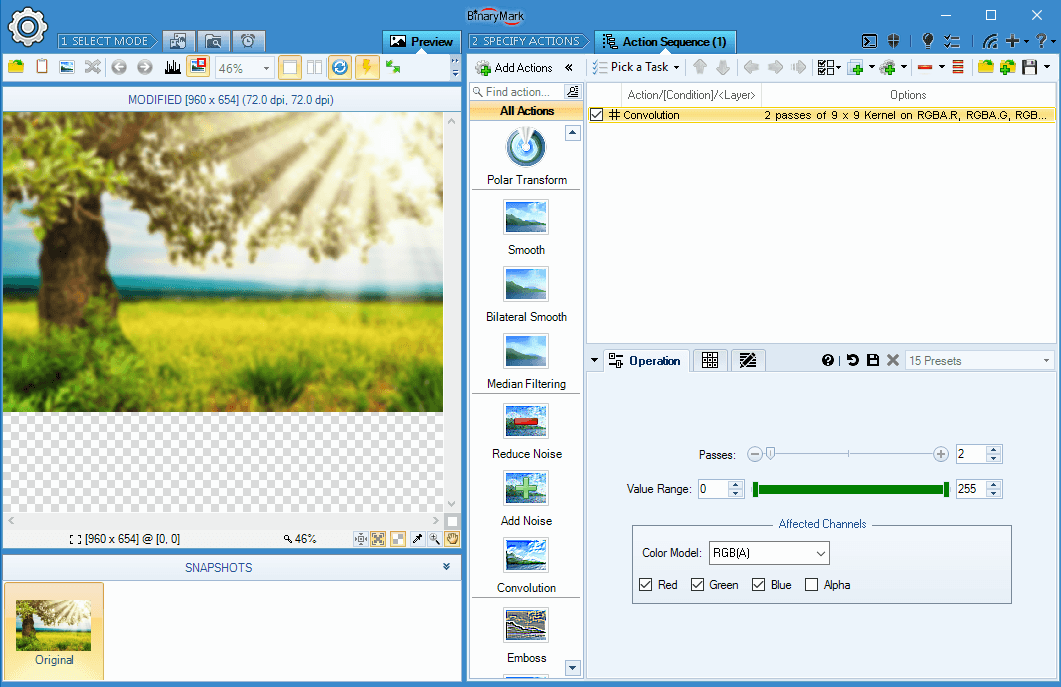
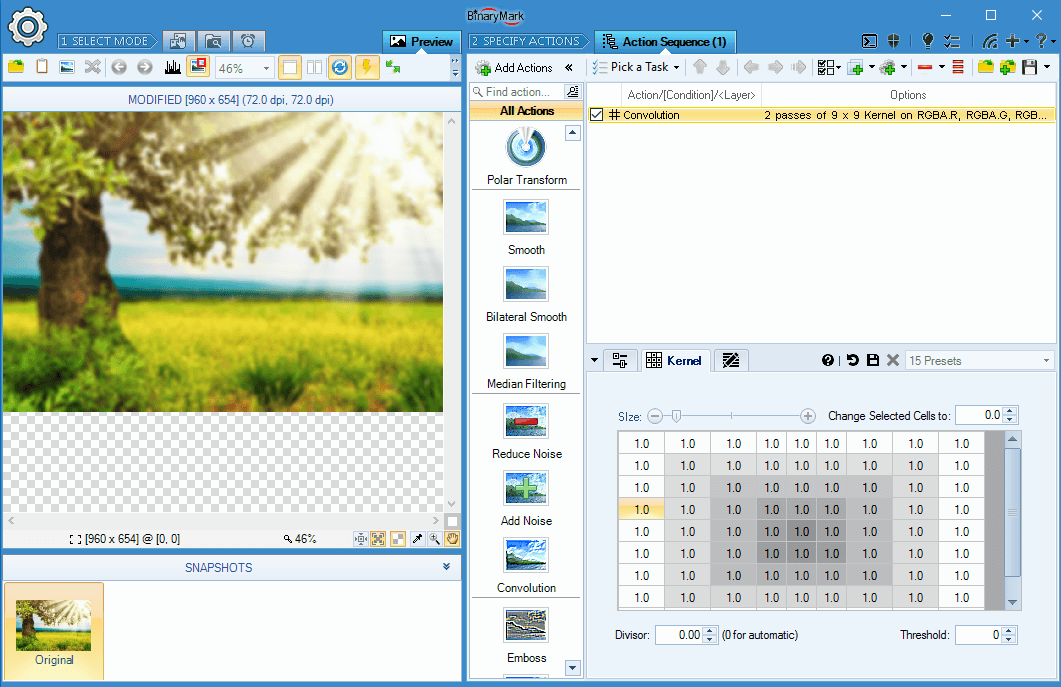
Image Convolution Operations
Batch Image Resizer supports custom image convolution operations with per-channel pixel processing, variable number of passes, and kernel matrices of up to 100 pixels in size!
There are also various built-in convolution presets like: Mean filtering, box blur, unsharp mask, edge detection and many others.
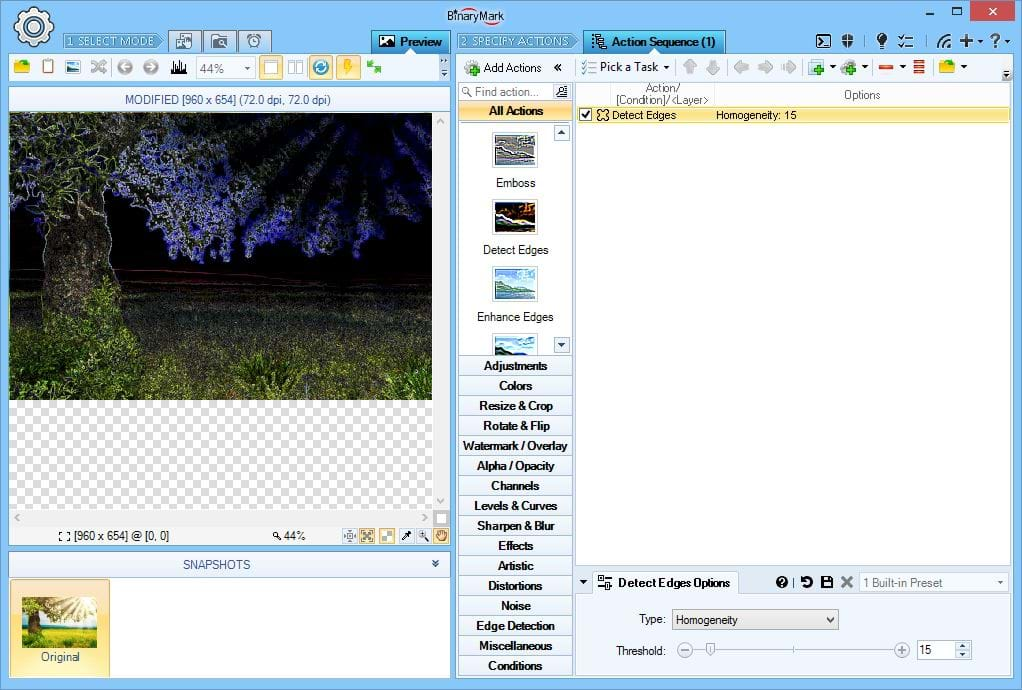
Edge Detection Filters
Batch Image Resizer offers several edge detection filters.
Basic edge detection methods include:
- Quick
- Emboss
- Horizontal
- Vertical
Some edge detection techniques allow you to specify a threshold:
- Homogeneity
- Difference
- Sobel
- Prewitt
- Kirsh
Additionally there are edge-enhancement-related actions: Edge Enhance, and Outline.
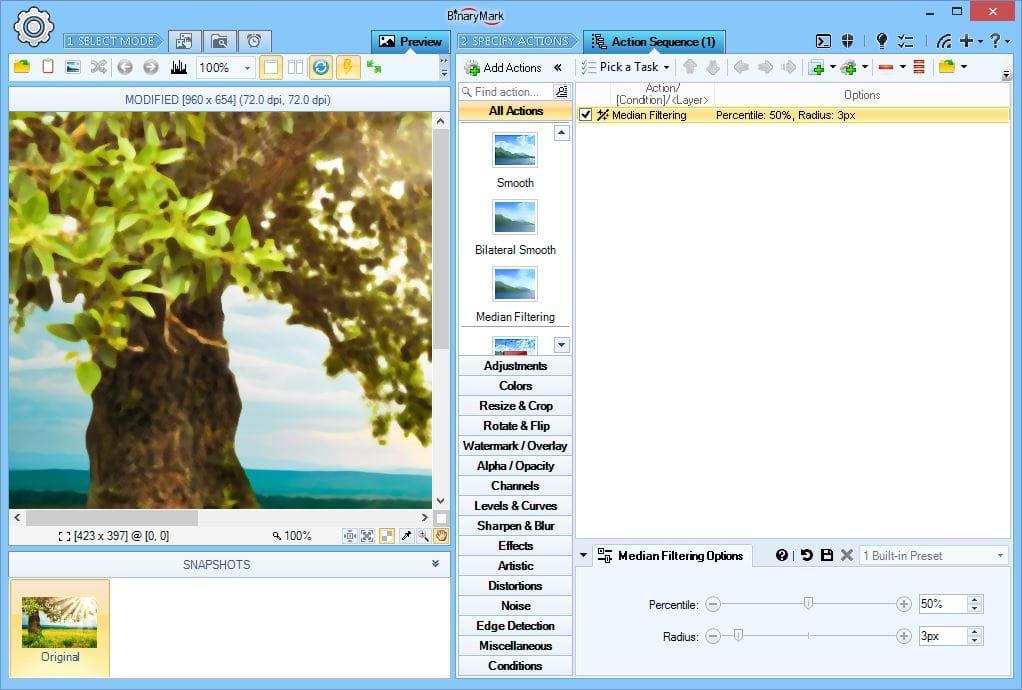
Median Filtering
Use this filter to reduce the amount of noise in your images while preserving detail. Typically it works better than Mean Filtering.
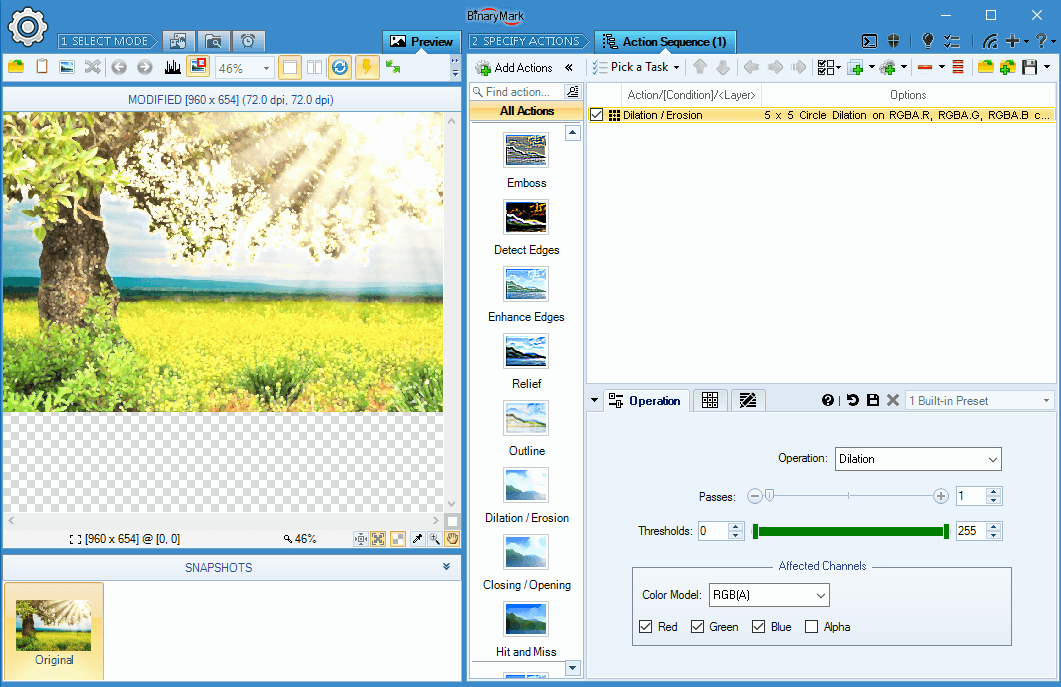
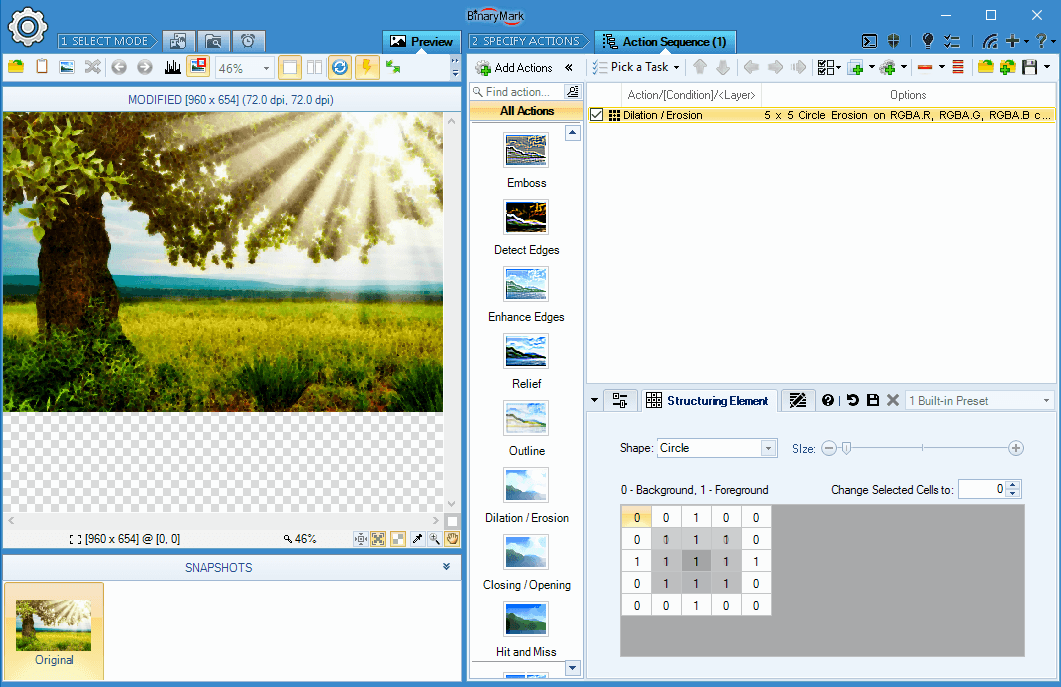
Morphological Dilation & Erosion Operations
Batch Image Resizer can perform custom mathematical morphology dilation and erosion operations with per-channel pixel processing, variable number of passes, and kernel matrices of up to 100 pixels in size!
- Dilation allows to grow separate objects or join objects.
- Erosion removes pixels, which are not surrounded by specified number of neighbors. It allows to remove noisy and stand-alone pixels and shrink objects.
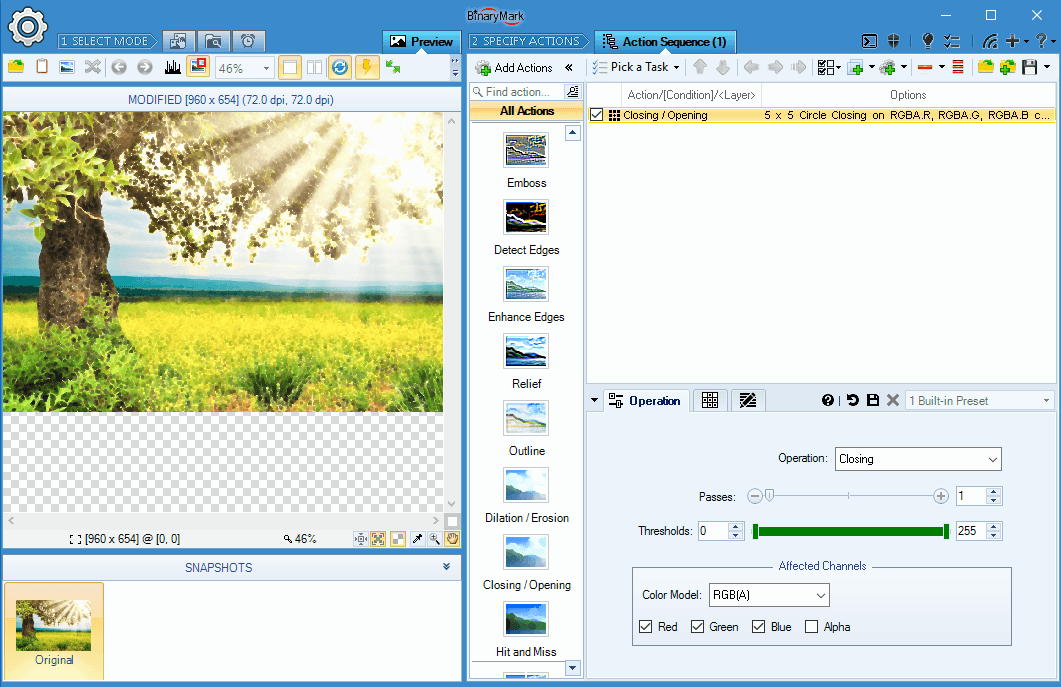
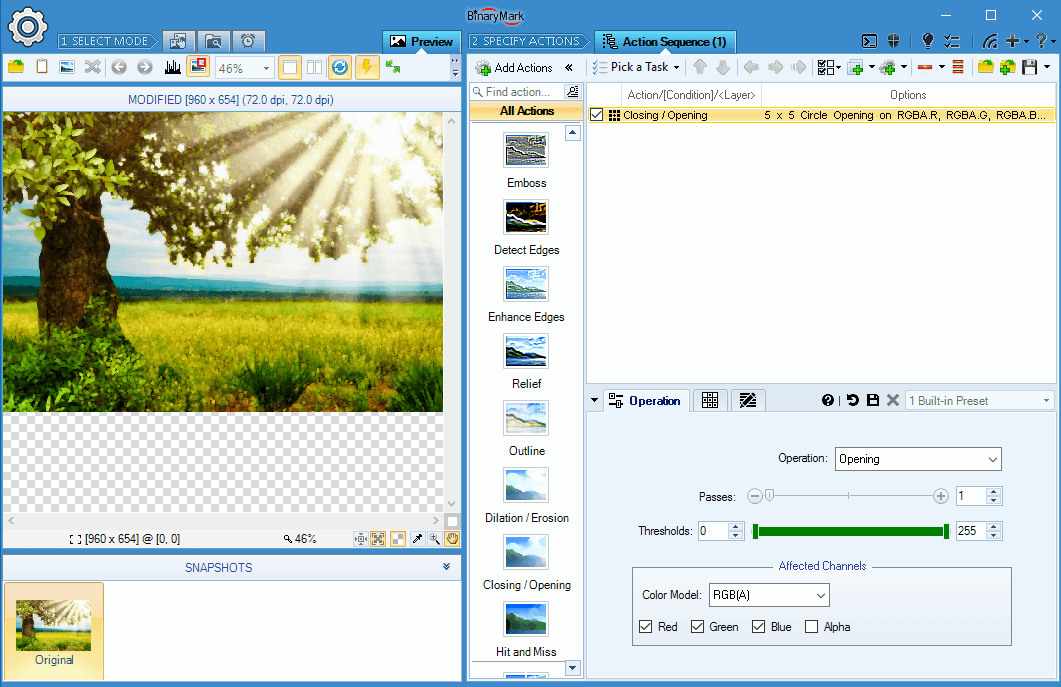
Morphological Closing & Opening Operations
Batch Image Resizer can perform custom morphological closing and opening operations with per-channel pixel processing, variable number of passes, and kernel matrices of up to 100 pixels in size!
- Closing is equivalent to Dilation followed by Erosion. It connects and fills objects. Since Dilatation is used first, it may connect/fill object areas. Then Erosion will restore the objects. However because Dilatation may connect something first, Erosion may not remove it afterwards due to formed connection.
- Opening is equivalent to Erosion followed by Dilation. It can be used for removing small objects while keeping big objects unchanged. Since Erosion is used first, it removes all small objects. Then Dilatation restores big objects that were not removed by the Erosion.
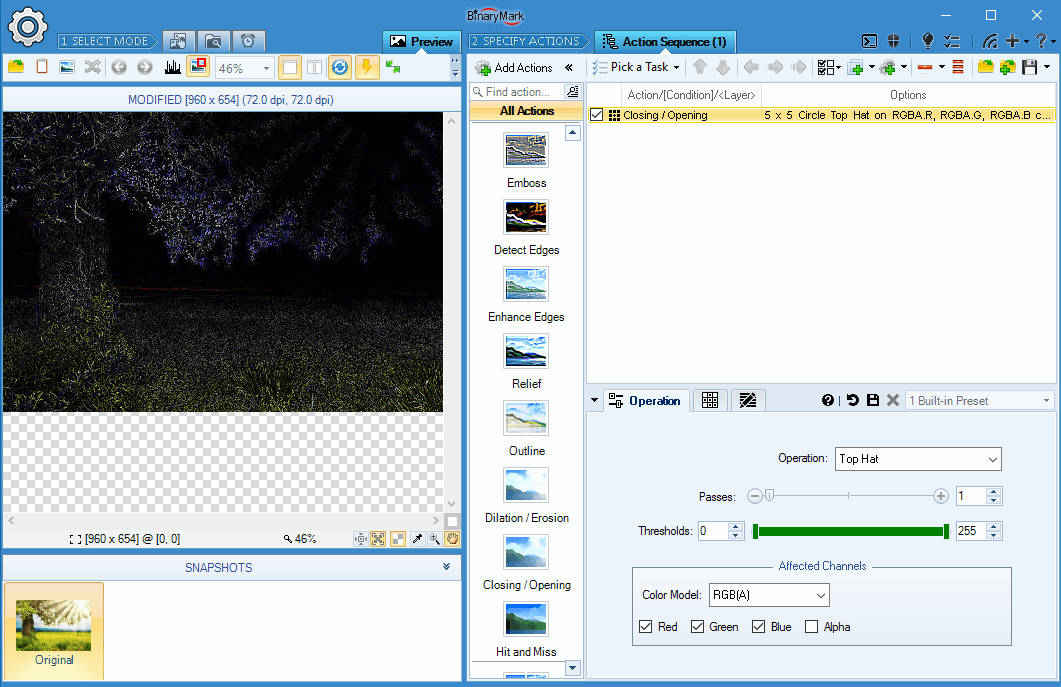
Other Morphological Operations
Among other morphological operations supported by Batch Image Resizer are: Bottom Hat, Top Hat, and Hit & Miss Filtering.
- Bottom Hat subtracts the original image from the result of Closing operation. It allows to get all object parts, which were added by Closing, but were not removed after that due to formed connections.
- Top Hat subtracts original image from the result of Opening operation. It allows to get all object parts which were removed by Opening, but were never restored.
- Hit and Miss is a generalization of Dilation and Erosion morphological operations.
Action Sequence Tree, Conditional Processing, and Layers
Action Sequence
With Action Sequence you can easily specify which actions to perform on the selected files, under what circumstances, and in which order.
- Drag & drop to add, copy, and move actions
- Easily duplicate (copy) actions with all their settings
- Toggle individual actions on and off
- View a summary of action's settings right in the list
- Perform certain actions only when specified requirements are satisfied using conditions
- See condition relationships visually in a tree
- Group multiple actions into layers to merge them with original image together
- Nest conditions inside of layers, and layers inside of conditions for advanced image processing scenarios
- Save action sequence to XML-based template file
- Open / append previously saved action sequence
- Save action sequence summary to text file
- Get instant feedback about any errors
- See selected action details in tooltips
- Actions are numbered and color-coded to help you identify their order and distinguish different types of actions
You tell the program how to process files by adding various actions to the Action Sequence, which represents a sequence of operations to be performed step by step. In the Action Sequence, actions can be easily rearranged, moved around, duplicated using simple drag and drop operations and / or keyboard commands.
Conditions and Processing Paths
Conditional processing is possible with conditions, which are simply special actions that make sure that the actions that follow them should only be performed if particular requirements are satisfied: file name and file size match specified parameters, or an image contains human faces, etc. This results in potentially different processing paths for different files.
Actions, conditions, and layers are visually presented in the action sequence using numbered hierarchical tree-like list and arrows, making it easy to design and see processing logic and understand various relationships between the actions and conditions.
There is no limit to how many actions, conditions, or layers can be added to the action sequence, nor are there any restrictions as to how the actions should be ordered. Do whatever you need to accomplish your goals!
XML Templates
The action sequence that you design, including all the actions, conditions, levels of hierarchy, and individual action's settings can be easily saved to a file as XML-based template that you can reuse later. Because templates are XML-based, you can actually use any text editor or specialized XML tools to edit these templates afterwards. In addition, template files can be used for processing using command line and in Triggered / Scheduled Mode.
Processing Flow Branching and Conditional Processing with Conditions
Conditional Processing
Apply different actions depending on the specified conditions: all within a single processing run.
- Conditions can be nested
- Conditions can be grouped
- Conditions can be mixed with layers
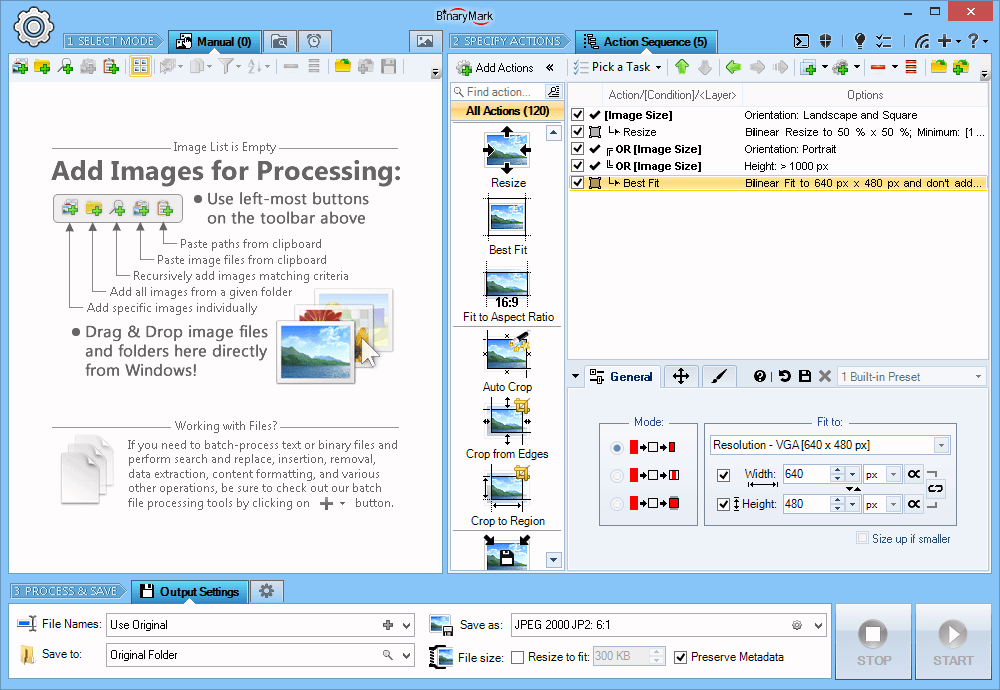
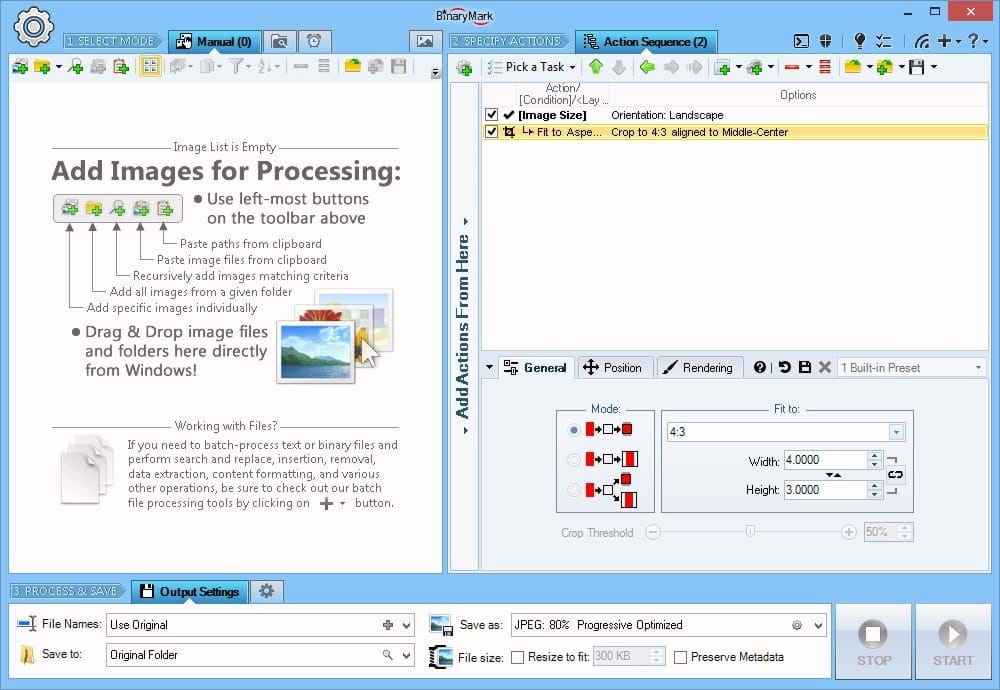
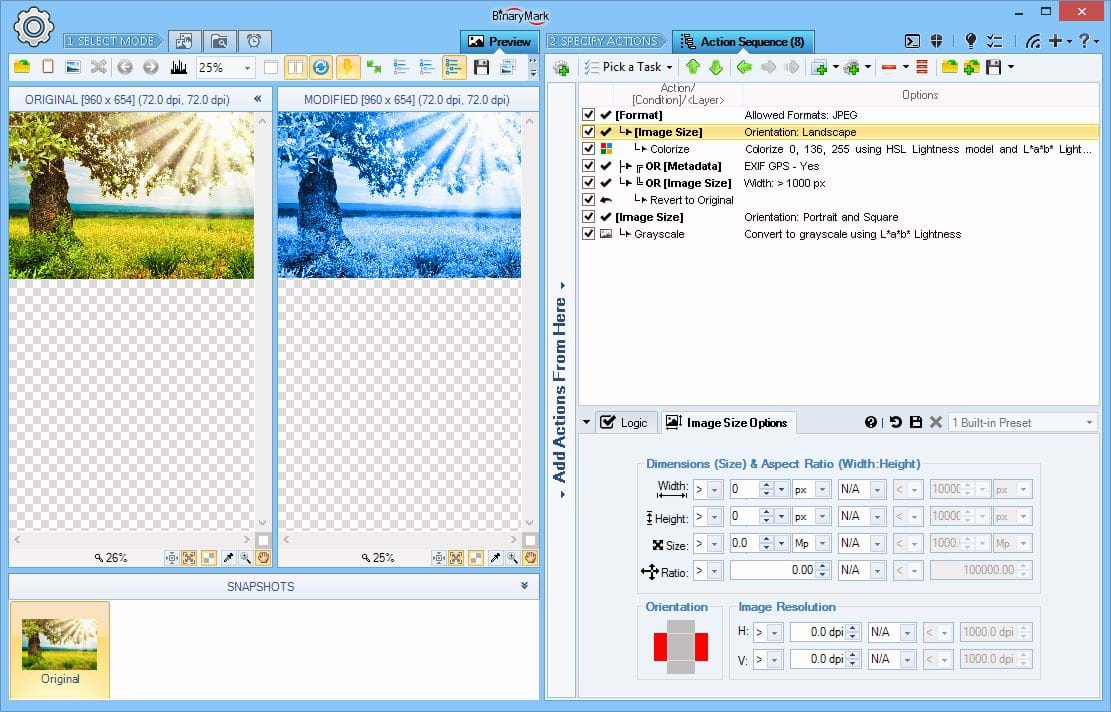
On the Screenshot In this example only Colorize action is applied because it is within Image Size condition and the image passed it because it matched the required Landscape orientation. Grayscale action was not performed because the image failed it since it has neither Portrait nor Square orientations demanded by the condition.
The image did not pass the "OR" condition group either, because it does not contain EXIF GPS meta data, nor is its width bigger than 1000 pixels, as is demanded by those conditions; so the Revert to Original action was skipped.
Conditional processing allows you to perform different actions and operations on different images. This is accomplished using Conditions in the actions sequence, which alter the processing flow, so that different images may be processed using different processing paths!
Any actions that follow a condition in the action sequence will be performed only if the check(s) defined by the condition have been passed by the image being processed. Any actions nested inside a condition whose check(s) have not been passed by the images will not be performed on those images.
If another condition is encountered later, it may add to the effects of previously defined condition(s), so that any subsequent actions will be performed, provided the image being processed passes the new condition's check(s) as well.
- 8 Built-in conditions that can check image properties and content
- Conditions can be nested, which is equivalent to grouping conditions together using AND logical operator
- Conditions can be grouped together using either AND, OR (inclusive OR), or XOR (exclusive OR) logical operators
- Both the individual condition's check result as well as the check result of the whole condition group can be negated (logical NOT), which is useful when you want to apply certain actions to all images except those matched by the condition(s)
- Nested conditions can have actions and/or layers between them to allow for complex hierarchical processing scenarios
- Condition relationships with each other as well as hierarchy of actions they control is clearly reflected in an action sequence with arrows and alignment, so you know which actions and layers are controlled by which condition(s)
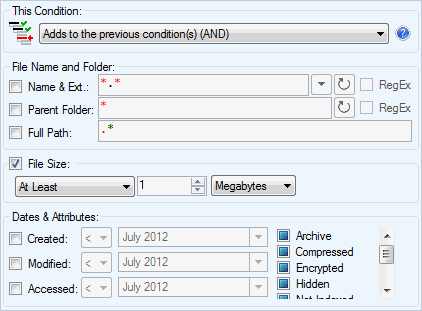
File Information Condition
Check if the file being processed matches specified file properties such as name pattern, location, size, and attributes.
The following checks can be performed by this condition:
- File name and extension match a predefined pattern (either wildcards or RegEx)
- File's parent directory matches a predefined pattern (either wildcards or RegEx)
- File's full path matches a predefined pattern (RegEx only)
- File's size is within specified range: at least N bytes, at most N bytes, exactly N bytes, between N and M bytes, not equal to N bytes
- File's creation, change, and access dates are within specified range
- File's attributes match supplied values
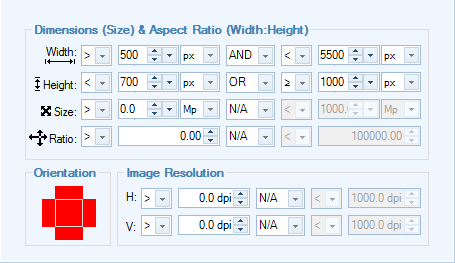
Image Size Condition
Check if the image being processed matches specified size (dimensions) such as width and height.
The following checks can be performed by this condition:
- Image width and height are within specified ranges
- Image overall area (pixel count, width x height) matches specified range
- Image aspect ratio (width : height) falls within specified range
- Image has a certain orientation: Landscape, Portrait, or Square
- Image has a given horizontal and/or vertical resolution (in dpi)
Face Detection Condition
Check if the image being processed contains any matching human faces.
- Specify required number of faces
- Specify required face size, and size variation/range
- Specify face orientation (tilt)
- Specify various accuracy settings
- Ability to select a rectangular region where faces should be looked for
- Optional ability to use cloud-based face recognition provided by Microsoft (entirely optional and should only be used if built-in face detection results are poor).

RGBA Levels Condition
Check if the image being processed has certain color characteristics as determined by the RGB color model.
First, RGBA histogram is computed for the specified rectangular region (or by default the whole image). Then that histogram is evaluated against specified Red, Green, Blue, and Alpha intensity ranges using a selected statistic: mean, median, minimum, maximum, or specified percentage of pixels.
This allows you to perform highly fine-tuned processing with different actions and/or options being applied to different images depending on, for example, their Redness, or the amounts of Blue.
- Specify Red, Green, Blue, and Alpha intensity ranges
- Specify statistic to check for each range: Minimum, Maximum, Average (Mean), Midpoint (Median), Specified Percentage of all pixels
- Specify rectangular region to check (by default whole image is checked). Use rectangular region setting if some of your images have a logo in a particular place. This will allow you to split images into 2 groups: those with logo and those without logo automatically, so you can perform different actions on each!
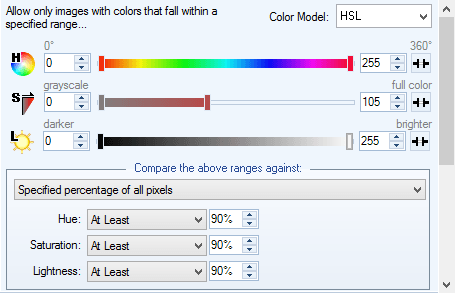
Color Levels Condition
First, a histogram is computed for the specified rectangular region (or by default the whole image). Then that histogram is evaluated against specified component intensity ranges that depend on the selected color model using a selected statistic: mean, median, minimum, maximum, or specified percentage of pixels.
This allows you to perform highly fine-tuned processing with different actions and/or options being applied to different images depending on, for example, their Brightness, or Saturation.
- RGBA, CMY, HSL, HSV, HSI, HWB, CIE Lab, CIE LCH, YCbCr models
- Specify component intensity ranges: Hue, Saturation, Luminosity, etc. (depends on the selected model)
- Specify statistic to check for each range: Minimum, Maximum, Average (Mean), Midpoint (Median), Specified Percentage of all pixels
- Specify rectangular region to check (by default whole image is checked). Use rectangular region setting if some of your images have a logo in a particular place. This will allow you to split images into 2 groups: those with logo and those without logo automatically, so you can perform different actions on each!

Metadata Condition
Check if a given image file has or does not have a specified metadata.
The following checks can be performed by this condition:
- Presence or absence of the following metadata: Comments, EXIF, EXIF Specific, EXIF GPS, EXIF MakerNote, EXIF Interop, IPTC, XMP, Geo TIFF
- EXIF Orientation specification: one of 8 possible values
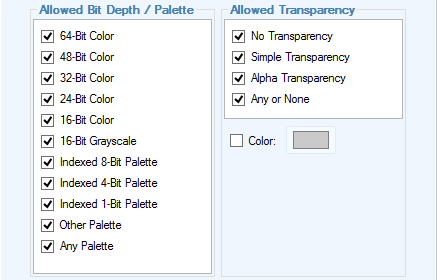
Palette Condition
Check the bit depth of an image as well as transparency type (if any).
The following checks can be performed by this condition:
- Palette type (color count): 64-bit color, 48-bit color, 32-bit color, 24-bit color, 16-bit color, 16-bit grayscale, 8-bit indexed, 4-bit indexed, 1-bit indexed, any
- Transparency type: none, simple, alpha-transparency, any
- Transparent color (for indexed palettes)

Image Format Condition
Check actual format of the image. This does a detailed image format check by actually inspecting the image file itself instead of just looking at the file extension.
The condition allows you to specify allowed and disallowed image formats by putting a check-mark next to the allowed ones.
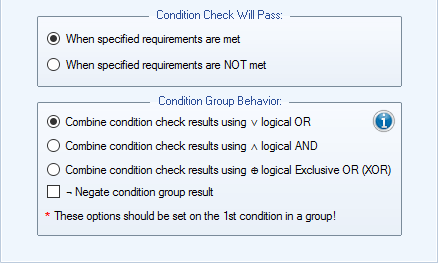
Condition Behavior Settings
Every condition has these common behavior settings that determine how it interacts with other conditions and thus how it affects image processing flow.
- Condition may allow further processing either if the requirements / check specified by it are met or not met (i.e. if the result of checking the image against a constraint is either True or False).
- Condition group behavior determines whether the conditions add to each other (i.e. each condition in a group adds additional requirements — equivalent to logical AND, or if the processing should continue as long as at least one condition in a group will pass — equivalent to logical OR.
- In addition it is possible to compare conditions inside a group using logical XOR operator, and negate the entire condition check.
- Negation of a condition or a condition group result may be very useful, because some times it is easier to define the checks for the True case and not for the negated case.
Manual Processing Mode
In Manual Mode you explicitly select images for processing in a variety of ways. You can drag & drop images from Windows Explorer; paste them from clipboard; add all images from a given folder; add specific images by selecting them from a list; search for specific images that match given criteria; or paste file paths.
Additionally you can further refine the image list by unchecking the images you wish to temporarily exclude from processing.
When satisfied with image selection, you can then manually process the whole batch. Processing can be started as long as the image list contains at least one checked image.
Manual Processing Mode
In Manual Mode the program processes images only upon explicit initiation (when you add images, and click on the Start button).
Images can be added to the processing list in a variety of ways:
- Images can be selected individually
- All images from a particular folder can be added in one click
- Recursively scan directories and look for images that match given criteria
- Drag and drop from Windows Explorer / Folder / Desktop
- Import from a text-based list of file paths
- Paste from clipboard
- Open from previously saved file list
- Directly from Windows by selecting images in Windows Explorer, right-clicking, and launching the program that way (selected images will be automatically added)
Manual Mode Image List Management
In Manual Mode you can sort and filter images in various ways. This way you can quickly select only those images that match desired criteria.
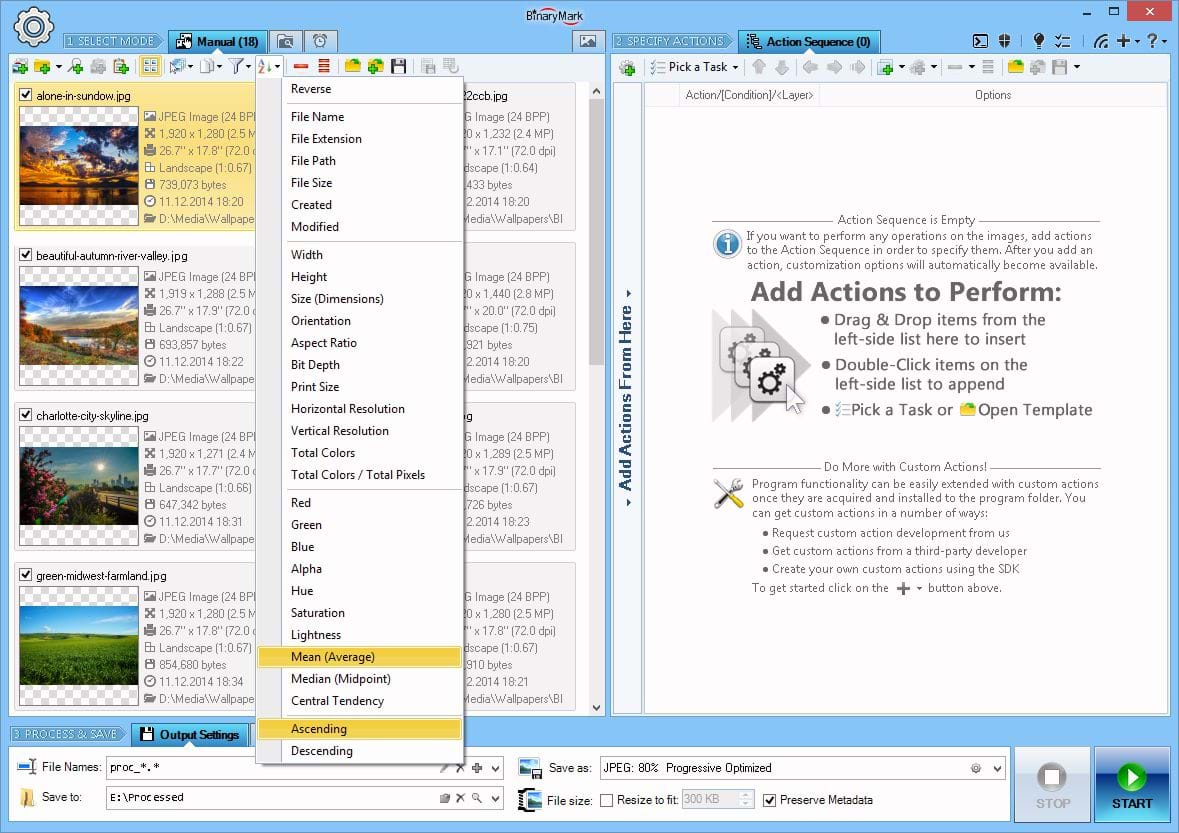
Images can be sorted within the processing list in a variety of ways:
- By their file attributes like name and size
- By image size like width, height, overall size, resolution
- Color diversity - number of unique colors
- Color properties: brightness, saturation, even hue
Ability to filter and sort images by their color-related properties is unique to Batch Image Resizer and you will not find it in other programs.
Clicking on an image thumbnail will take you to the Preview Mode where you will be able to see how the processed image will look like after all the actions you have defined were applied.
Processing in Manual Mode
When images are processed in Manual Mode, a detailed progress is displayed right within the image list, letting you know which imagea are being processed and what is the processing stage
Once the image has been processed, its thumbnail along with preview will be automatically updated to reflect any changes. Attributes that have been changed will be shown in bold making it easy for you to spot changes. The color of the thumbnail will reflect the status: green means no errors, while orange or red indicate warnings and errors during processing, in which case you can click on the log icon that appears to see a detailed processing log for the image and figure out what went wrong.
In addition, you can easily filter the image list by processing result status. For example, you may remove all successfully processed images with just one click, leaving only those that had issues or were skipped.
- Add and remove images easily
- Save image list for future use and append existing lists
- Temporarily prevent processing of certain images by unchecking them
- Images are color-coded after processing, making it easy to spot problems
- List supports two views: Thumbnails and Details
- Thumbnail view shows image preview together with image file attributes: width, height, resolution, bit depth, file name & size...
- Detailed tips appear when you hover over files displaying image and file properties, preview, and RGB histogram for the image
- Processing result is displayed right within the image list with preview reflecting any changes and a link to a detailed log
Automatic / Background / Continuous Processing Mode
In Automatic Mode, instead of selecting specific images for processing, you setup "monitors" that tell the program which images should be processed and when. The processing is performed automatically and continually when the specified conditions are met and the program is in the active monitoring mode.
A monitor works by performing periodic scans of the specified folder(s) for all the images that match given criteria and satisfy monitor's behavior type (see below). All matching images that were found by the monitor are then put into the processing queue. Periodicity of the scan/check can be controlled and can range anywhere from 1 minute to several hours or even days.
Depending on the monitor behavior type, image processing may be initiated under different conditions:
- File is Present - processing is performed on all images matching criteria located the monitored folder (same image may be processed multiple times unless destination and original file paths differ and the original images are deleted after processing).
- File was Modified - processing is performed on all images that have been modified since the last time the monitored folder was checked.
- New File was Added - processing is performed only on the new images that were added to the folder since the last time the folder was checked.
There is no limit to how many monitors you can setup — it only depends on the system resources that are available to you. The monitor setup can be easily saved to a template file for future use.
Once you have setup the monitors and actions, you can start monitoring and processing images. Unlike the Manual Mode, processing in the Automatic Mode can be paused, so you can edit both the monitors and actions in the Action Sequence, and then safely resume processing.
Automatic Mode is ideal for cases when your workflow involves continually working with small batches of images that are coming in periodically and require similar kind of processing.
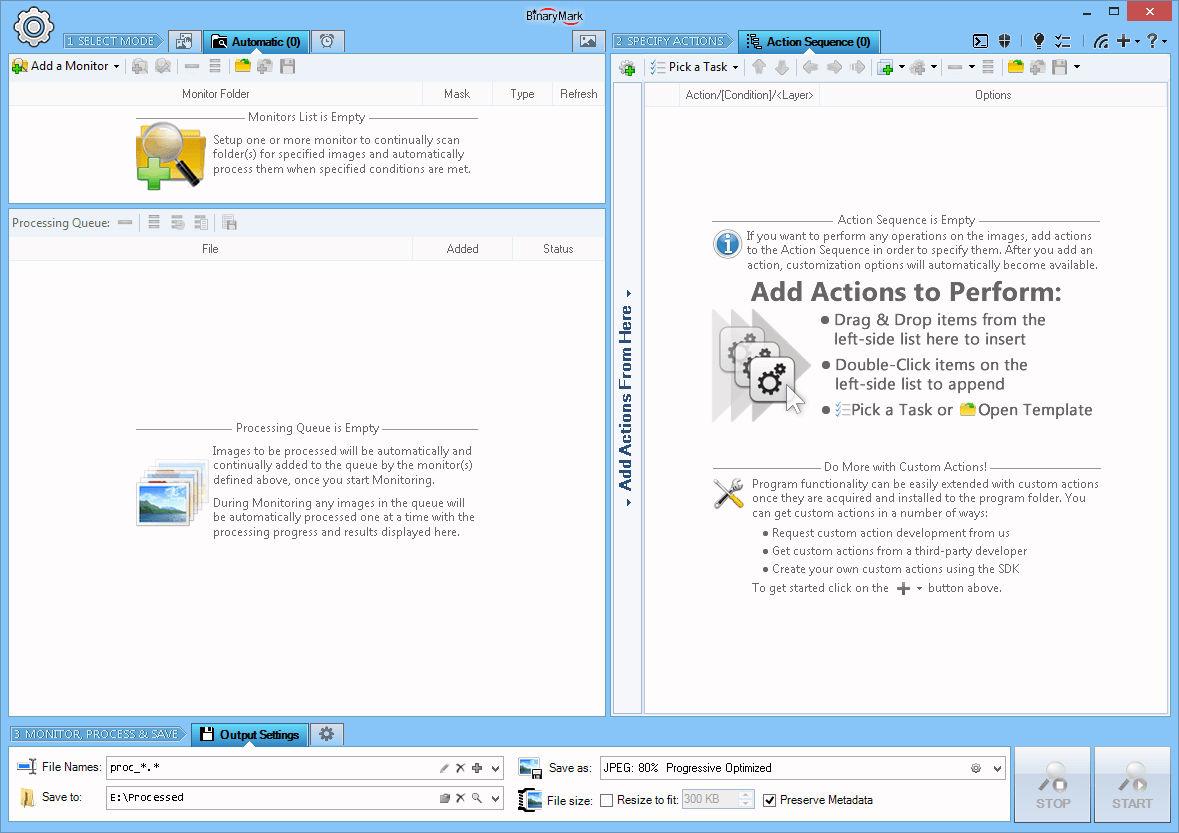
Automatic Processing Mode
In Automatic Mode, instead of selecting specific images for processing, you setup "monitors" that tell the program which images should be processed and when; and the processing is performed automatically and continually when the specified conditions are met.
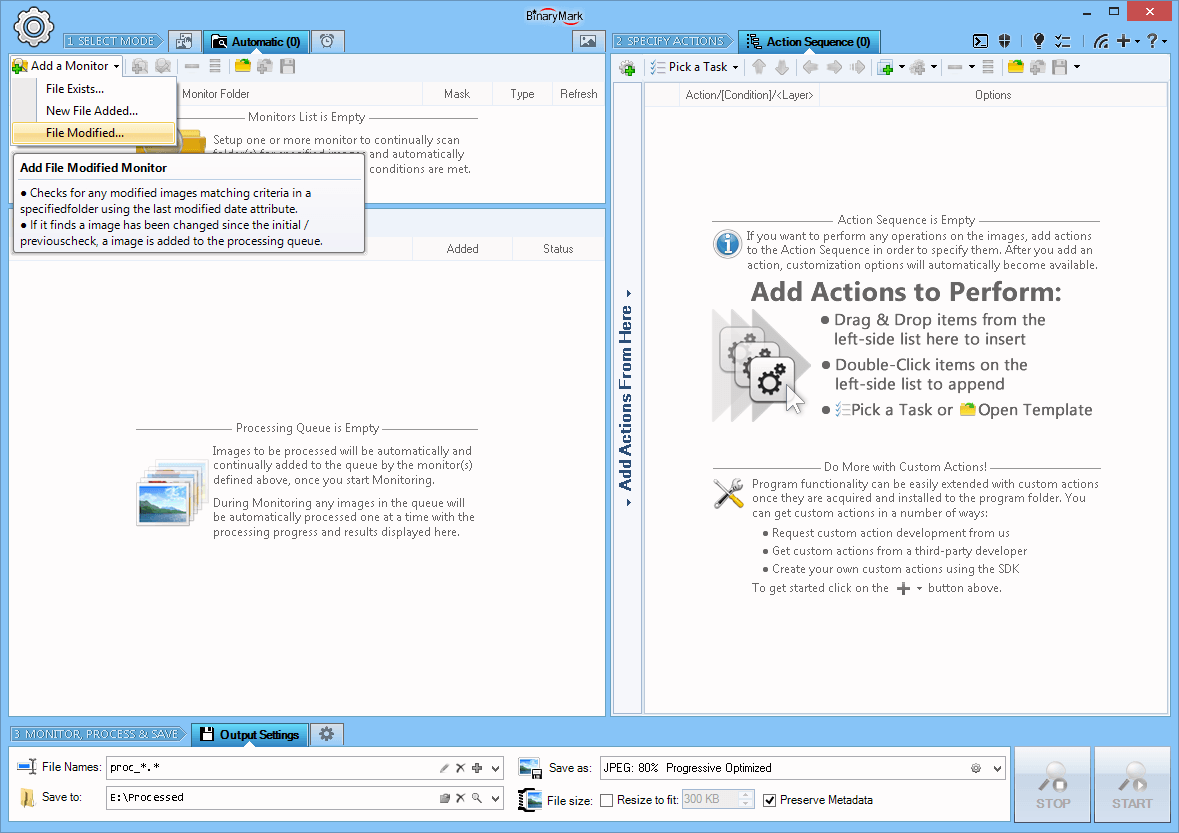
3 Types of Monitors
The program supports 3 kinds of monitors: File Exists, File Added, and File Changed. Depending on the kind of monitor you setup, the processing will be triggered only when appropriate condition is met.
For example, if you set up a File Exists monitor, the program will always process all qualified images in the monitored folder as long as they are present; however if you set up a File Added monitor, the program will process only the new images that have been copied to or moved to the folder since the start of its monitoring.
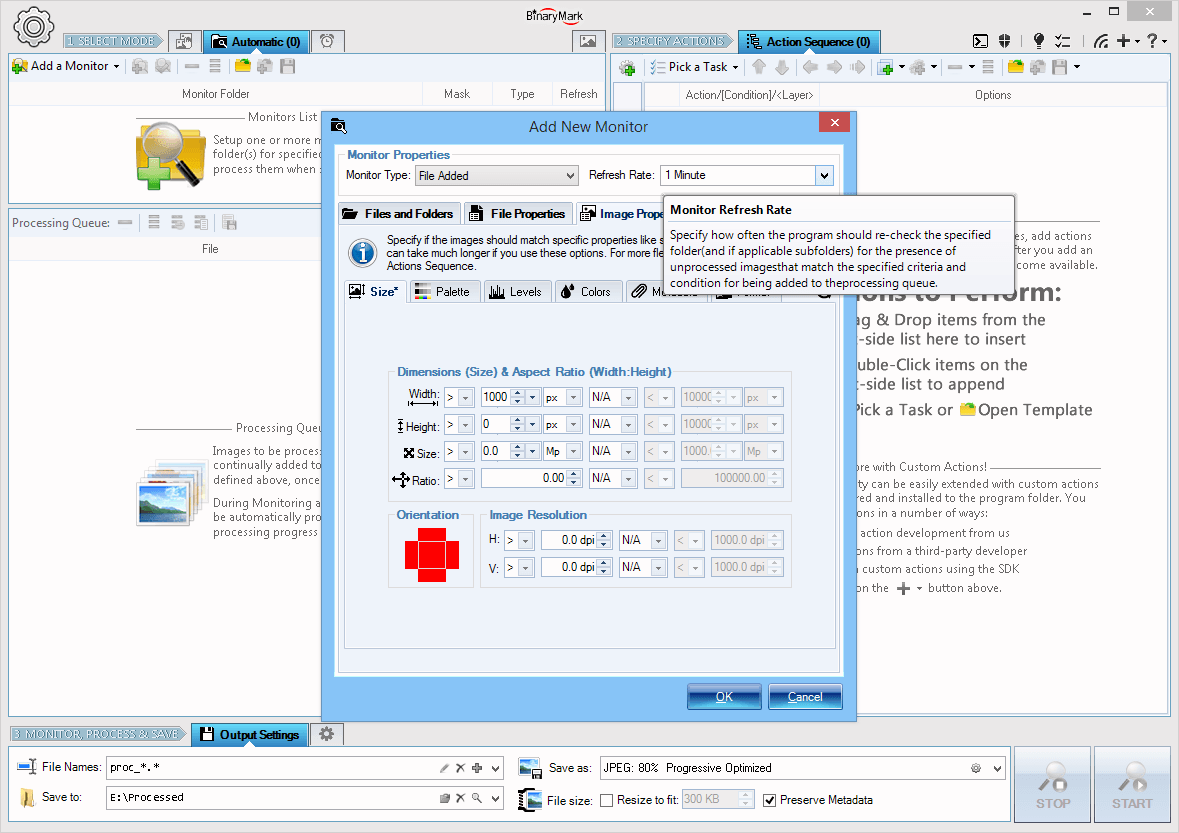
How Monitors Work
The monitors work by continually scanning the specified folder (directory) and subfolders for specified images that match a predefined naming pattern (mask) as well as other properties. The scanning happens at equally spaced time intervals that you define (refresh rate).
Among the file properties that may be examined are: file size, file dates, file attributes. In addition a variety of image-specific properties can be examined: image dimensions, aspect ratio, color depth, EXIF meta-data, etc. Thus Batch Image Resizer will enqueue for processing only those images that match all the requirements specified in the monitor.
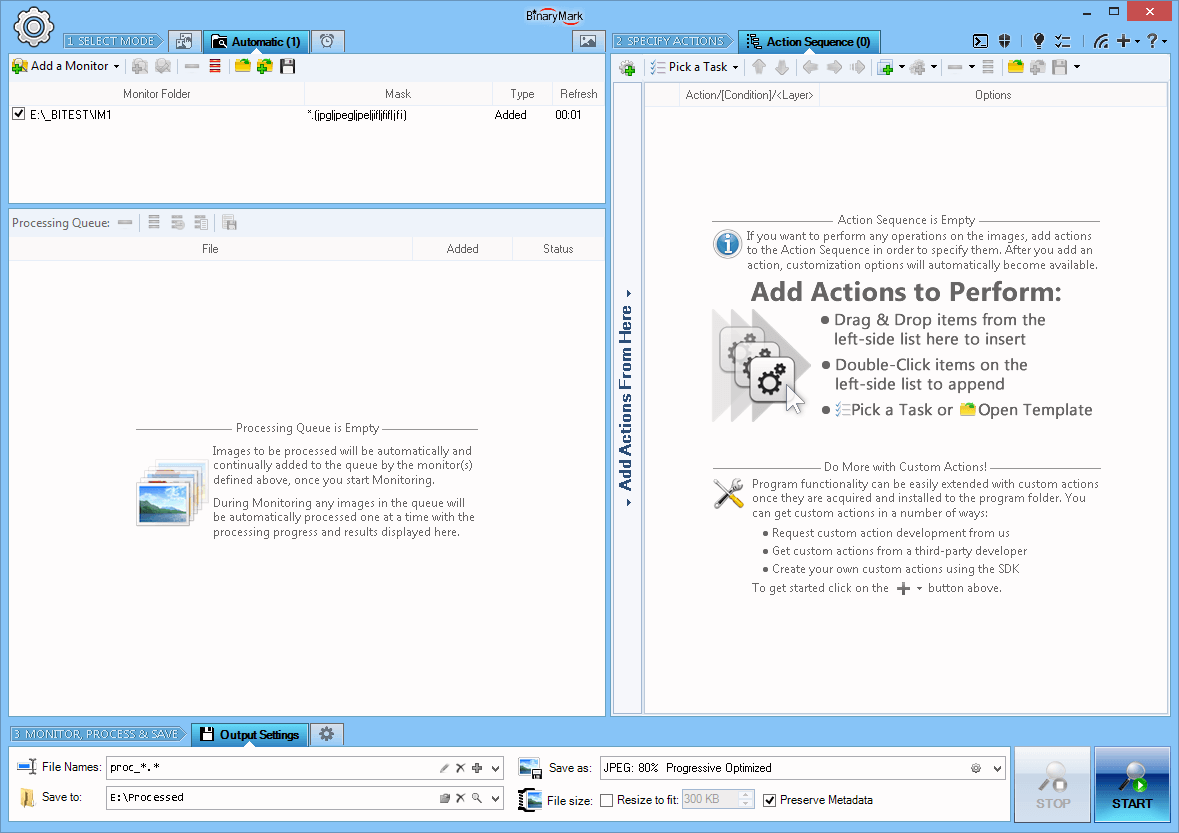
Monitors List
After a monitor has been set up, it will appear in the list of monitors.
You can define as many monitors as you like subject to the system resources you have and the product edition that you are using. Additionally, monitors can be enabled and disabled with a single click.
You can also save and open monitor lists easily, so you can reuse your monitor setups later.
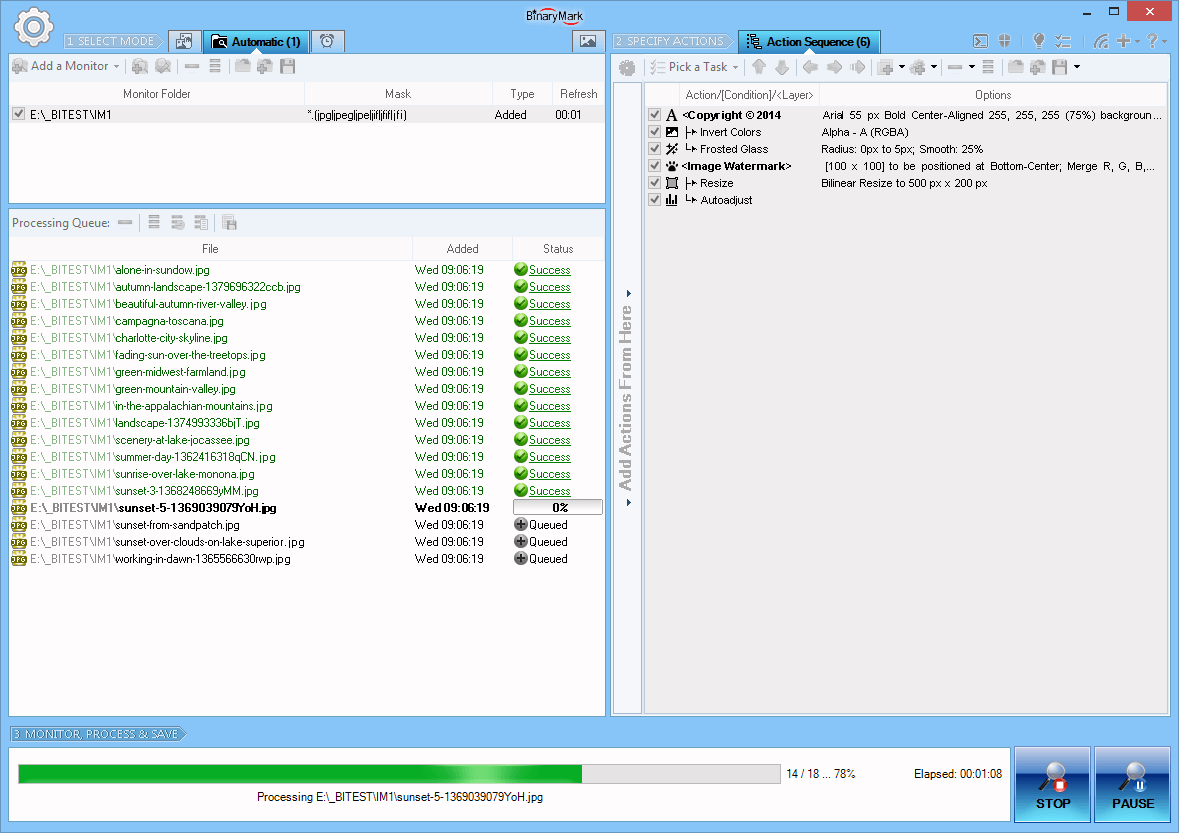
Processing in Automatic Mode
In automatic mode processing works in 2 stages. First, the monitor(s) scan the specified folder(s) for any valid images, and add them to the processing queue. Then the program automatically processes all the images in that queue. These 2 stages need not be consecutive, as the program begins processing as soon as the queue is non-empty.
Unlike in the Manual Mode, in the Automatic Mode you can pause processing, make the changes to the actions in the actions sequence and / or the monitors, and then resume.
Triggered / Scheduled Processing Mode
Triggered or Scheduled Processing Mode lets you define different processing jobs that can be executed on schedule or a particular trigger, such as: on every Monday at 2:00; at Logon; on a particular system event; etc.
The program does not need to be running for the processing job to be activated - it will be automatically started with the right command line parameters at the right time by Windows Task Scheduler Service (which needs to be enabled for this feature to work) and begin performing the tasks defined by the processing job.
Processing jobs are easily managed within the program, but should the need arise, you can also modify their properties in Windows Task Scheduler directly.
Batch Image Resizer can perform processing jobs in 3 different modes:
- Command Line Mode - only the console window will be displayed.
- GUI Mode - program is launched and performs processing displaying progress in regular Graphical User Interface.
- Invisible Mode - no user interface of any kind is shown, and the processing job is performed in the background.
All processing jobs can be different: for every job you can specify not only the trigger or schedule that will determine when it runs, but also the images to be processed, actions to be performed, output file name pattern and directory, and a host of other options.
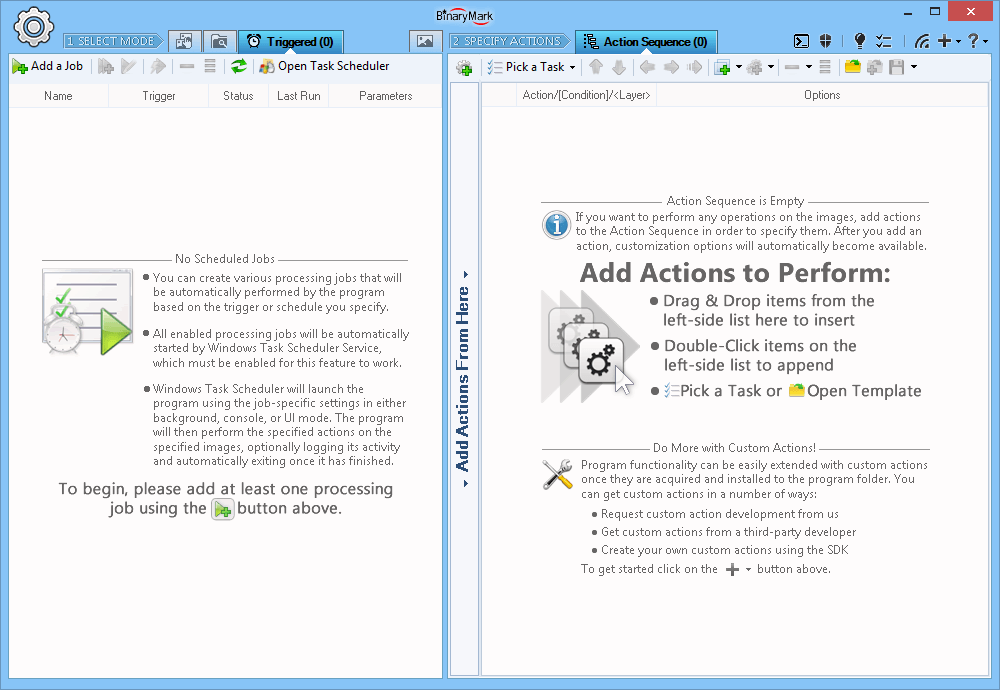
Triggered / Scheduled Processing Mode
In Triggered or Scheduled Processing Mode, image processing is started upon a specified event (trigger) or at a specific time as per the specified schedule.
You can create as many triggered/scheduled processing jobs as you want - all with different schedules, files to process, actions to perform, and other settings.
Batch Image Resizer need not be running in order for the processing jobs to be activated, the program and processing is started automatically by Windows Task Scheduler Service.
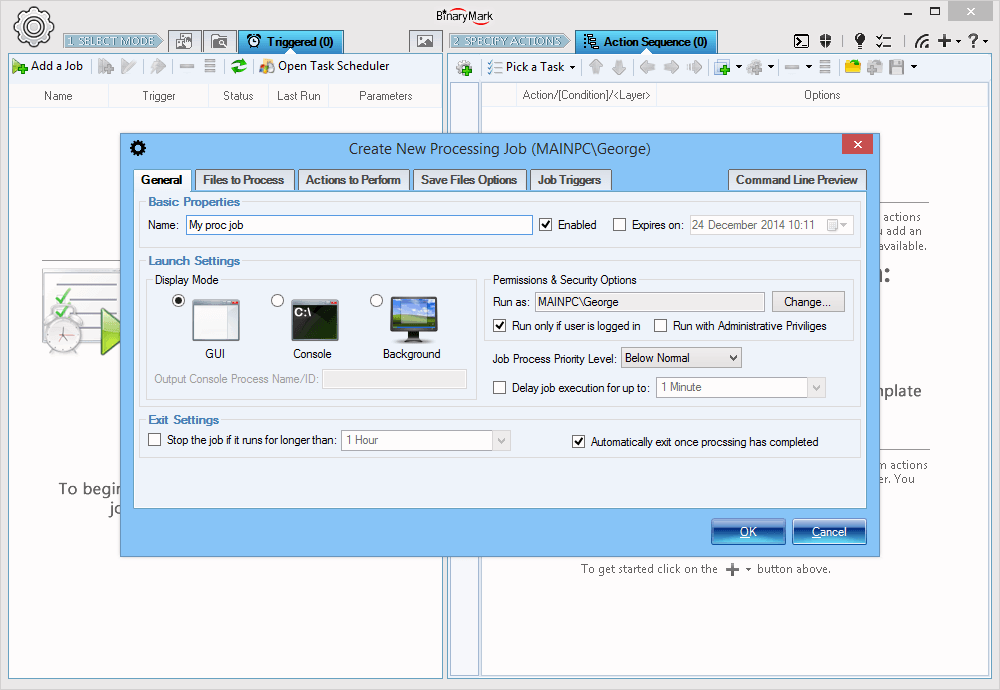
Creating Processing Jobs
Creating a processing jobs is straight forward. You define some general settings such as job's name, mode of operation. Then you specify the job's schedule or trigger that will determine when the processing job is actually ran. Finally you specify the which images should be processed; how the images should be processed (which actions should be performed); and where the processed images should be saved.
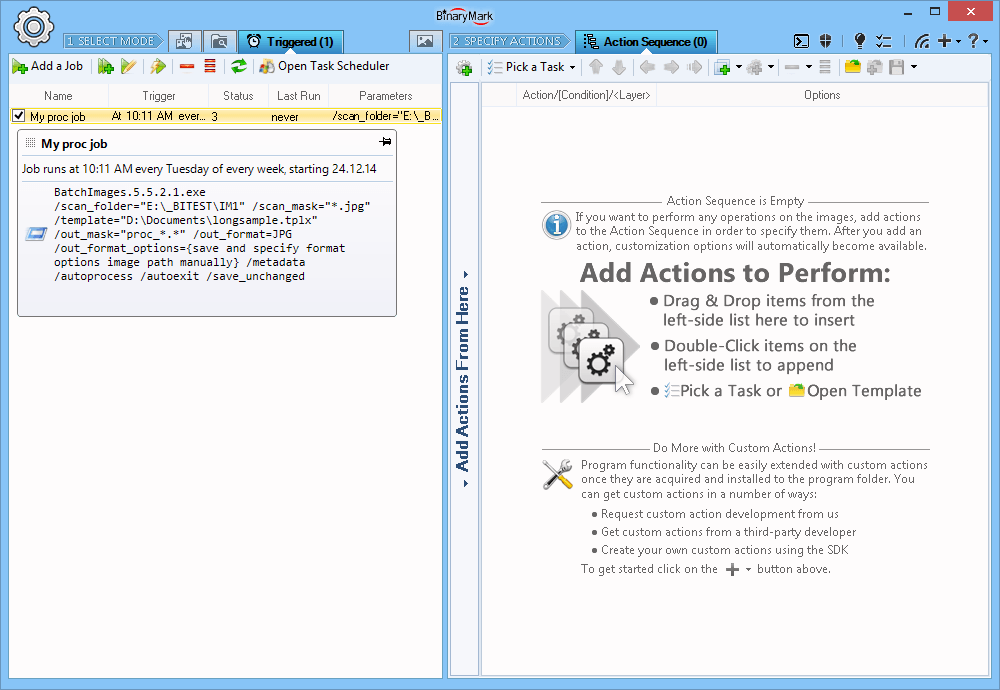
Managing Processing Jobs
Once the processing job has been created, it appears in the list of processing jobs. This list reflects all the jobs that have been created and are registered with Windows Task Scheduler Service which is responsible for job's execution.
Jobs can be enabled and disabled with a single click by putting or removing the checkmark next to the job's name in the list.
Processed Images: Destination Folder and File Name Options
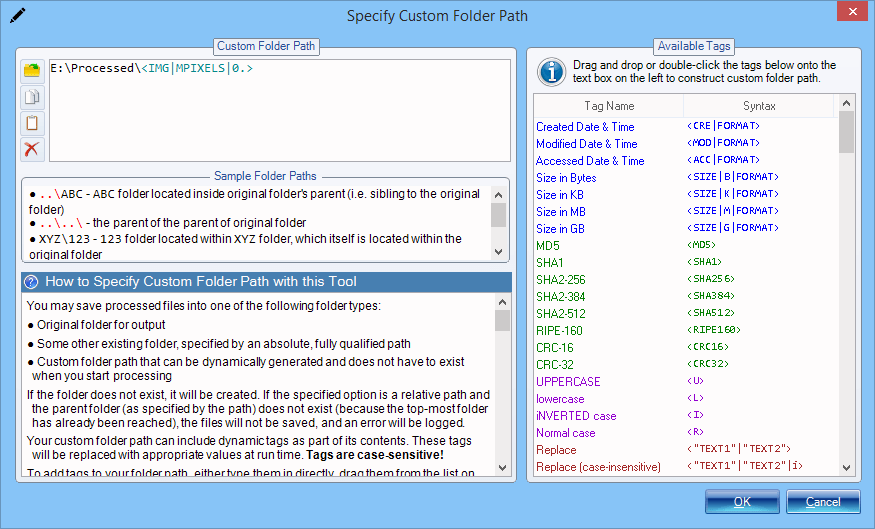
Specify Destination Folder
Processed images can be saved to:
- Original folder
- An existing folder given by absolute path
- An existing folder given by relative path
- A folder given by dynamic path, which may include over 100 different dynamic tags like image width, height, EXIF data, original folder, etc. If the generated path does not exist, it will be created automatically.
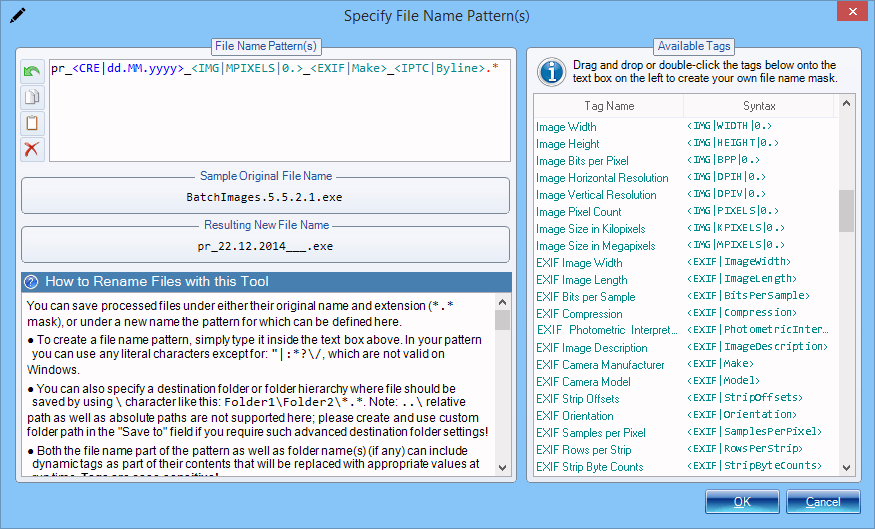
Use Tags to Generate Dynamic File Names
You can save processed images under either the original or the new file name. Batch Image Resizer can automatically generate new file name according to the pattern you specify. This pattern may include literal characters, as well as over 100 built-in dynamic tags that will be automatically replaced with appropriate content at run time.
Program features a built-in File Name Designer with simple drag & drop user interface that lets you select various tags from a large list and use these tags as part of the generated file name.
The tags may represent either dynamically generated content that can be included as part of the file name, or a command that somehow modifies the part of the filename that has already been generated (like changing letter case, or performing replacement operation).
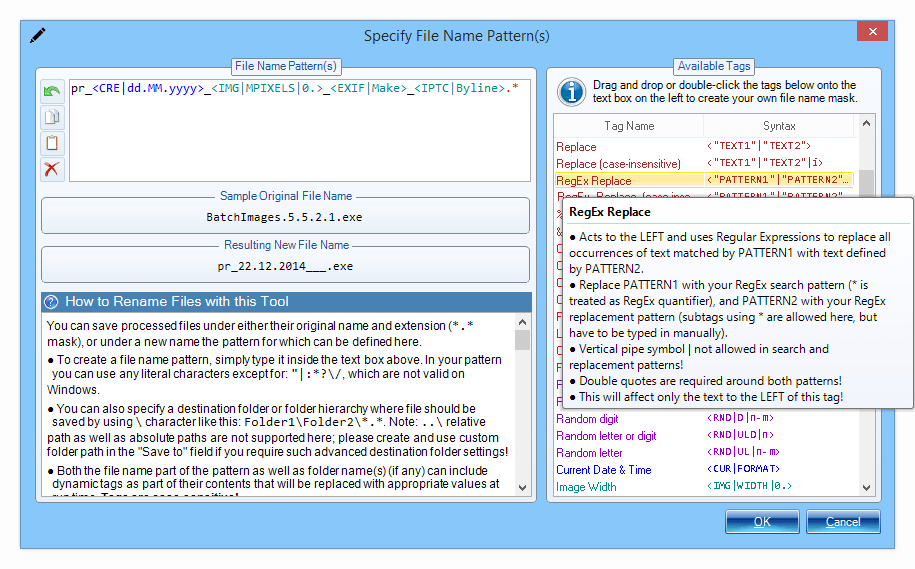
More than 100 Tags!
There are more than 100 different tags that can be used to generate dynamic file names that meet your requirements. Simply include the tag in the appropriate place in the file name pattern to have dynamically generated content inserted in the right place (if the tag generates content), or to affect the generated filename in other ways (if the tag represents a command or operation).
The following tags are available:
- File creation and modification dates, file size
- Current date and time
- Random numbers and letters
- Image properties: width, height, size, bit depth, resolution
- File hashes: MD5, SHA1, SHA2, CRC…
- Original file name, extension, folder name
- EXIF and IPTC tags
- Search & Replace operation letting you replace text within file name
- RegEx Replace - replace within file names using Regular Expressions
- Letter case modification commands (make upper case, lower case)
When it comes to saving processed images, the program really shines, as it comes with built-in professional file renamer tool that lets you easily design file naming pattern simply by drag-dropping different name parts (tags) onto the text area. And there are many tags to choose from: various hashes and checksums like MD5, SHA, SHA2, CRC16, CRC32, etc; file size; parts of original name/folder; creation and modification dates and their parts; random characters; EXIF and IPTC meta data tags; image attributes like width and height; etc. You can even perform search and replace operations on the file name patterns you design!
Moreover the program can act solely as bulk file name renamer utility: you do not have to add any actions to the action sequence, and choose to only rename files instead!
Select Images for Processing with Recursive Image Search and Filters
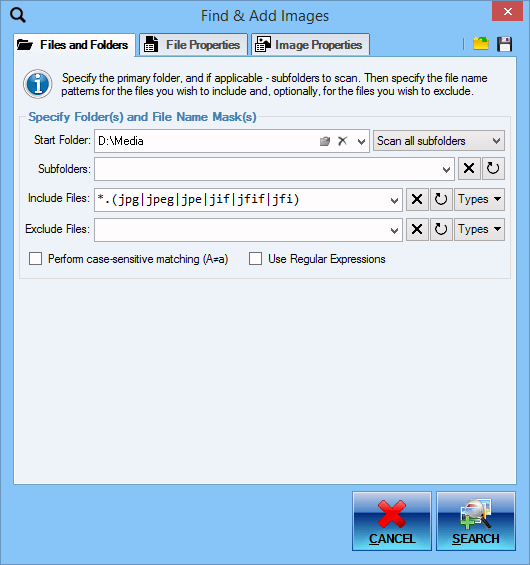
Recursive Image Search
One of the ways you can add images to the image list for processing is by doing a search for all images that match criteria you specify. The program will scan selected directories and subdirectories for any valid images and automatically add them to the list.
- Recursive scanning with customizable depth
- Specify files to include and exclude using highly customizable patterns and masks - much more powerful than your basic wildcards but easier to use than Regular Expressions!
- Specify directories to exclude from search
- Use Regular Expressions to specify file name patterns
- Use case sensitive matching
Note that you can save your customized image searches as templates for future use.
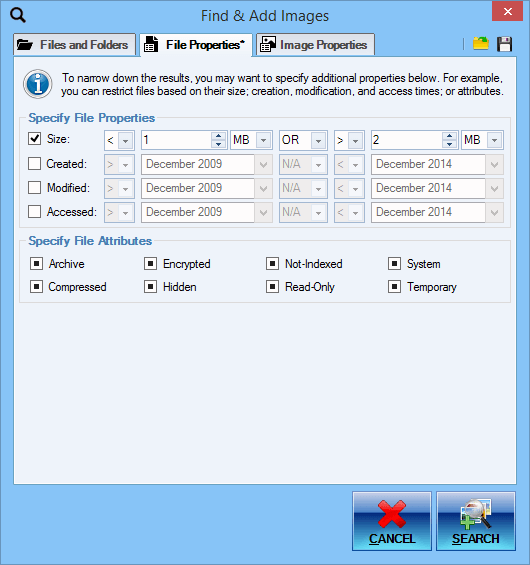
Search for Files Based on Properties
You can find images you need for processing based on file properties like size or creation date, and attributes. This is in addition to basic search by name!
What's more is that you can fine tune these and select the exact ranges for all properties, like setting the size to be between 1MB and 5MB for example. With dates, too, you can be as specific as you want: you may, for example, look for files created on any day in May 2020, or on May 10 2020 specifically.

Find Images Matching Certain Attributes
You can search for and add images for processing using not just their file names and file properties, but actual image properties as well!
Search for images based on their attributes:
- Width and Height
- Area (Pixel Size)
- Aspect Ratio
- Orientation: Landscape, Portrait, Square
- Horizontal and Vertical Resolution
- Bit Depth and Palette Type
- Transparency Type and Color
- Actual Image File Format: JPEG, PNG, BMP, etc...
- Metadata EXIF, IPTC, GPS, XMP, etc...
Find photos with Faces
With built-in face recognition it is possible to automatically find and add for processing only those images that have human faces in them.
You can select from various options like: face size and orientation, face count, etc.
It is possible to use an optional cloud-based face recognition provided by Microsoft if you are not satisfied with the detection results provided by built-in face recognition.
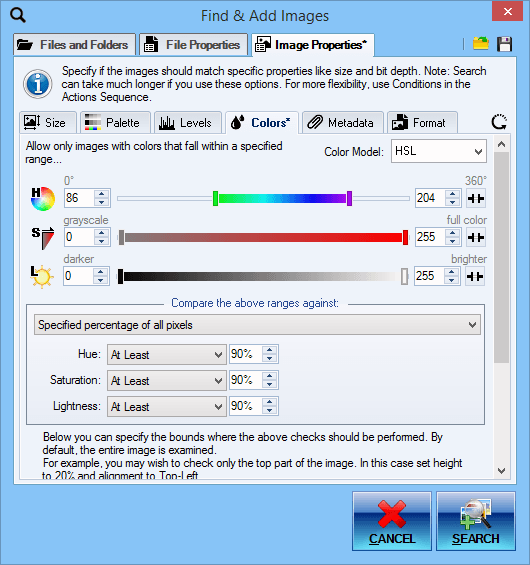
Pixel-Based Image Search
You can search for and add files for processing using their content - that is using their pixels! Maybe you are looking for grayscale or highly desaturated images in a folder that contains various images. Or perhaps you need to find images with a particular dominant hue. These tasks are possible with pixel based image search!
For each image examined, a histogram is computed for the specified rectangular region (or by default the whole image). Then that histogram is evaluated against specified component intensity ranges that depend on the selected color model using selected statistic: mean, median, minimum, maximum, or specified percentage of pixels.
- RGBA, CMY, HSL, HSV, HSI, HWB, CIE Lab, CIE LCH, YCbCr models
- Specify component intensity ranges: Hue, Saturation, Luminosity, etc. (depends on the selected model)
- Specify statistic to check for each range: Minimum, Maximum, Average (Mean), Midpoint (Median), Specified Percentage of all pixels
- Specify rectangular region to check (by default whole image is checked).
Tip Use rectangular region setting if some of your images have a logo in a particular place. This will allow you to add either only the images with a logo or those without logo automatically!
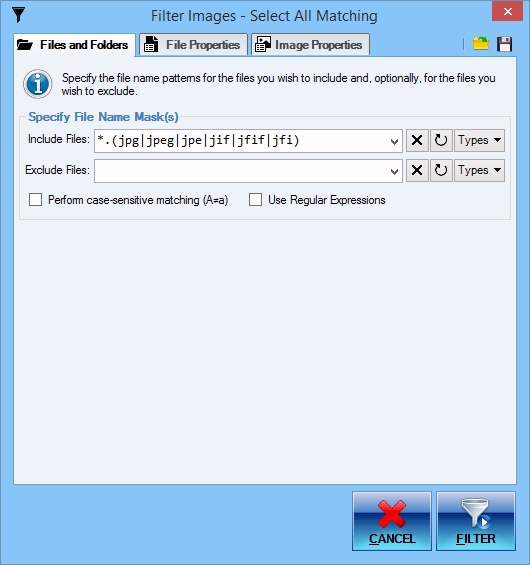
Filter Images In/Out of Your List
You can use built-in Image Filter with identical functionality to the Image Search feature. This allows you to easily remove from the list or select all matching images that are already in your list!
In all of the processing modes, images for processing can be selected using recursive (deep) image search, where the program automatically scans specified directories for images matching desired criteria, such as: file name pattern, extension, size, dates, image width, image height, other image attributes, etc. This has several advantages:
- Program automatically searches for desired images - no need to pick images manually
- Not just file name and attributes, but also image attributes and even content (actual pixels) can be examined
- Complex searches can be saved and reused later
For finding images with file names matching a specific pattern, you can either use extended wildcards with support for positive and negative matches, sub-masks, character ranges, grouping and alternation patterns; or use even more powerful Regular Expressions.
Advanced Wildcards
You can easily add images for processing matching a specific file name pattern and having certain extension(s) with advanced wildcards! Of course, you could use regular Operating System file search, but it is very weak and supports only basic wildcards. On the other hand, Regular Expressions may be too complicated for a trivial task like selecting files matching a give name pattern.
Advanced wildcards, one of Batch Image Resizer's many unique features, is what you would want to use!
| Regular OS Wildcards | Advanced Wildcards | Regular Expressions |
|---|---|---|
Files beginning with lowercase letters a through m and having jpg, bmp, or png extensions: | ||
a*.jpg;a*.bmp;a*.png;b*.jpg;… |
<a-m>*.(jpg|bmp|png) |
[a-m].*\.(jpg|bmp|png) |
Files beginning with file which is not followed by an underscore character _: | ||
| - | file(!_)*.* |
file(?!_).*\..* |
Files beginning with start and not containing skip between start and end: | ||
| - | start*(!skip)*end*.* |
start(?(.*(skip))|.*)end.*\..* |
Files not beginning with page, whose name part ends with a digit, and not having either txt or rtf extensions: | ||
| - | (!page)*#.*(!txt|rtf) |
(?<!page).*\d\..*(?!(txt|rtf)) |
Triggered / Scheduled Processing Jobs
It is possible to create scheduled or triggered processing jobs that will be automatically performed even if the program is not running. And there is no limit to how many such jobs can be created!
For every job you can specify the images to be processed, actions to be performed, output settings, and other processing options.
When the processing job is triggered, depending on the job's setting the program will be automatically launched in either GUI, console, or hidden mode, and the processing will be automatically started. When done, the program will exit automatically.
There are numerous triggers available: daily, weekly, monthly, event-based, etc.
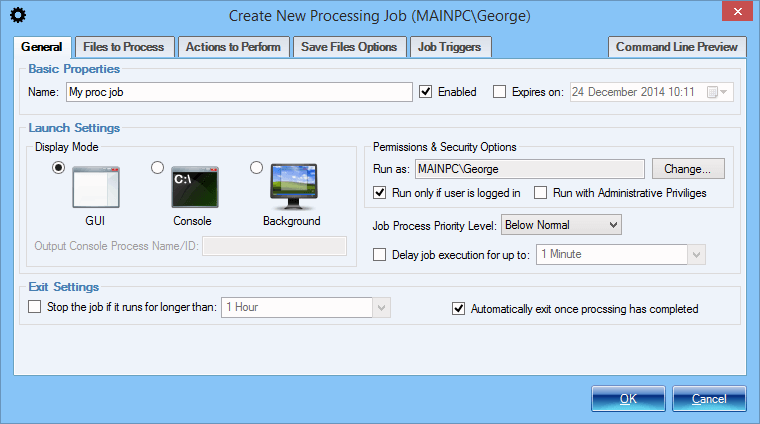
Setup a Processing Job - General Properties
Processing jobs allow you to setup various batch image processing tasks that will be executed on a specified trigger or on schedule.
General properties include: name of the job, general timeframe when the job can be active, operation mode that determines if any UI will be shown, and user account together with security context under which the job will be executed.
Setup a Processing Job - Select Images
There are several ways in which you can specify which images should be processed by a processing job:
- Specified directories will be scanned for files matching a given name pattern
- Specified image search template will be used (see Recursive File Search)
- Specified list of files containing files' full paths will be used.
Setup a Processing Job - Specify Actions
Once you have specified which images should be processed by a processing job, the next step is to specify how these images should be processed, which actions and operations should be performed. This is done by specifying a previously saved Action Sequence.
Additionally you can customize a few other processing aspects like the number of processing threads and logging options.
Setup a Processing Job - Output Settings
Output settings determine where and how the processed images are saved. All the options that are available in Step 3 in Manual and Automatic processing modes can be customized here as well. These include:
- File naming pattern and destination / output folder
- Image File Format and parameters
- Ability to define a third-party tool to execute after processing has finished
- Backup- and file saving- related options

Setup a Processing Job - Triggers
Last step in setting up a processing job is to define a trigger or specify a schedule that will determine when the processing job will actually execute.
The following triggers are available:
- Monthly - job executed on a monthly basis
- Weekly - job executed on a weekly basis
- Daily - job executed daily at a specified time or every specified time interval
- Event-Driven - job executed on a certain trigger like a given system event
Setup a Processing Job - Command Line Preview
A processing job is automatically executed by the means of Windows Task Scheduler Service launching the program on appropriate trigger / schedule and with job-specific command line arguments.
The Command Line Preview tab shows you the exact command line that will be run in order to start the processing job. That way you can launch the program manually with appropriate parameters and have the same processing job be manually started.
Built-In Automatic Preview
With built-in Preview mode you can easily preview how the processed images will look. Preview mode has many features like:
- Side-by-side view showing the original and new image which remain in sync as you pan and scroll.
- Interactive histogram that shows color count information for the previewed image using one of the available color models like RGB and HSL.
- Ability to take named snapshots so you can experiment with various action options and presets more easily by being able to compare snapshot previews with one set of options to the current preview with a different set of options.
- Annotations that let you preview certain operations like image splitting, face detection, and others.

Preview Action Effects
Before you process images you can preview either currently selected action or all actions in the action sequence on the preview image of your choice.
You can toggle Side-by-Side view as shown here, or you can view only the modified version of the image.
You can also toggle histogram below that will display color counts for the displayed image in one of the supported color models.
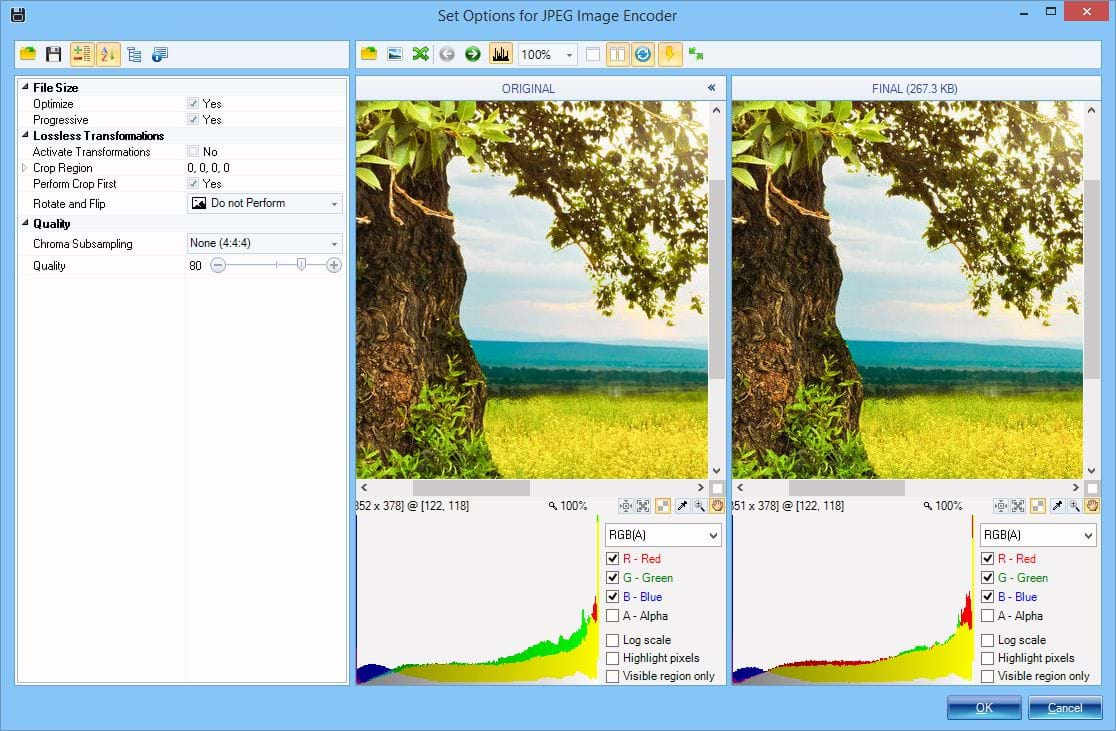
Preview Image Format Options
You can also preview the results of saving an image using a particular image format and its format-specific options like JPEG's quality setting.
It not only shows resulting file size but preview the actual image so you can select appropriate quality by judging how the result looks.
Common Image Processing Tasks
Batch Image Resizer gives you full control when designing the sequence of actions; yet at the same time if you are just starting or want to perform some basic task quickly, the program offers numerous common tasks organized into categories that you can simply click on and see the needed actions be automatically added to the action sequence for you, so you can get started in no time!
Note that with the built-in actions and operations you can do much more than what you can do with common tasks described above! Common tasks by no means represent all of product's functionality, but rather facilitate product's use when it comes to dealing with frequently occurring tasks.
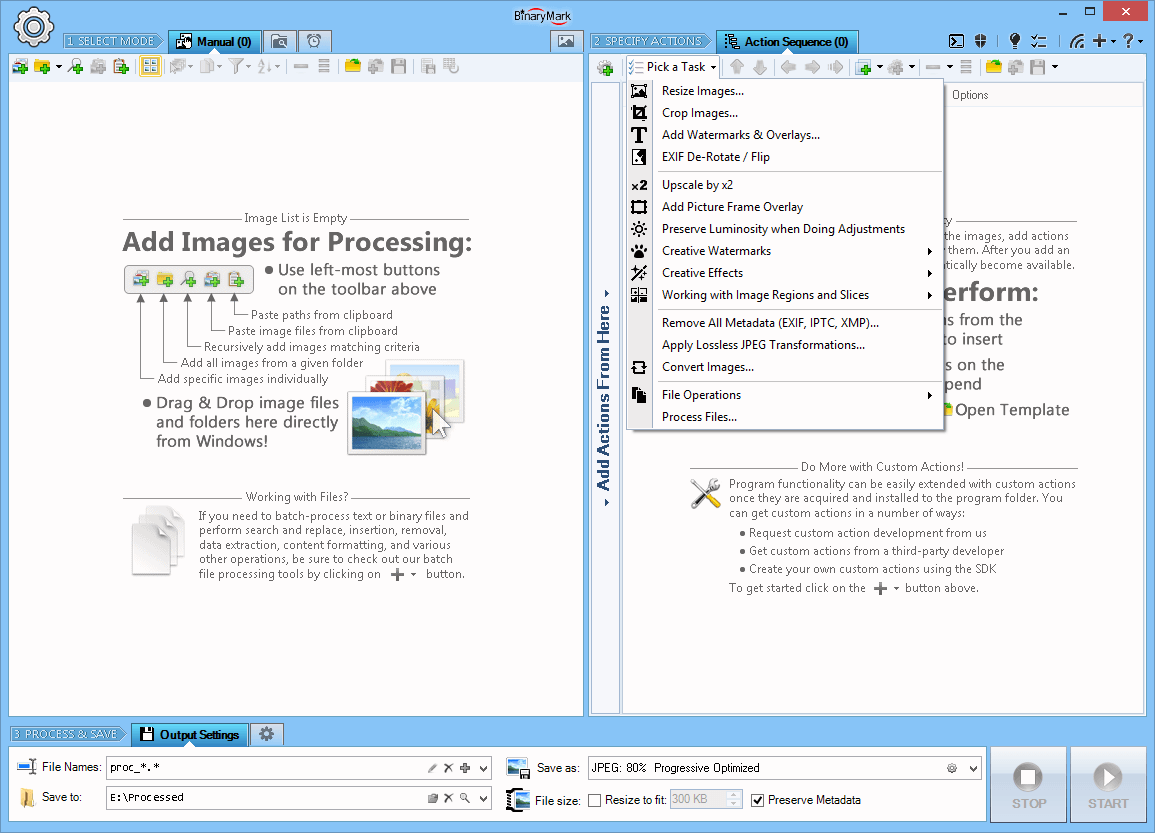
Common Image Processing Tasks
Common Tasks menu offers a quick and easy way to perform a variety of common image operations using built-in helpers, wizards, and templates:
- Resize images
- Crop images
- Add watermarks and overlays
- Rotate and Flip images
- Convert images
- Rename files
- Apply creative effects
Full Command Line Support & Console Operation
Batch Image Resizer has full support for command line operation. It can not only be started from command line with specific options, but it can also run and operate entirely in console window.
A typical usage scenario would be to first specify a sequence of actions to be performed and then save that sequence to a template file. Then you can easily process files entirely from command line using a few switches: input directory and input file pattern, path to a saved action sequence template file, and output directory with file naming pattern.
Some benefits of command-line processing include:
- Ability to launch program and perform image processing on demand or by invoking it from third-party tools
- Perform processing a bit more efficiently without consuming a few extra resources needed to display and update Graphical User Interface
- Manually schedule the program to run with specific parameters using third-party scheduling programs or other automation software
- Execute batch processing tasks directly from Windows Power Shell
- Execution from a batch file with different parameters each time
- Simultaneous execution of several instances
- Faster startup and configuration as predefined command line snippets can be used, and in general typing is faster than manipulating UI elements
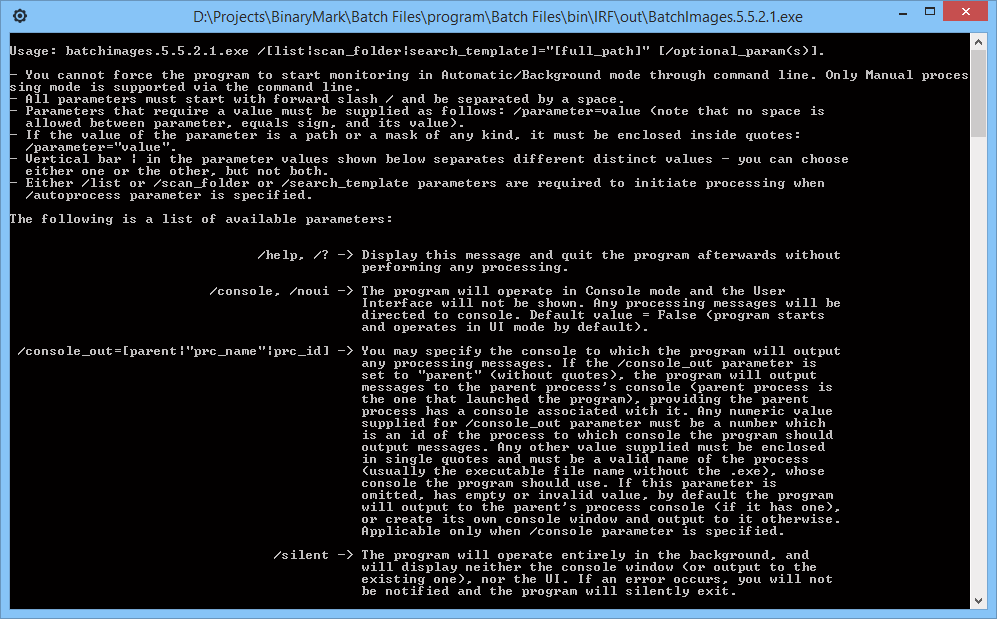
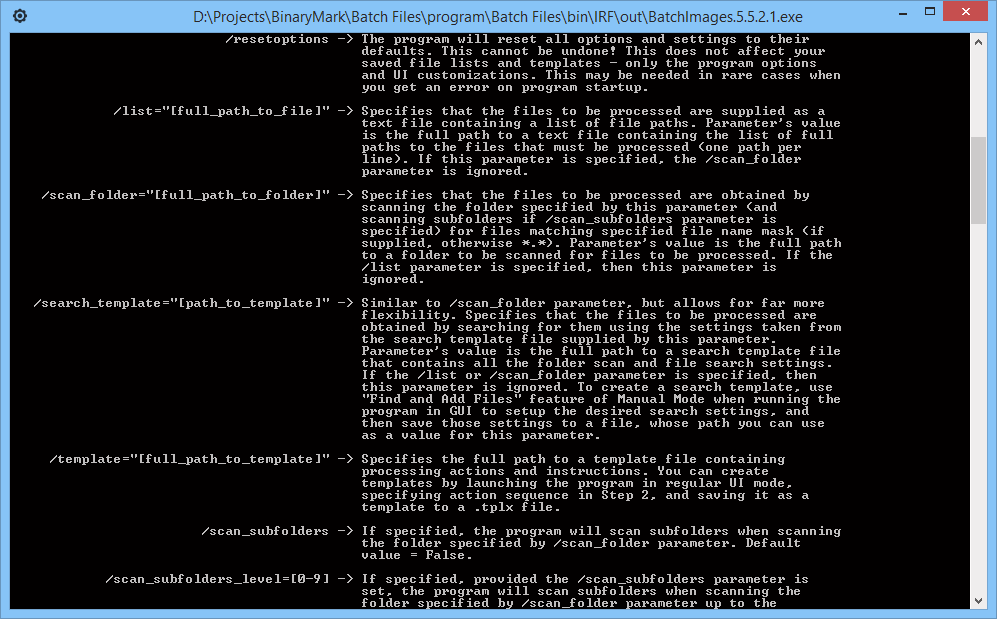
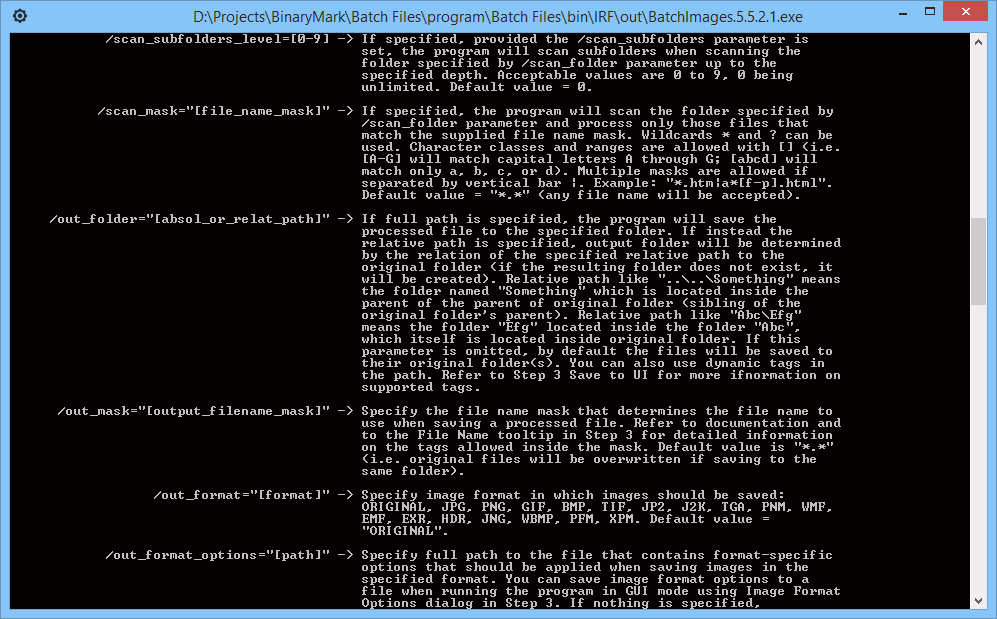
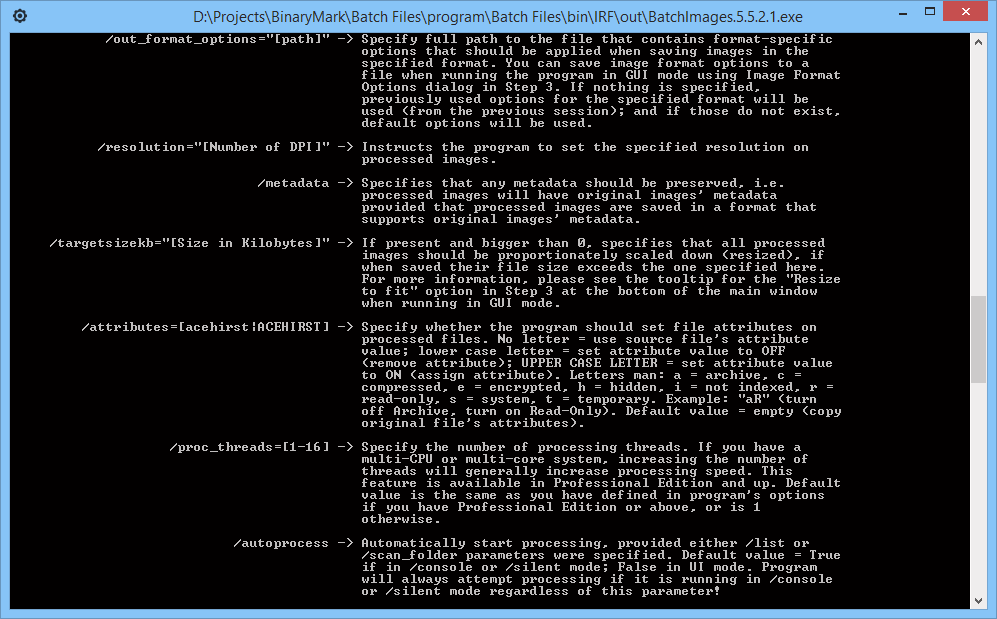
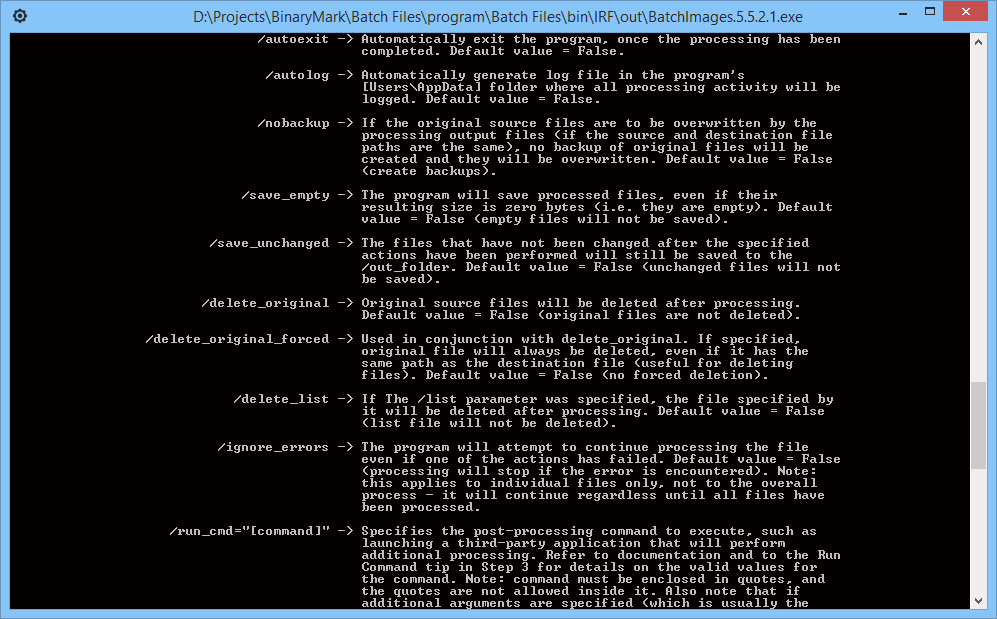
File Operation Helpers
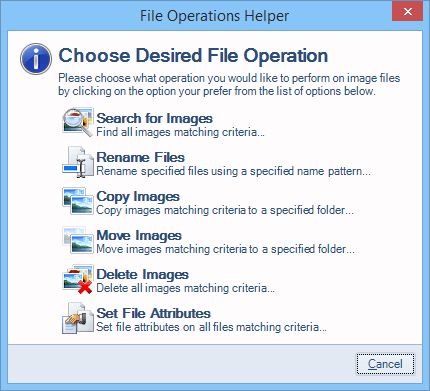
File Operation Helpers make it easy to perform various file-system-related tasks that do not modify images in any way and do not directly correspond to the built-in actions. File Operation Helpers automatically setup the proper output settings depending on the operation you choose to perform.
File Operation Helpers are available for the following operations:
- Find images matching criteria
- Copy and Move images
- Rename image files
- Delete images
- Set or Change file attributes
Customization & Extensibility
Although by itself Batch Image Resizer is a professional product, it cannot possibly offer every feature you may want, or be used in all possible scenarios. This is not a problem however, because this product was built with extensibility in mind from the ground up.
The functionality offered by Batch Image Resizer can be extended in the following ways:
- Software Development Kit (SDK) will let you develop your own actions and conditions that can be directly used by the product just as built-in ones. All that is required is basic knowledge of either C#, F#, or VB.NET and Microsoft .NET Framework 3.5 / .NET Core 3.1 or higher.
- Actions Library will let you use all the various processing actions together with their UI in your own projects. Library is provided as a COM-Compatible .NET DLL that you can use in your own projects to leverage the functionality offered by the various processing actions.
- Custom Development - should you need it, we can customize the product for you so it specifically meets your needs. Batch Image Resizer provides a solid foundation for batch file processing upon which our experienced developers can quickly create a customized, professional solution that meets your needs.
Software Development Kit (SDK)
You can easily extend functionality offered by Batch Image Resizer' built-in actions by designing your own using this SDK as a guide. Batch Image Resizer provides all the basic actions that perform general tasks, such as resize, crop, watermark, etc.; however you may have a need to process images in a specific way, and hence require custom actions.
With this SDK and basic VB.NET or C# programming skills you will be able to create your own custom actions that you can then use from within the program to effectively accomplish your goals. We recommend you use Microsoft's free Visual Studio Community to develop your extensions using this SDK, but of course if you have Visual Studio, SharpDevelop IDE, or any other IDE capable of producing .NET 3.5 libraries, you can use it as well.
Actions Library
Actions Library is provided as a COM-Compatible .NET DLL that you can use in your own projects to leverage the functionality offered by the product's various processing actions. Whereas with SDK you extend the product with the actions you create, with Actions Library you extend your own solution by utilizing the functionality of the product.
For example, if you want to use image processing capabilities offered by Batch Image Resizer, with the Actions Library you will be able to do just that.
Actions Library needs to be acquired separately from the main product. So, please contact us to get Actions Library. We will also be happy to answer any questions you may have regarding licensing, pricing, integration, and other issues.
Let Us Customize Batch Image Resizer for You!
If Batch Image Resizer is not exactly what you are looking for, we can customize it for you so it specifically meets your needs! It can be done at a low cost to you, as Batch Image Resizer provides a solid foundation upon which new features can be effectively added by our experienced developers to quickly create a customized, professional solution that meet your needs!
Keep in mind that contracting us to customize the product will be much cheaper and faster than hiring a programmer or doing the work with your own resources, as we have extensive experience in the area of custom development, and what's more - Batch Image Resizer is a solid foundation upon which all the extra functionality that you desire can be built. Thousands of man-hours and over 100000's lines of code went into the creation of Batch Image Resizer, so recreating even part of its functionality from scratch would require lots of resources.
Do you need customization?
- The product does not exactly meet your needs?
- Some feature you would like to use is not in the product?
- Would you like to add another action or operation?
- Need more options and customizations?
- Want to integrate the product with your existing business logic?
Custom Development Benefits
- No programming skills are required - we do everything for you!
- Low-cost professional development by experienced team
- Fast development because it leverages existing product and infrastructure
- Professional User Interface and familiarity as new features are integrated into existing product
- Royalty-free, flexible licensing model
Look no further! Contact us to request a quote and start custom development!