
Batch File Split & Join
Split and merge multiple text and binary files with this powerful tool!
Split one or more files based on either characters, lines, or bytes
Merge multiple files together on either characters, lines, or bytes
Split using specified text or binary separator
Split targeting specific number of parts or specific part size
4 Operation modes: manual, automatic / continuous, scheduled / triggered, command line!
How it Works
Choose Processing Mode and Select Files
Batch File Split & Join can process files in 3 distinct modes:
- Manual Mode - files are selected for processing, which is then started manually by clicking on the Start button
- Automatic / Background Mode - "monitors" are setup that scan specified folders for either existing, new, or modified files matching criteria, which are then automatically processed once the program starts "monitoring"
- Scheduled / Triggered Mode - processing is performed by processing jobs that can run on schedule or be started on specified events
In Manual mode files for processing can be selected and added to the processing list in multiple ways:
- One by one or in groups
- All from a given directory
- Recursive searching for files with names matching a pattern
- Drag & drop from Windows Explorer
- Paste from clipboard, paste paths
- Import from text-based file containing paths
- Right-clicking on selected files or folder in Windows Explorer
Split or Join Files
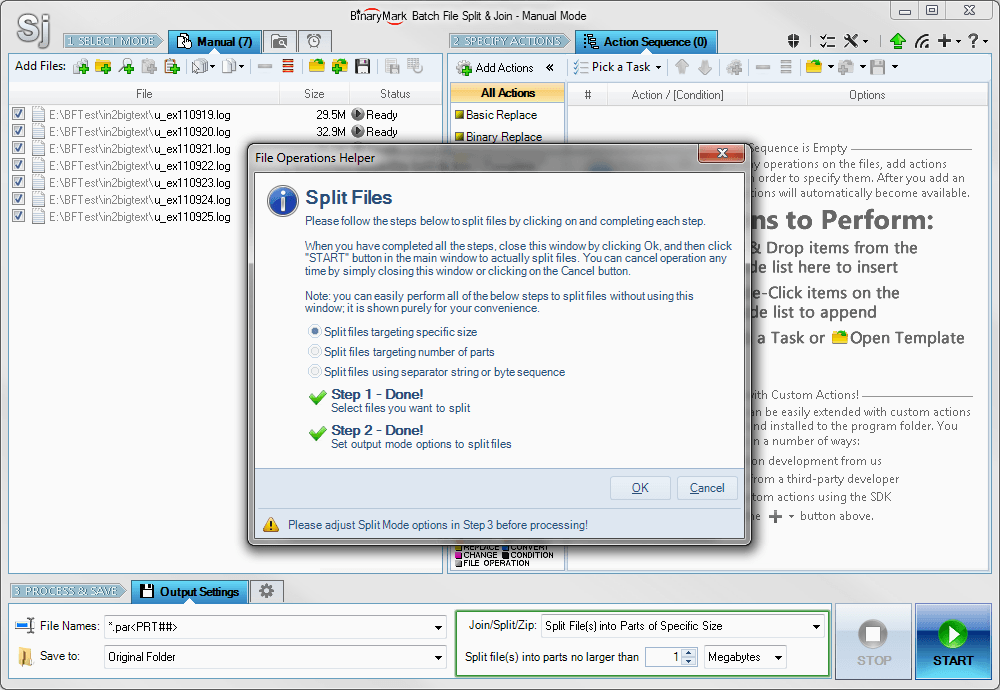
Once the files you wish to split or join have been selected, pick the task you want to perform from the Pick a Tasks menu. A helper dialog will appear like the own shown here. It will guide you through customizing the operation you want to perform.
For example, if you want to Split files, it lets you select the kind of splitting you wish to perform: split by separator, split into parts of a given size, or split into a given number of parts of the same size.
Top Features
- 4 Processing Modes Manual, Automatic / Continuous, Triggered / Scheduled, Command Line.
- 4 Output Modes: normal, split files, join / merge files, zip files.
- Conditional Processing lets you perform different operations with different files.
- Advanced File Naming and Renaming: use file properties, random characters, EXIF tags, perform search and replace.
- Advanced File Search: advanced wildcards, file properties, regular expressions, search in file contents.
- Complete Unicode Support throughout the program.
- Extensive support for Regular Expressions (RegEx) throughout the program.
- Can be integrated with Windows Shell.
- Very detailed processing logging capabilities.
- Fast multi-threaded processing that can utilize all available cores/CPUs.
- Run multiple program instances simultaneously.
Split and Join Files by Choosing Output Mode
Joining and splitting can be done at either binary level by bytes or at the text level by either characters or lines.
Joining / Merging Files Together
When joining by bytes, the files are aligned so that the last byte of the first file comes right before the first byte of the second file. For character and line modes this works the same way, except the alignment occurs at the last/first character and the last/first line respectively.
Splitting Files
For splitting you have 3 options:
- Split using separator - choose the type of a separator (text or binary) and enter the separator in the provided space. If binary separator is used, it is entered in hexadecimal format.
- Split into parts of a given size - specify the size of the file part in terms of bytes, lines, or characters. The number of file parts may be different for every file processed.
- Split into N parts - specify into how many parts you want every processed file to be split. Every file will be split into the same number of parts, but the parts belonging to different files may have different sizes.
Zipping Files
In Zip mode files are put together into root directory of a single zip file and optionally compressed. This mode is similar to Join mode, in that in the end only one output file is produced, - in this case it is the zip archive containing processed files. All the files inside the archive are named according to the file name pattern that you specify.
Join / Merge Files Output Mode
In Join output mode, processed files will be joined together. Files will be joined in the same order as they appear in the file list.
Files can be joined either in binary mode at the byte level, or in text mode either at the character or line level (subsequent files are put on the new line).

Split by Separator Output Mode
In Split by Separator output mode, each processed file will be split into parts by the specified either text or binary separator (entered in hexadecimal format). Typically if N separators are found, file is split into N + 1 parts (unless file starts or ends with a separator, or several separators appear one after another).
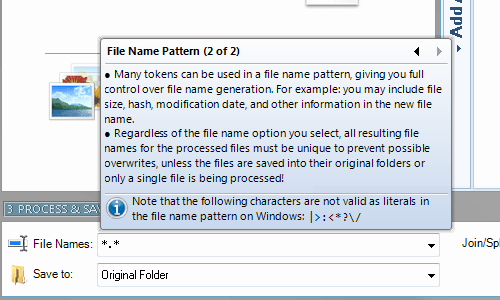
When choosing output file name pattern, you can specify where the dynamically generated file part number should be included in the file name. By default, numeric code is appended to the end of file's full name.

Split into Parts Output Mode
In Split into Parts output mode, each processed file will be split into specified number of parts of equal size. The number of parts will be fixed, but their size may be different, depending on the size of original file.
When choosing output file name pattern, you can specify where the dynamically generated file part number should be included in the file name. By default, numeric code is appended to the end of file's full name.

Split by Size Output Mode
In Split by Size output mode, each processed file will be split into parts of specified size. The number of parts will vary depending on the size of original file.
When choosing output file name pattern, you can specify where the dynamically generated file part number should be included in the file name. By default, numeric code is appended to the end of file's full name.

Zip Output Mode
In Zip output mode, processed files will be put into a single zip archive into its root directory and optionally compressed using deflate compression algorithm.
This mode is similar to Join output mode, except the files are put into an archive instead of simply being joined together, and their output file names will be preserved in an archive.

File Operations Helpers
File Operation Helpers make it easy to perform certain file-related tasks that do not directly correspond to the built-in actions. File Operation Helpers automatically setup the proper output settings depending on the operation you choose to perform.
File Operation Helpers are available for the following operations:
- Copy and Move files
- Rename files
- Delete files
- Set or Change file attributes
- Split files
- Join / Merge files
- Generate hashes of files' contents
- Encrypt / decrypt files
Note different file operation helpers are available depending on the product you are using.
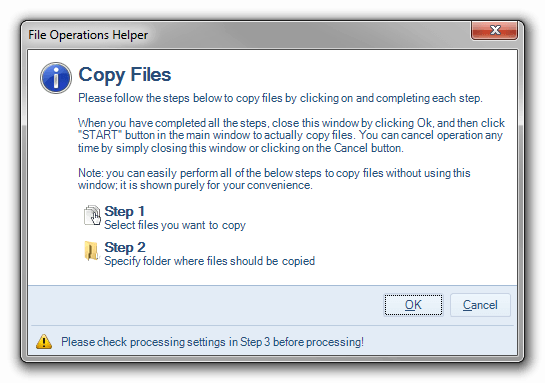
File Copy Helper
This dialog helps you copy files matching criteria you specify.
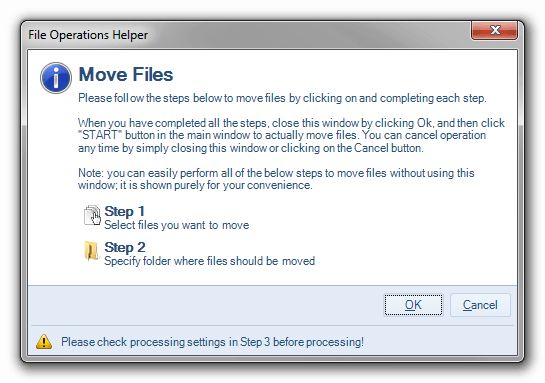
File Move Helper
This dialog helps you move files matching criteria you specify from one folder to another.
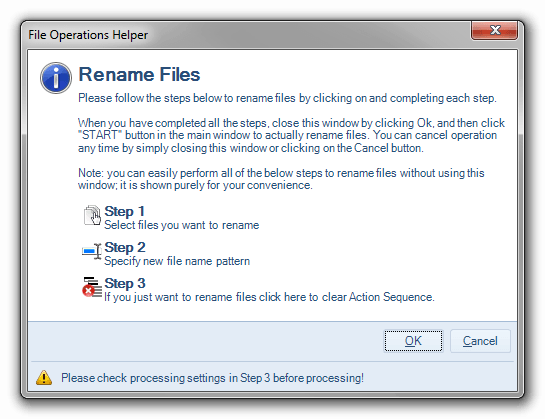
File Rename Helper
This dialog helps you rename multiple files matching criteria you specify according to the specified pattern.
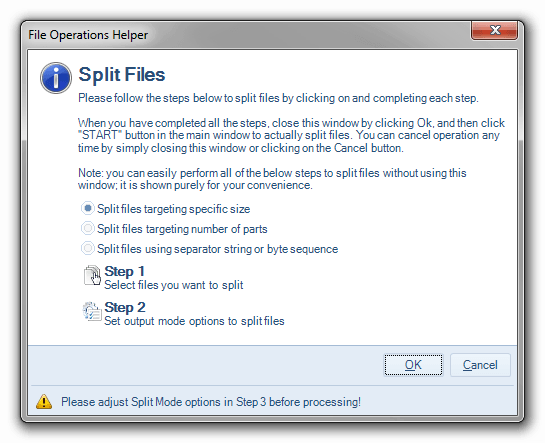
Split Files Helper
This dialog helps you split multiple files matching criteria you specify.
You can split files into parts of a given size or into specified number of parts.
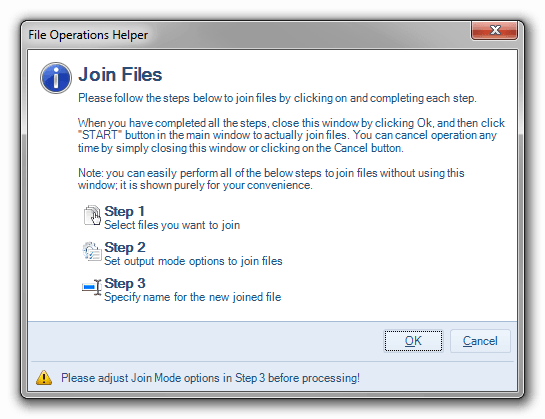
File Merge Helper
This dialog walks you through the process of combining multiple files into one using specified options and merge mode.
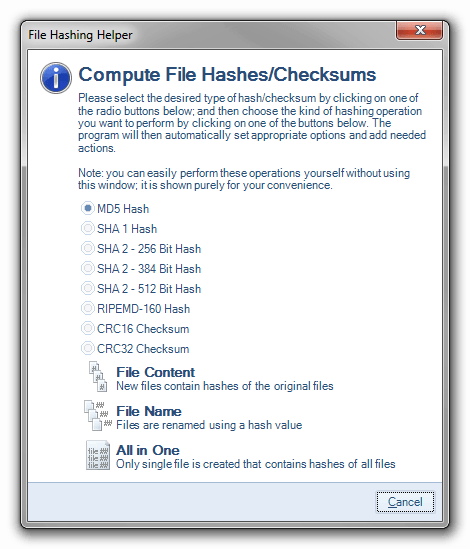
File Hash Calculator
This dialog lets you specify how you want the file hashes to be generated and where the output should be saved.
Get Started Quickly
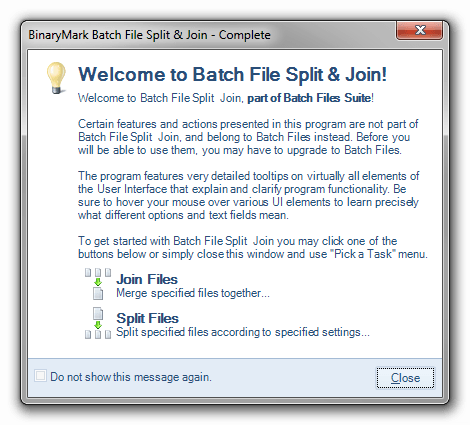
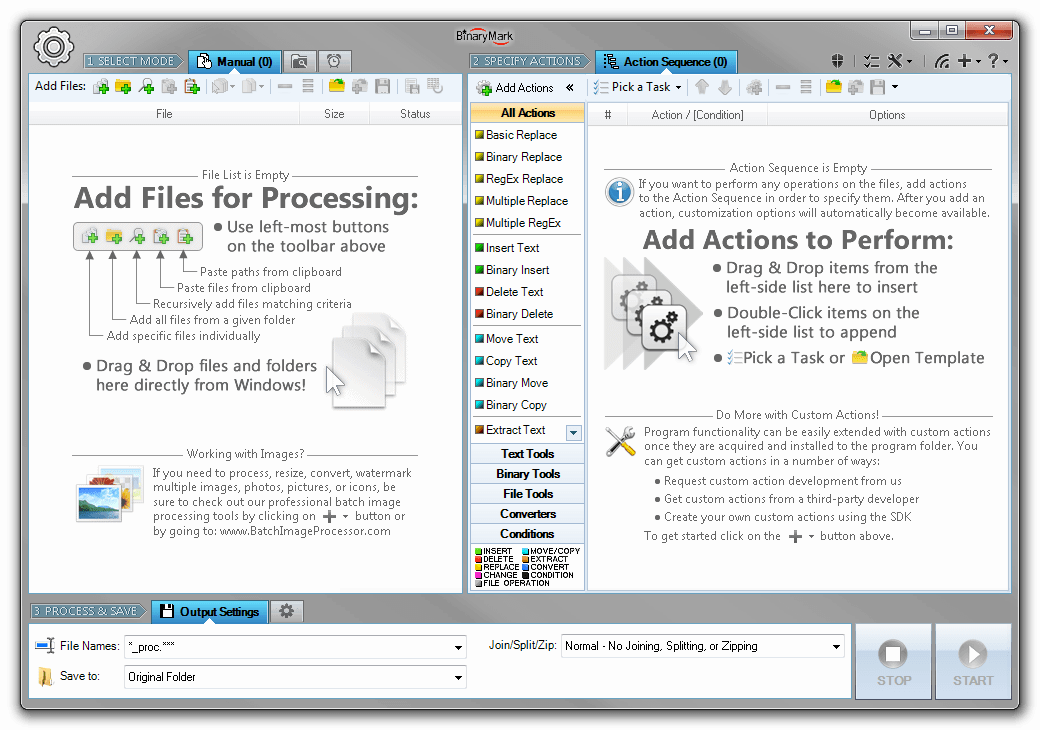
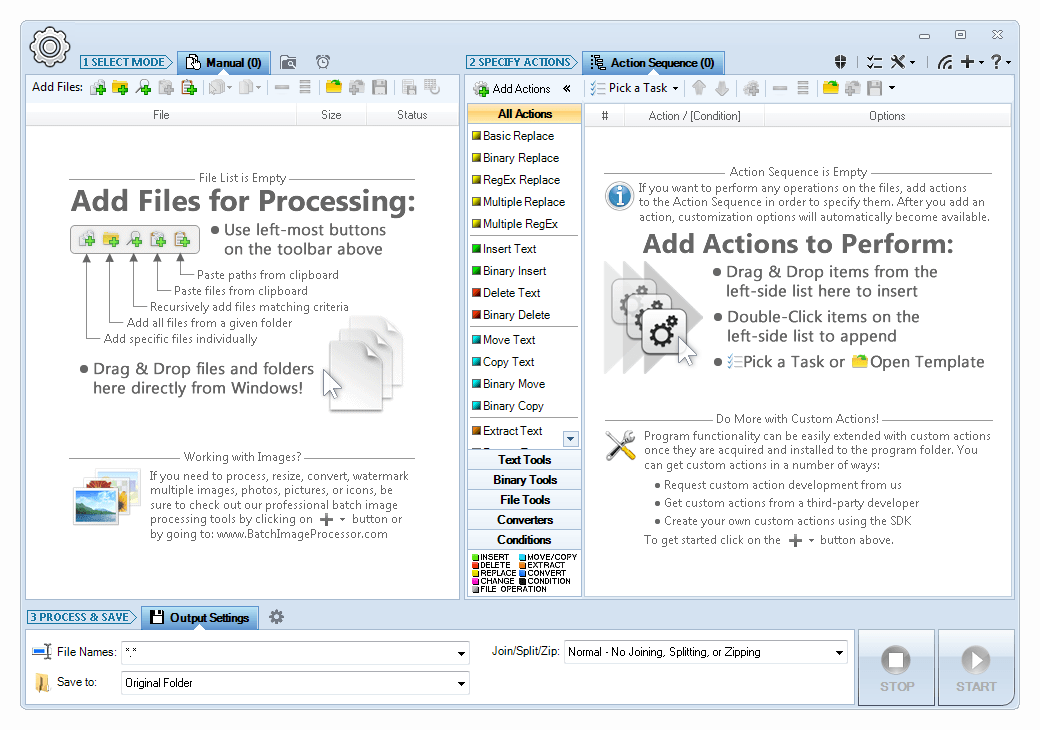
When you run the program, it greets you with a welcome screen, explaining how to get started right away.
Manual Processing Mode
In Manual Mode you explicitly select files for processing in a variety of ways. You can drag & drop files from Windows Explorer; paste them from clipboard; add all files from a given folder; add specific files by selecting them from a list; search for specific files that match given criteria; or paste file paths.
Additionally you can further refine the file list by unchecking the files you wish to temporarily exclude from processing.
When satisfied with file selection, you can then manually process the whole batch. Processing can be started as long as the file list contains at least one checked file.
Manual Processing Mode
In Manual Mode the program processes files only upon explicit initiation (when you add files, and click on the Start button).
Files can be added to the processing list in a variety of ways:
- Files can be selected individually
- All files from a particular folder can be added in one click
- Recursively scan directories and look for files that match given criteria
- Drag and drop from Windows Explorer / Folder / Desktop
- Import from a text-based list of file paths
- Paste from clipboard
- Open from previously saved file list
- Directly from Windows by selecting files in Windows Explorer, right-clicking, and launching the program that way (selected files will be automatically added)
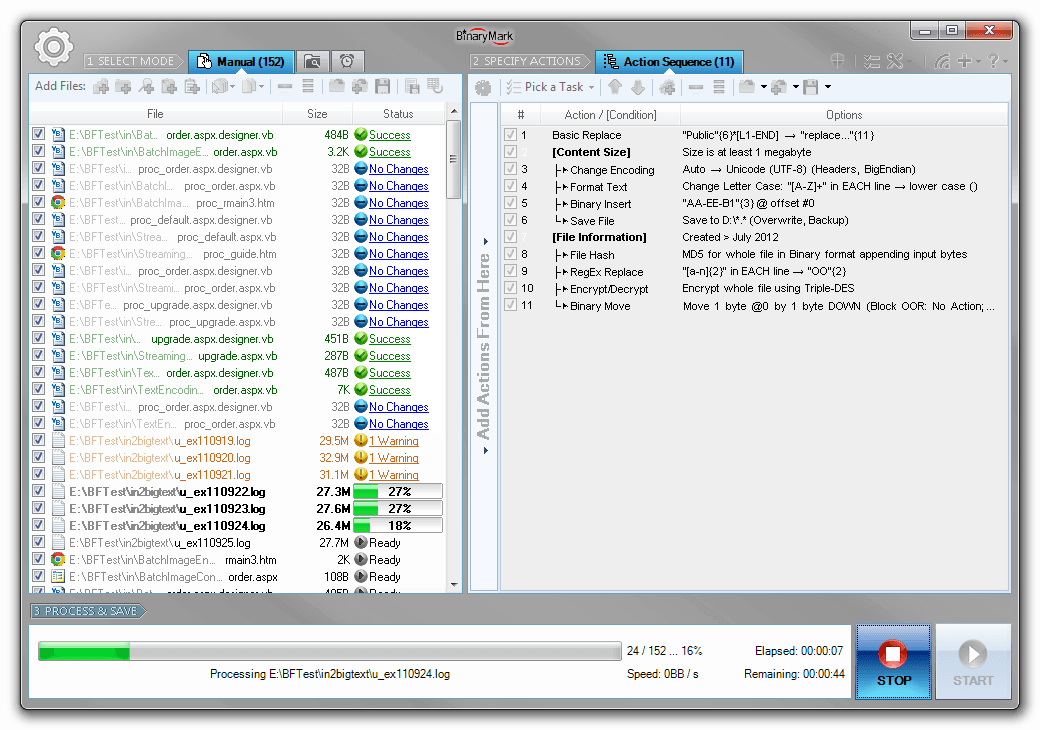
Processing in Manual Mode
When files are processed in Manual Mode, a detailed progress is displayed right within the file list, letting you know which filea are being processed and what is the processing stage. A processing result will be displayed in the file list as well once the file has been processed. You can then click on that processing result to see a detailed processing log for the file.} else if (Model.ISBI) { - all through a visual pie chart.
In addition, you can easily filter the file list by processing result status. For example, you may remove all successfully processed files with just one click, leaving only those that had issues or were skipped.
- Add and remove files easily
- Save file list for future use and append existing lists
- Temporarily prevent processing of certain files by unchecking them
- Files are color-coded after processing, making it easy to spot problems
- File path is intelligently drawn whereby file name stands out from the whole path, the start and the end of the file path are always visible
- An icon is displayed next to every file making it easier to identify file type
- Detailed tips appear when you hover over files displaying file properties and even file's contents
- Processing result is displayed right within the file list with appropriate icon and a link to a detailed log
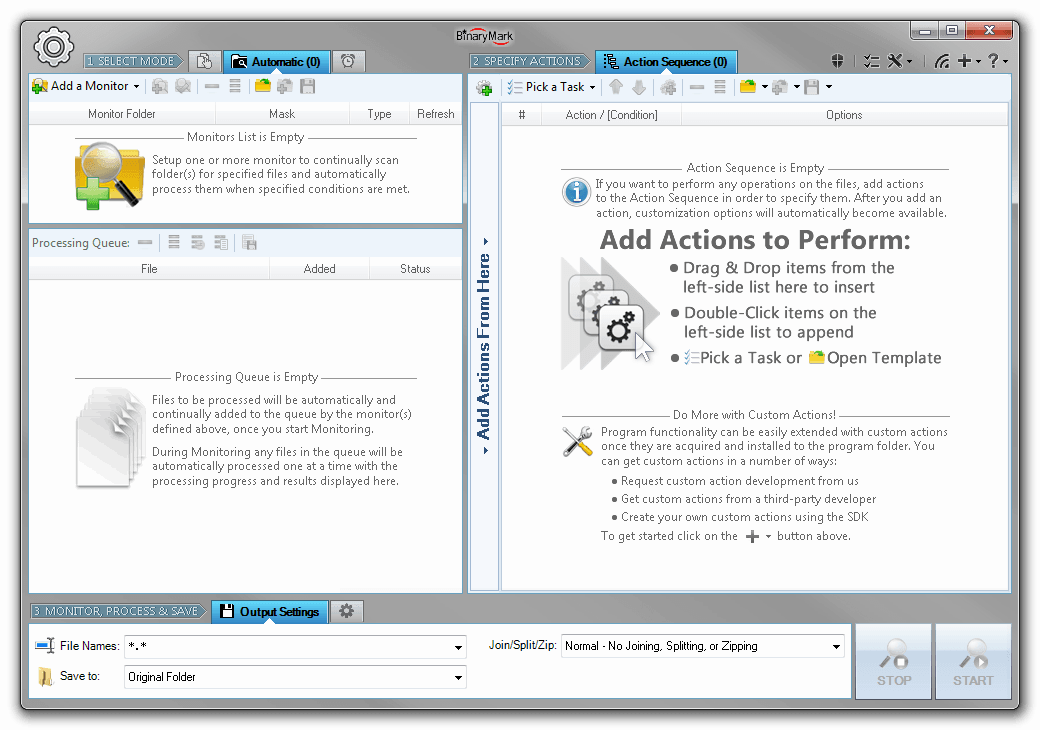
Automatic / Background / Continuous Processing Mode
In Automatic Mode, instead of selecting specific files for processing, you setup "monitors" that tell the program which files should be processed and when. The processing is performed automatically and continually when the specified conditions are met and the program is in the active monitoring mode.
A monitor works by performing periodic scans of the specified folder(s) for all the files that match given criteria and satisfy monitor's behavior type (see below). All matching files that were found by the monitor are then put into the processing queue. Periodicity of the scan/check can be controlled and can range anywhere from 1 minute to several hours or even days.
Depending on the monitor behavior type, file processing may be initiated under different conditions:
- File is Present - processing is performed on all files matching criteria located the monitored folder (same file may be processed multiple times unless destination and original file paths differ and the original files are deleted after processing).
- File was Modified - processing is performed on all files that have been modified since the last time the monitored folder was checked.
- New File was Added - processing is performed only on the new files that were added to the folder since the last time the folder was checked.
There is no limit to how many monitors you can setup — it only depends on the system resources that are available to you. The monitor setup can be easily saved to a template file for future use.
Once you have setup the monitors and actions, you can start monitoring and processing files. Unlike the Manual Mode, processing in the Automatic Mode can be paused, so you can edit both the monitors and actions in the Action Sequence, and then safely resume processing.
Automatic Mode is ideal for cases when your workflow involves continually working with small batches of files that are coming in periodically and require similar kind of processing.
Automatic Processing Mode
In Automatic Mode, instead of selecting specific files for processing, you setup "monitors" that tell the program which files should be processed and when; and the processing is performed automatically and continually when the specified conditions are met.
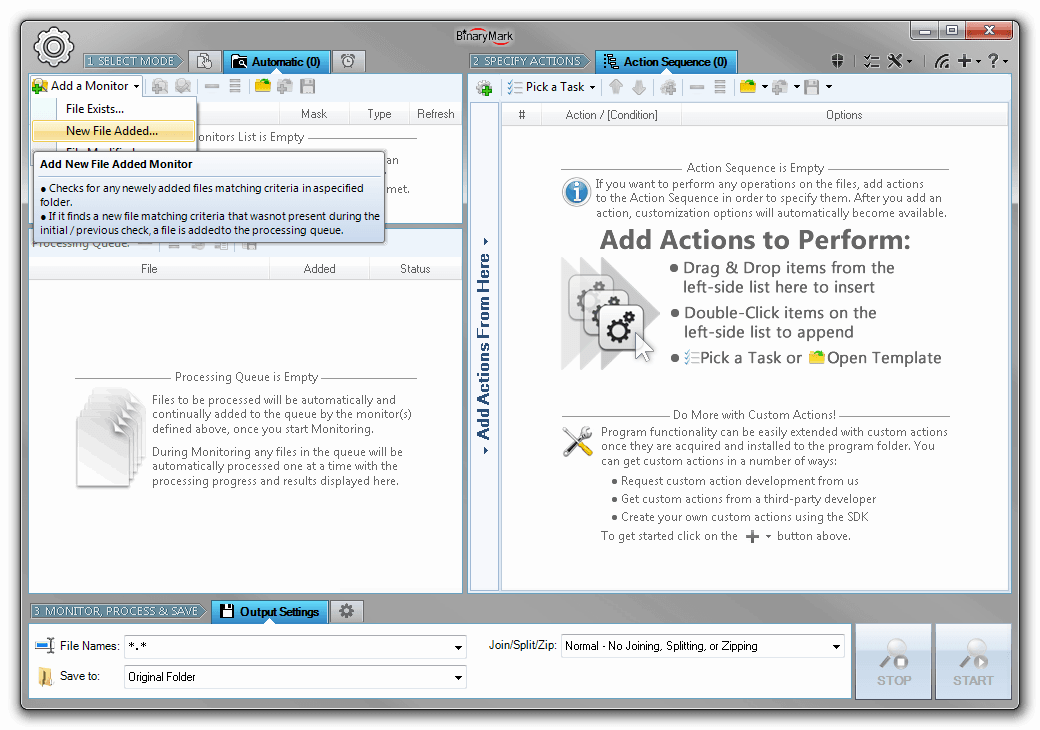
3 Types of Monitors
The program supports 3 kinds of monitors: File Exists, File Added, and File Changed. Depending on the kind of monitor you setup, the processing will be triggered only when appropriate condition is met.
For example, if you set up a File Exists monitor, the program will always process all qualified files in the monitored folder as long as they are present; however if you set up a File Added monitor, the program will process only the new files that have been copied to or moved to the folder since the start of its monitoring.
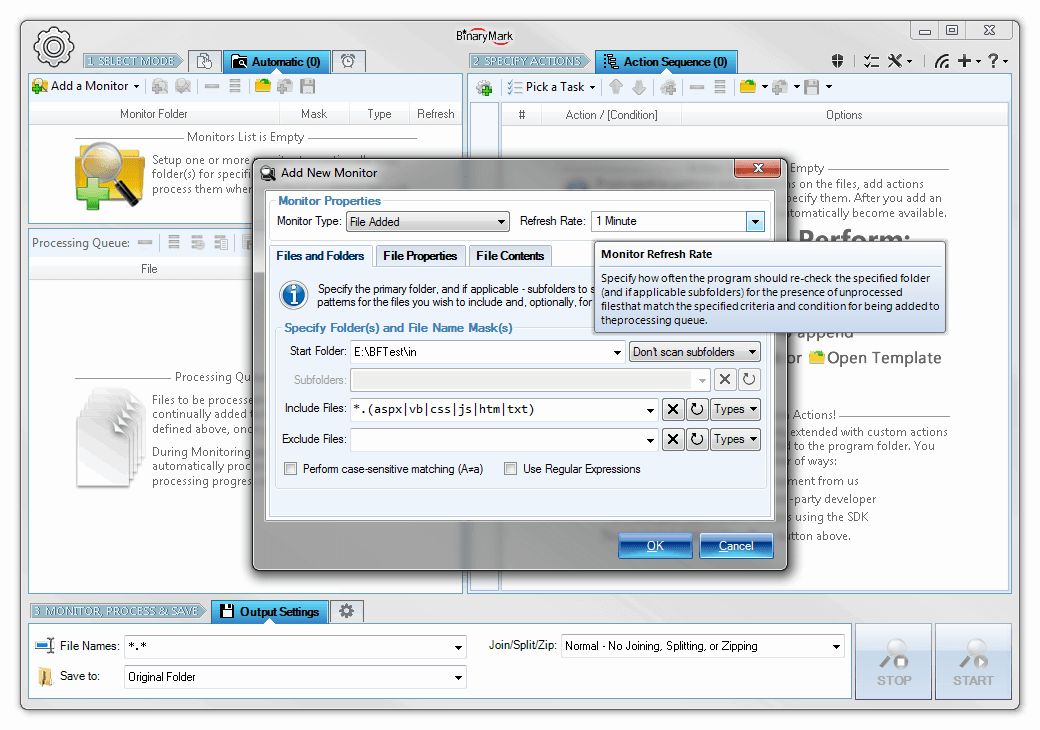
How Monitors Work
The monitors work by continually scanning the specified folder (directory) and subfolders for specified files that match a predefined naming pattern (mask) as well as other properties. The scanning happens at equally spaced time intervals that you define (refresh rate).
Among the file properties that may be examined are: file size, file dates, file attributes. Thus Batch File Split & Join will enqueue for processing only those files that match all the requirements specified in the monitor.
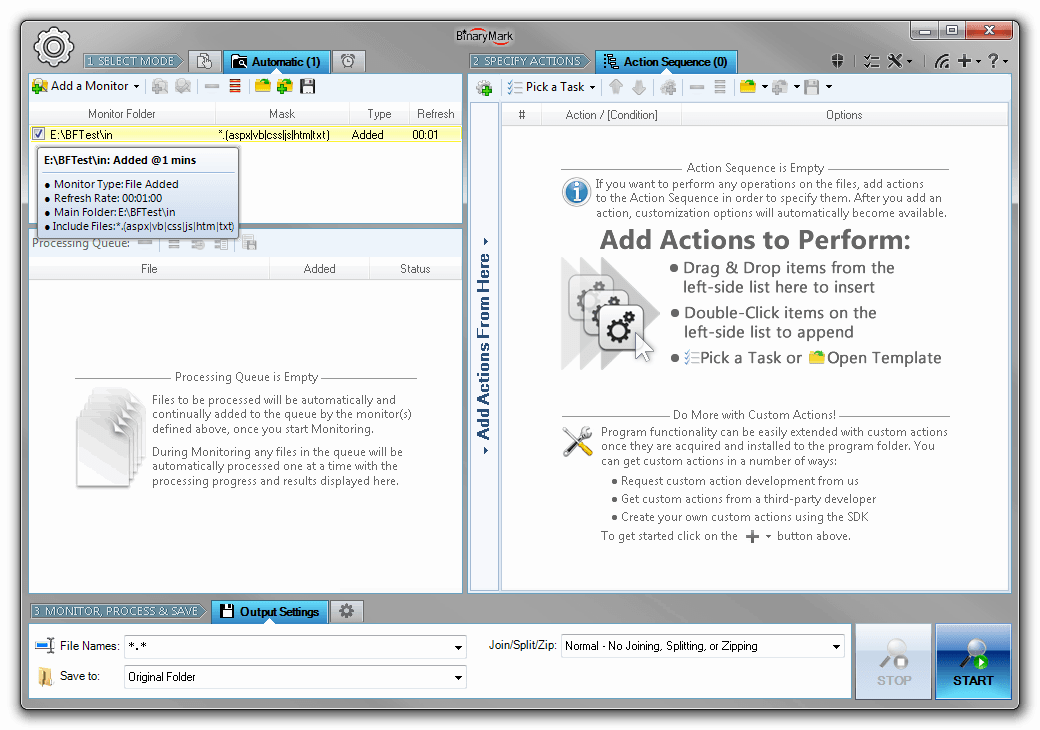
Monitors List
After a monitor has been set up, it will appear in the list of monitors.
You can define as many monitors as you like subject to the system resources you have and the product edition that you are using. Additionally, monitors can be enabled and disabled with a single click.
You can also save and open monitor lists easily, so you can reuse your monitor setups later.
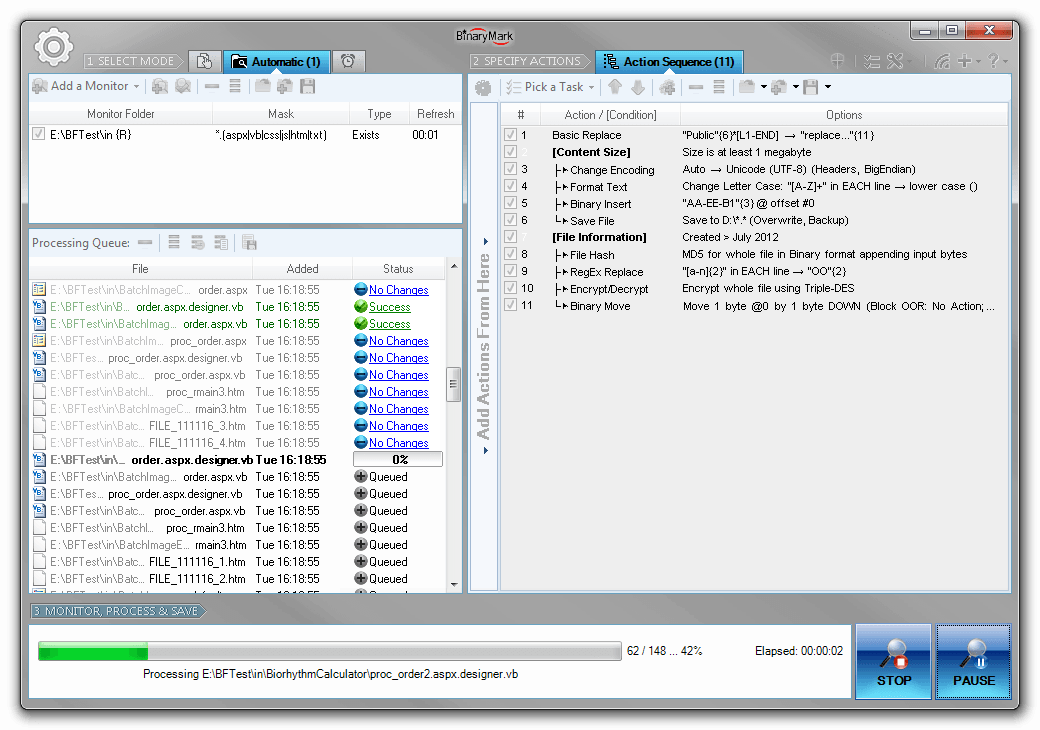
Processing in Automatic Mode
In automatic mode processing works in 2 stages. First, the monitor(s) scan the specified folder(s) for any valid files, and add them to the processing queue. Then the program automatically processes all the files in that queue. These 2 stages need not be consecutive, as the program begins processing as soon as the queue is non-empty.
Unlike in the Manual Mode, in the Automatic Mode you can pause processing, make the changes to the actions in the actions sequence and / or the monitors, and then resume.
Triggered / Scheduled Processing Mode
Triggered or Scheduled Processing Mode lets you define different processing jobs that can be executed on schedule or a particular trigger, such as: on every Monday at 2:00; at Logon; on a particular system event; etc.
The program does not need to be running for the processing job to be activated - it will be automatically started with the right command line parameters at the right time by Windows Task Scheduler Service (which needs to be enabled for this feature to work) and begin performing the tasks defined by the processing job.
Processing jobs are easily managed within the program, but should the need arise, you can also modify their properties in Windows Task Scheduler directly.
Batch File Split & Join can perform processing jobs in 3 different modes:
- Command Line Mode - only the console window will be displayed.
- GUI Mode - program is launched and performs processing displaying progress in regular Graphical User Interface.
- Invisible Mode - no user interface of any kind is shown, and the processing job is performed in the background.
All processing jobs can be different: for every job you can specify not only the trigger or schedule that will determine when it runs, but also the files to be processed, actions to be performed, output file name pattern and directory, and a host of other options.
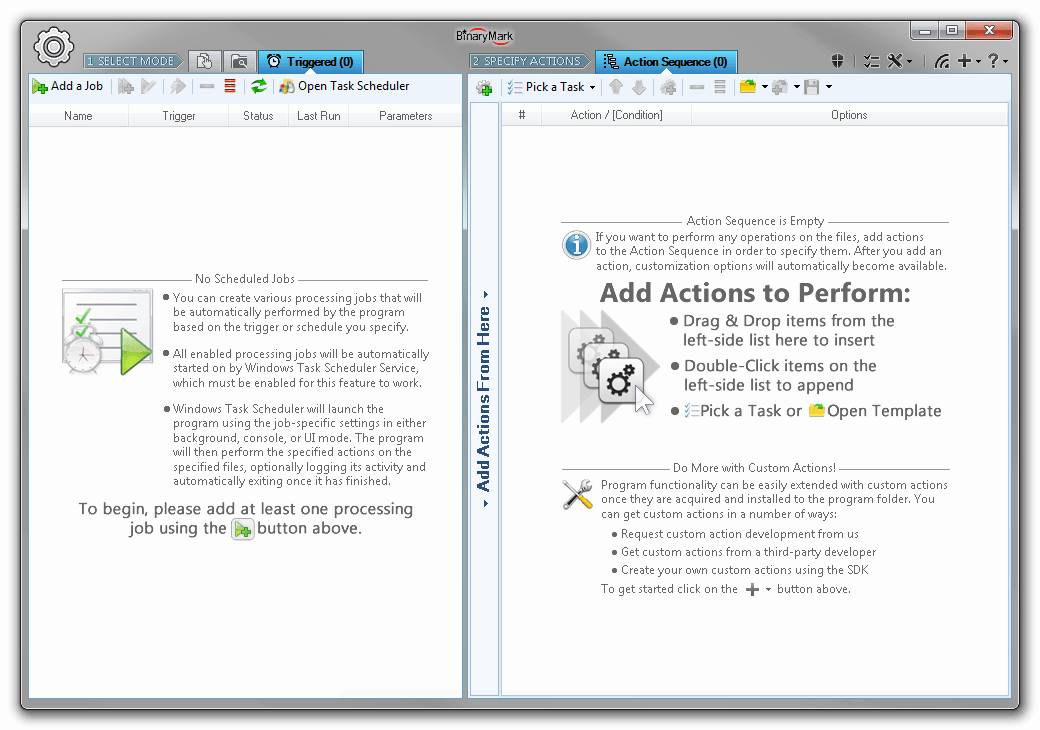
Triggered / Scheduled Processing Mode
In Triggered or Scheduled Processing Mode, file processing is started upon a specified event (trigger) or at a specific time as per the specified schedule.
You can create as many triggered/scheduled processing jobs as you want - all with different schedules, files to process, actions to perform, and other settings.
Batch File Split & Join need not be running in order for the processing jobs to be activated, the program and processing is started automatically by Windows Task Scheduler Service.
Creating Processing Jobs
Creating a processing jobs is straight forward. You define some general settings such as job's name, mode of operation. Then you specify the job's schedule or trigger that will determine when the processing job is actually ran. Finally you specify the which files should be processed; how the files should be processed (which actions should be performed); and where the processed files should be saved.
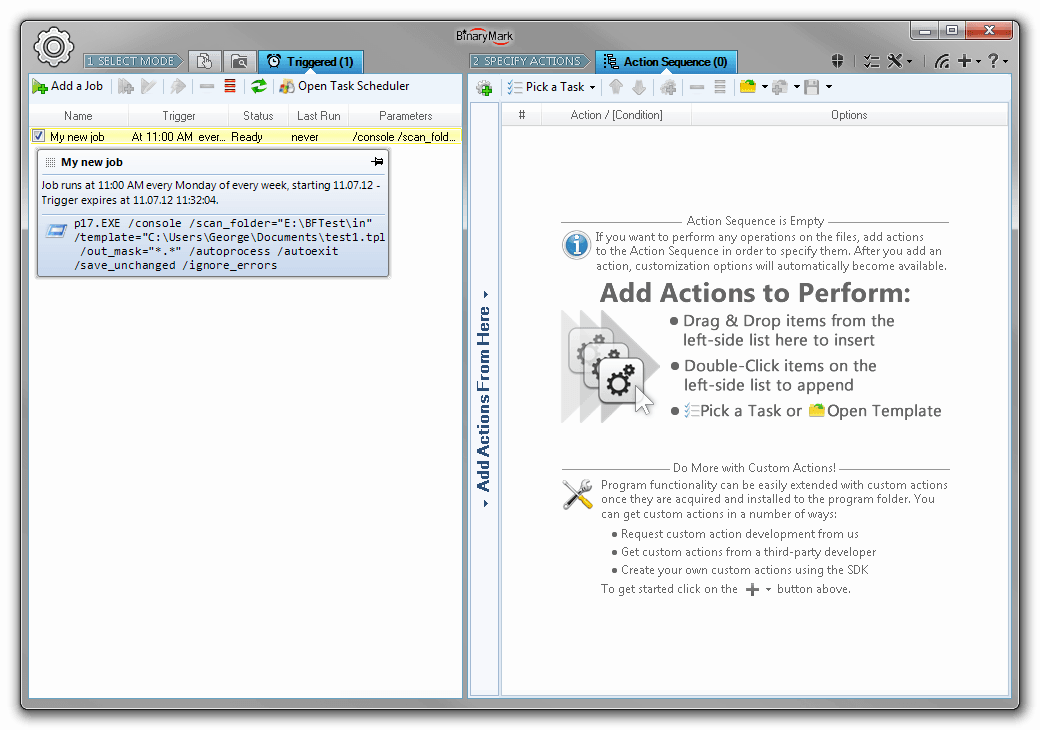
Managing Processing Jobs
Once the processing job has been created, it appears in the list of processing jobs. This list reflects all the jobs that have been created and are registered with Windows Task Scheduler Service which is responsible for job's execution.
Jobs can be enabled and disabled with a single click by putting or removing the checkmark next to the job's name in the list.
Processed Files Naming Options
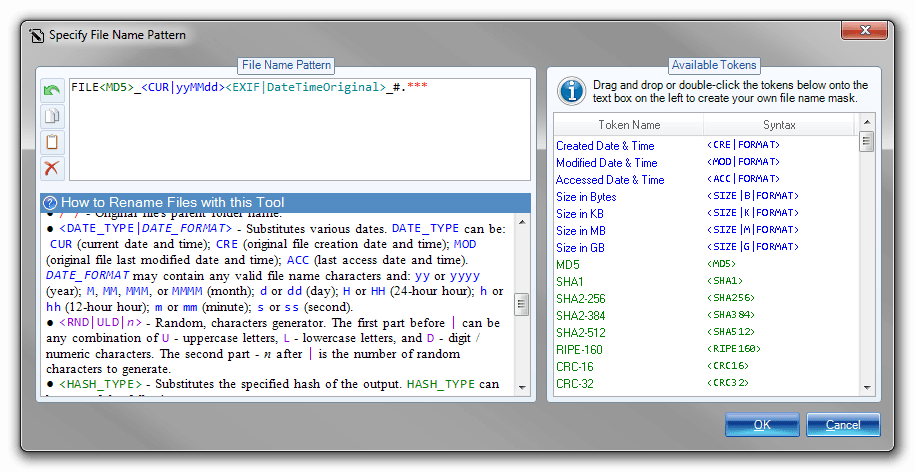
Rename Files
You can give processed files any name you desire with the powerful built-in file name designer tool. It features simple drag & drop user interface that lets you select various tokens from a list of almost 100 and use these tokens as part of the generated file name.
The tokens may represent either dynamically generated content that can be included as part of the file name, or a command that somehow modifies the part of the filename that has already been generated (like changing letter case, or performing replacement operation).
Use Tags to Generate Dynamic File Names
There are close to 100 different tokens that can be used to generate dynamic file names that meet your requirements. Simply include the token in the appropriate place in the file name pattern to have dynamically generated content inserted in the right place (if the token generates content), or to affect the generated filename in other ways (if the token represents a command or operation).
The following tokens are available:
- File creation and modification dates, file size
- EXIF, ID3, and other mete-tags
- Current date and time
- Random numbers and letters
- File hashes: MD5, SHA1, SHA2, CRC…
- Original file name, extension, folder name
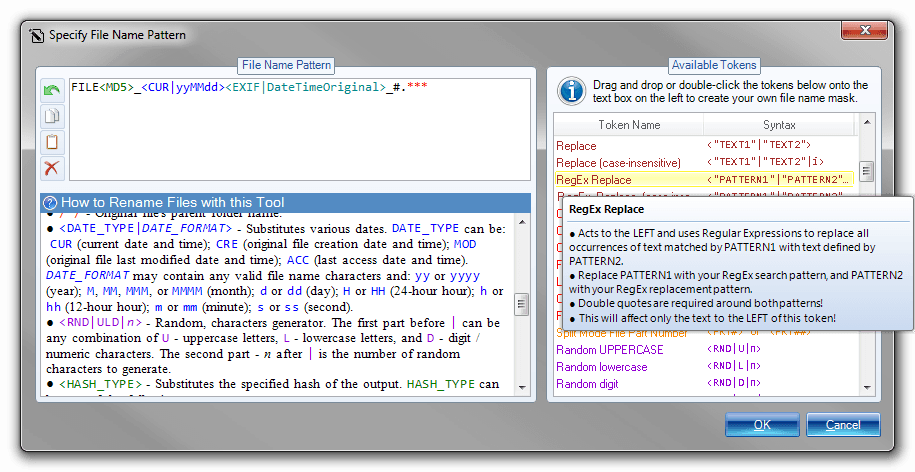
- Search & Replace operation letting you replace text within file name
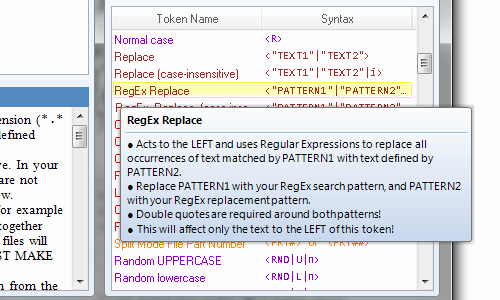
- RegEx Replace - replace within file names using Regular Expressions
- Letter case modification commands (make upper case, lower case)
When it comes to saving processed files, the program really shines, as it comes with built-in professional file renamer tool that lets you easily design file naming pattern simply by drag-dropping different name parts (tags) onto the text area. And there are many tags to choose from: various hashes and checksums like MD5, SHA, SHA2, CRC16, CRC32, etc; file size; parts of original name/folder; creation and modification dates and their parts; random characters; EXIF and ID3 met tags; etc. You can even perform search and replace operations on the file name patterns you design!
Moreover the program can act solely as bulk file name renamer utility: you do not have to add any actions to the action sequence, and choose to only rename files instead!
Select Files for Processing with Deep File Search
Recursive File Search
One of the ways you can add files to the file list for processing is by doing a search for all files that match criteria you specify. The program will scan selected directories and subdirectories for any valid files and automatically add them to the list.
- Recursive scanning with customizable depth
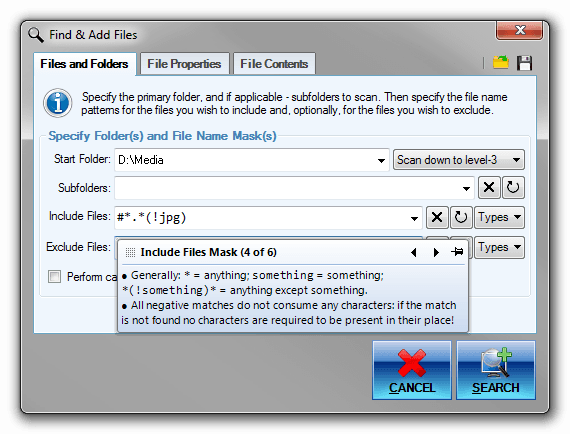
- Specify files to include and exclude using highly customizable patterns and masks - much more powerful than your basic wildcards but easier to use than Regular Expressions!
- Specify directories to exclude from search
- Use Regular Expressions to specify file name patterns
- Use case sensitive matching
Note that you can save your customized file searches as templates for future use.
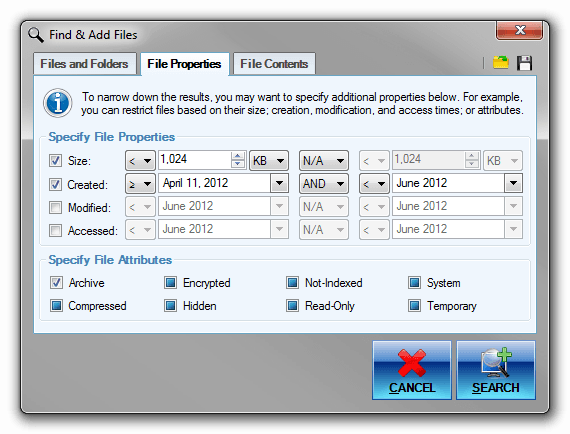
Search for Files Based on Properties
You can find files you need for processing based on file properties like size or creation date, and attributes. This is in addition to basic search by name!
What's more is that you can fine tune these and select the exact ranges for all properties, like setting the size to be between 1MB and 5MB for example. With dates, too, you can be as specific as you want: you may, for example, look for files created on any day in May 2020, or on May 10 2020 specifically.
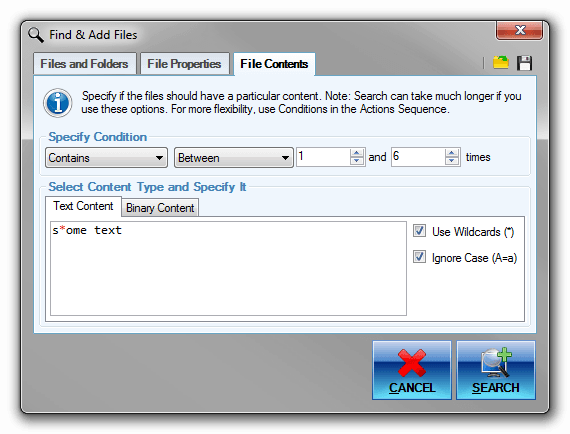
Search in Files for Text Content
You can search for and add files for processing using not just their names and properties, but actual contents as well. Perhaps you need to process only files that start with a particular text; or only those files that contain a particular phrase specified number of times. The program is very flexible!
Search for files based on text content using these conditions:
- Contains at least N times
- Contains at most N times
- Contains exactly N times
- Contains between N and M times
- Does not Contain N times
- Does not Contain
- Starts with / Does Not Start with
- Ends with / Does Not End with
Ignore case option and wildcards are fully supported for more advanced searches!
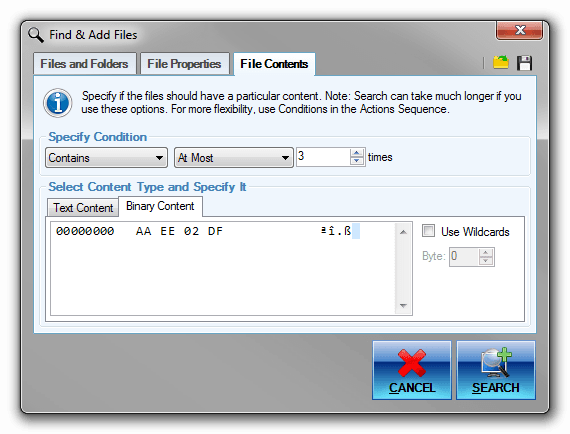
Search in Files for Bytes & Binary Content
You can search for and add files for processing using their binary content. Perhaps you need to process only files that start with a particular sequence of bytes; or only those files that contain a particular byte sequence no more than specified number of times. The program is very flexible!
Search for files based on binary content using these conditions:
- Contains at least N times
- Contains at most N times
- Contains exactly N times
- Contains between N and M times
- Does not Contain N times
- Does not Contain
- Starts with / Does Not Start with
- Ends with / Does Not End with
Wildcards are fully supported for more advanced searches!
In all of the processing modes, files for processing can be selected using recursive (deep) file search, where the program automatically scans specified directories for files matching desired criteria, such as: file name pattern, extension, size, dates, content etc. This has several advantages:
- Program automatically searches for desired files - no need to pick files manually
- Not just file name and attributes, but also their content in both text and binary form can be examined
- Complex searches can be saved and reused later
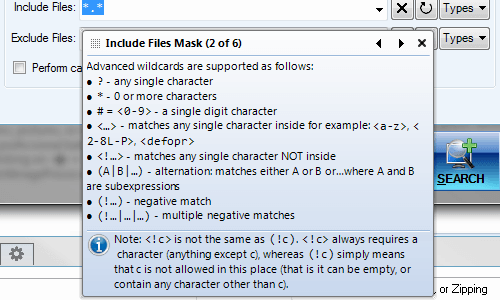
For finding files with file names matching a specific pattern, you can either use extended wildcards with support for positive and negative matches, sub-masks, character ranges, grouping and alternation patterns; or use even more powerful Regular Expressions.
Advanced Wildcards
You can easily add files for processing matching a specific file name pattern and having certain extension(s) with advanced wildcards! Of course, you could use regular Operating System file search, but it is very weak and supports only basic wildcards. On the other hand, Regular Expressions may be too complicated for a trivial task like selecting files matching a give name pattern.
Advanced wildcards, one of Batch File Split & Join's many unique features, is what you would want to use!
| Regular OS Wildcards | Advanced Wildcards | Regular Expressions |
|---|---|---|
Files beginning with lowercase letters a through m and having jpg, bmp, or png extensions: | ||
a*.jpg;a*.bmp;a*.png;b*.jpg;… |
<a-m>*.(jpg|bmp|png) |
[a-m].*\.(jpg|bmp|png) |
Files beginning with file which is not followed by an underscore character _: | ||
| - | file(!_)*.* |
file(?!_).*\..* |
Files beginning with start and not containing skip between start and end: | ||
| - | start*(!skip)*end*.* |
start(?(.*(skip))|.*)end.*\..* |
Files not beginning with page, whose name part ends with a digit, and not having either bmp or jpg extensions: | ||
| - | (!page)*#.*(!bmp|jpg) |
(?<!page).*\d\..*(?!(bmp|jpg)) |
Triggered / Scheduled Processing Jobs
It is possible to create scheduled or triggered processing jobs that will be automatically performed even if the program is not running. And there is no limit to how many such jobs can be created!
For every job you can specify the files to be processed, actions to be performed, output settings, and other processing options.
When the processing job is triggered, depending on the job's setting the program will be automatically launched in either GUI, console, or hidden mode, and the processing will be automatically started. When done, the program will exit automatically.
There are numerous triggers available: daily, weekly, monthly, event-based, etc.

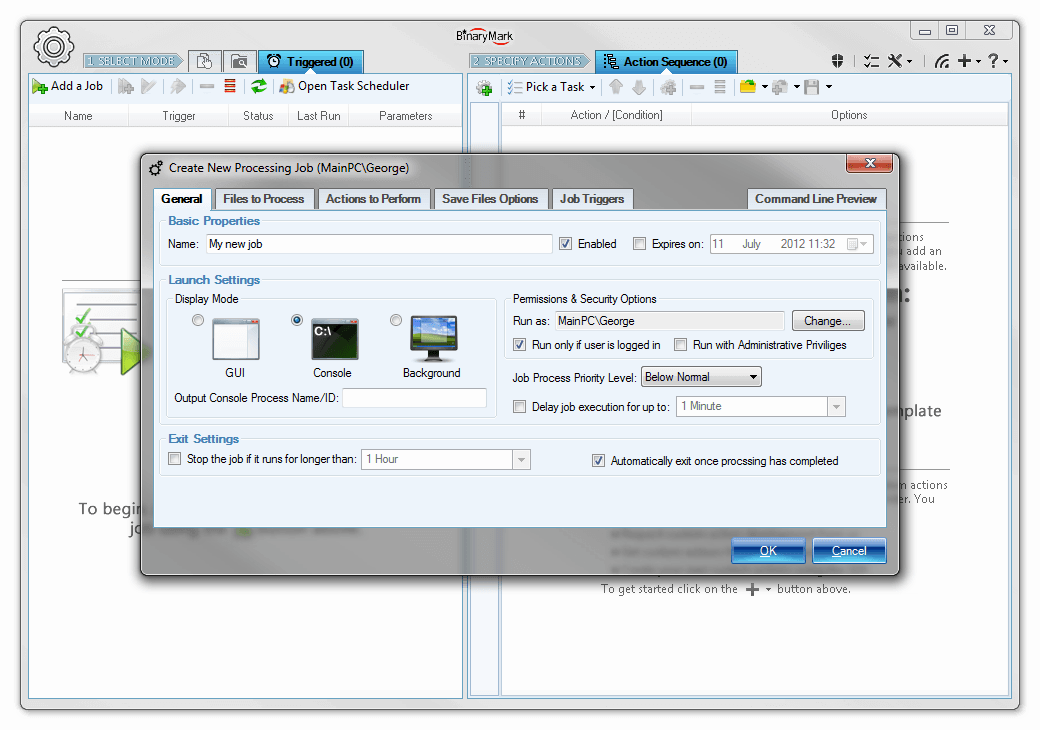
Setup a Processing Job - General Properties
Processing jobs allow you to setup various batch file processing tasks that will be executed on a specified trigger or on schedule.
General properties include: name of the job, general timeframe when the job can be active, operation mode that determines if any UI will be shown, and user account together with security context under which the job will be executed.
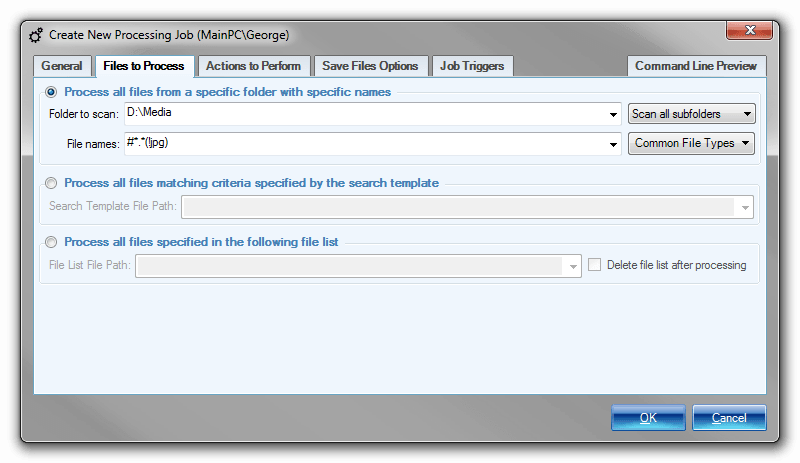
Setup a Processing Job - Select Files
There are several ways in which you can specify which files should be processed by a processing job:
- Specified directories will be scanned for files matching a given name pattern
- Specified file search template will be used (see Recursive File Search)
- Specified list of files containing files' full paths will be used.
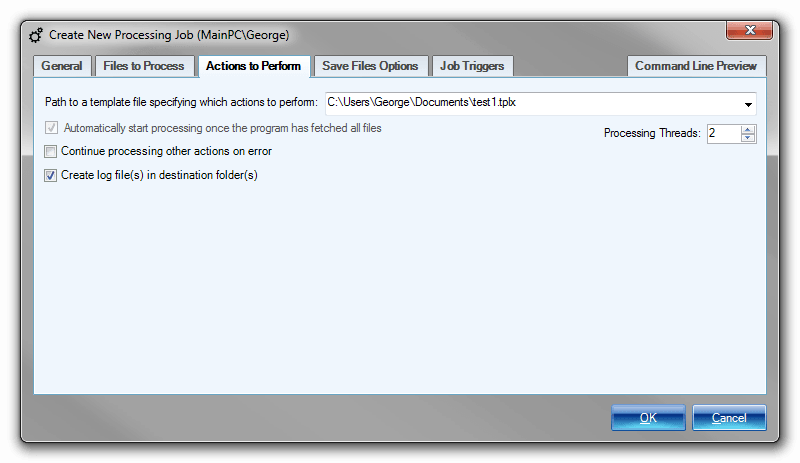
Setup a Processing Job - Specify Actions
Once you have specified which files should be processed by a processing job, the next step is to specify how these files should be processed, which actions and operations should be performed. This is done by specifying a previously saved Action Sequence.
Additionally you can customize a few other processing aspects like the number of processing threads and logging options.

Setup a Processing Job - Output Settings
Output settings determine where and how the processed files are saved. All the options that are available in Step 3 in Manual and Automatic processing modes can be customized here as well. These include:
- File naming pattern and destination / output folder
- Output mode: normal, join, split, or zip
- Ability to define a third-party tool to execute after processing has finished
- Backup- and file saving- related options
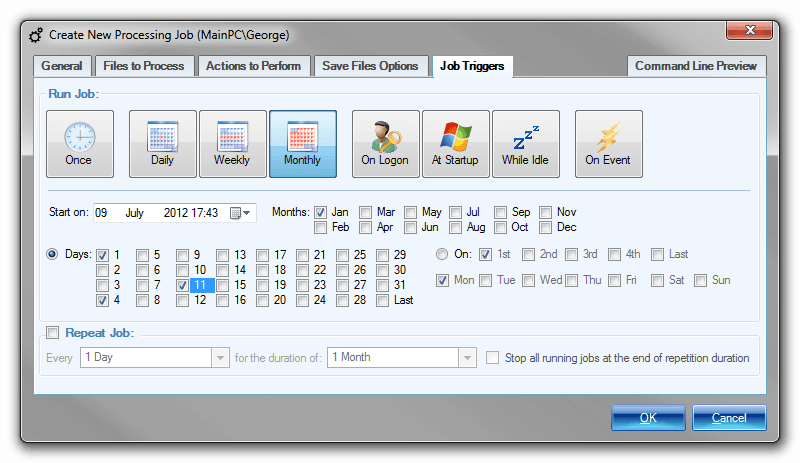
Setup a Processing Job - Triggers - Monthly
Last step in setting up a processing job is to define a trigger or specify a schedule that will determine when the processing job will actually execute.
Monthly trigger lets you specify that a job should be executed on a monthly basis. You can select specific days of the month or weeks when the job should be run, as well as specify which months should be included and which ones should be excluded.
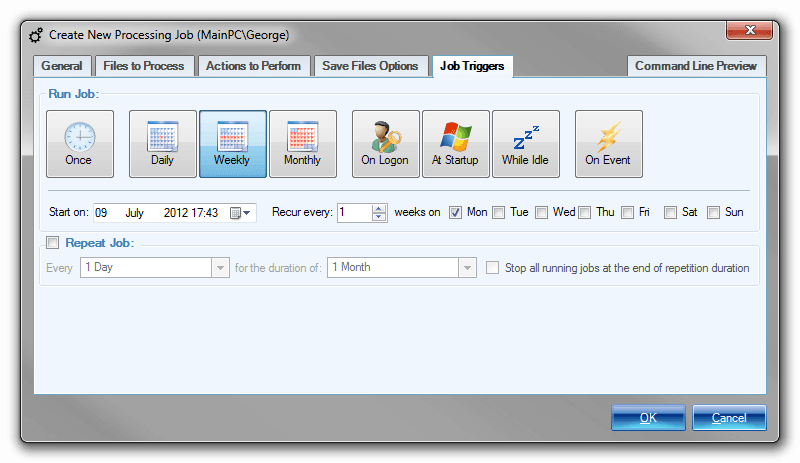
Setup a Processing Job - Triggers - Weekly
Last step in setting up a processing job is to define a trigger or specify a schedule that will determine when the processing job will actually execute.
Weekly trigger lets you specify that a job should be executed on a weekly basis. You can select specific days of the week when the job should be run.
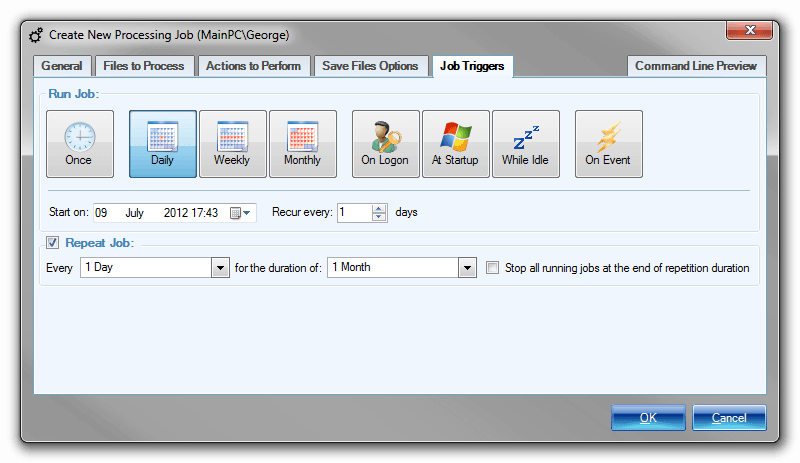
Setup a Processing Job - Triggers - Daily
Last step in setting up a processing job is to define a trigger or specify a schedule that will determine when the processing job will actually execute.
Daily trigger lets you specify that a job should be executed on a daily basis. You can specify the daily recurrence pattern as well.
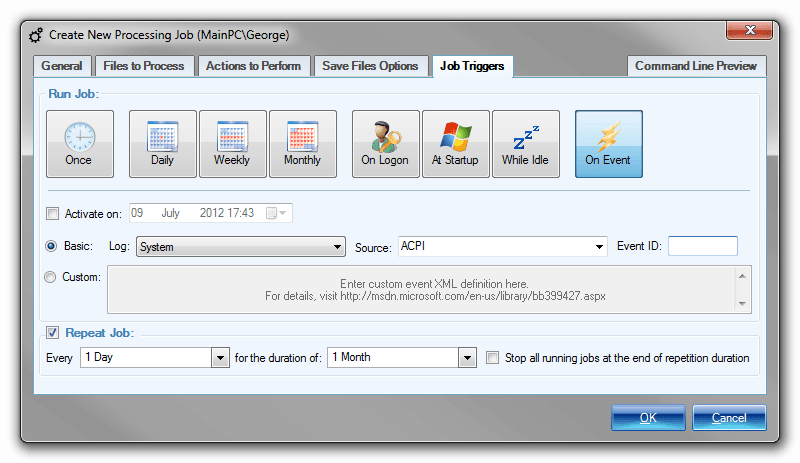
Setup a Processing Job - Triggers - Event
Last step in setting up a processing job is to define a trigger or specify a schedule that will determine when the processing job will actually execute.
Event-based triggers lets you specify that a job should be executed when a particular application or system event occurs. This feature is available only on Windows Vista or higher. Any events that you see in the Windows Event Viewer are supported, and a processing job will be automatically started by Windows Task Scheduler Service when the associated event occurs.
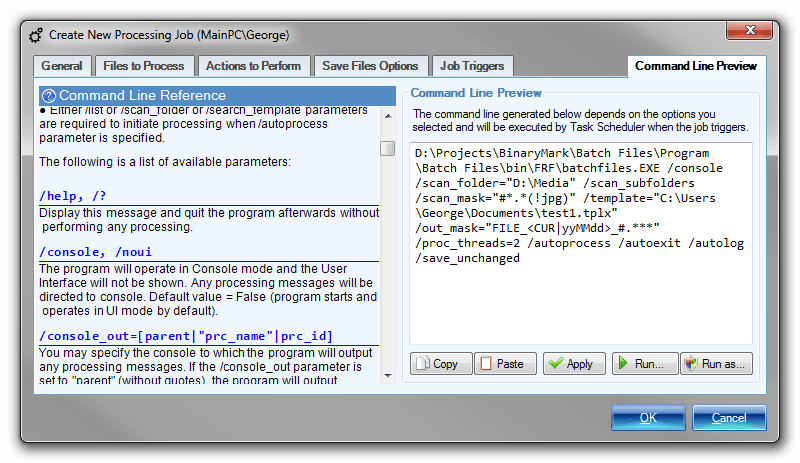
Setup a Processing Job - Command Line Preview
A processing job is automatically executed by the means of Windows Task Scheduler Service launching the program on appropriate trigger / schedule and with job-specific command line arguments.
The Command Line Preview tab shows you the exact command line that will be run in order to start the processing job. That way you can launch the program manually with appropriate parameters and have the same processing job be manually started.
Common Tasks
The program gives you full control when designing the sequence of actions; yet at the same time if you are just starting or want to perform some basic task quickly, the program offers numerous common tasks organized into categories that you can simply click on and see the needed actions be automatically added to the action sequence for you, so you can get started in no time!
Note that with the built-in actions and operations you can do much more than what you can do with common tasks described above! Common tasks by no means represent all of product's functionality, but rather facilitate product's use when it comes to dealing with frequently occurring tasks.
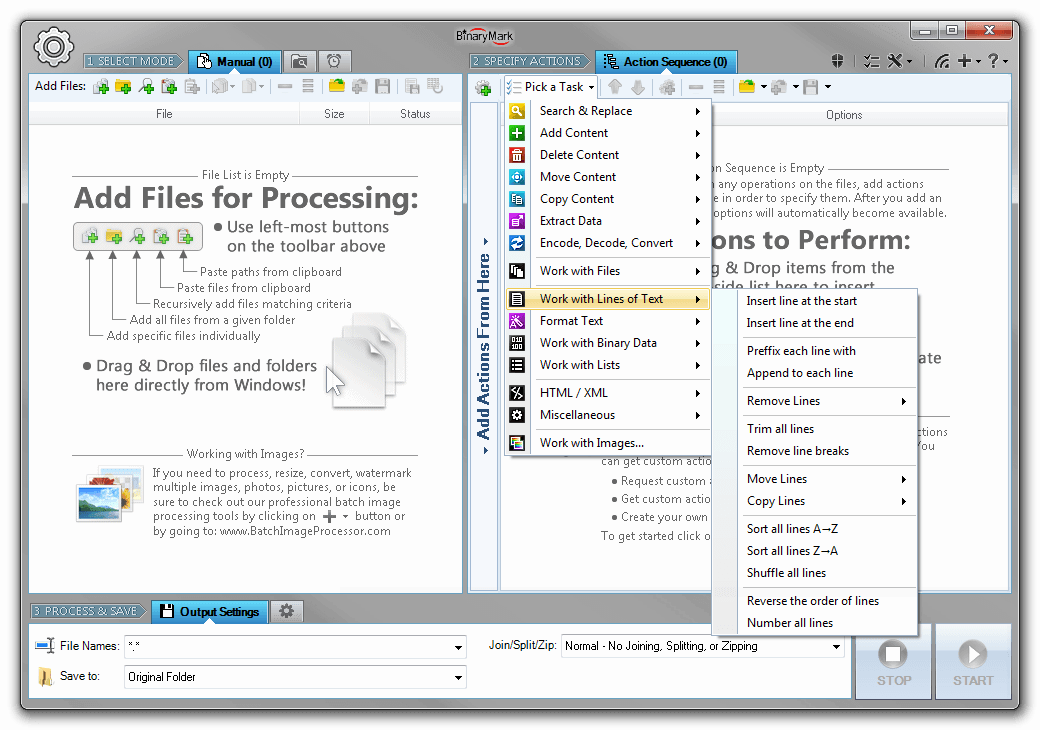
Common Tasks - Working with Lines
One of the most frequent tasks when processing text-based files is working with lines in one way or another. The program offers multiple common operations relating to lines:
- Sort and shuffle lines
- Delete specific lines, remove blank / empty lines
- Insert new lines
- Append or insert text, prefix lines
- Remove text from the ends of lines
- Trim and format lines
- Move and copy lines
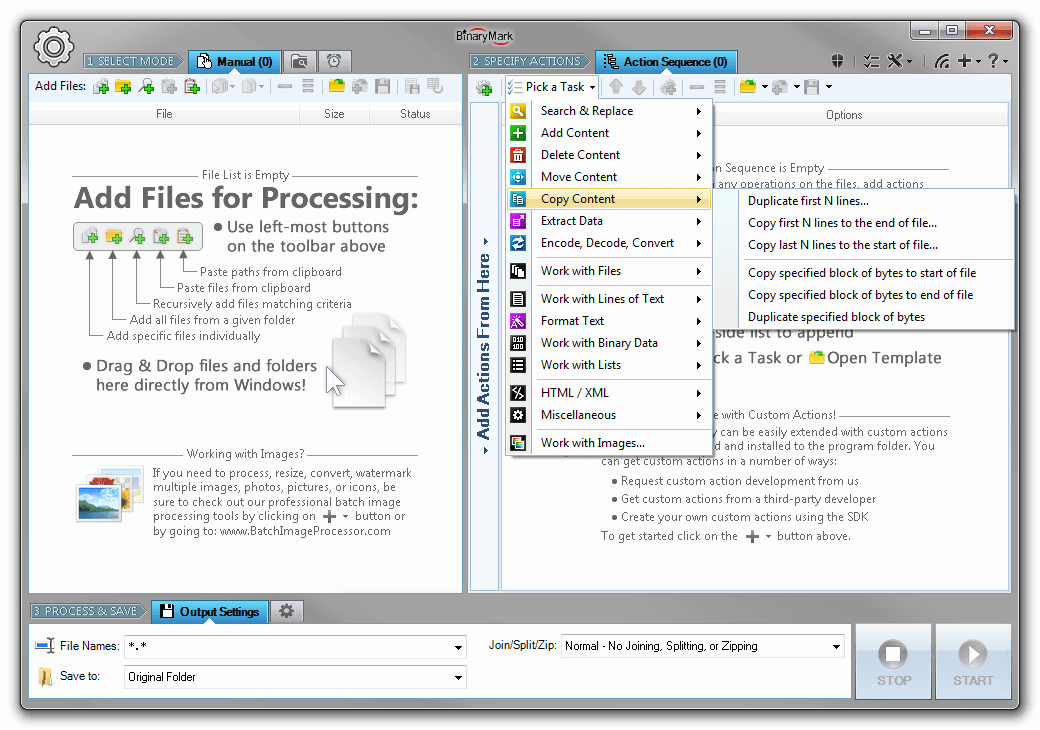
Common Tasks - Copy Content
There are several built-in common tasks for copying or moving parts of the file to another position. You can duplicate lines; you can copy lines from the start or end of the file to another position, or relative to their current location; you can copy blocks of bytes to another position; and more!
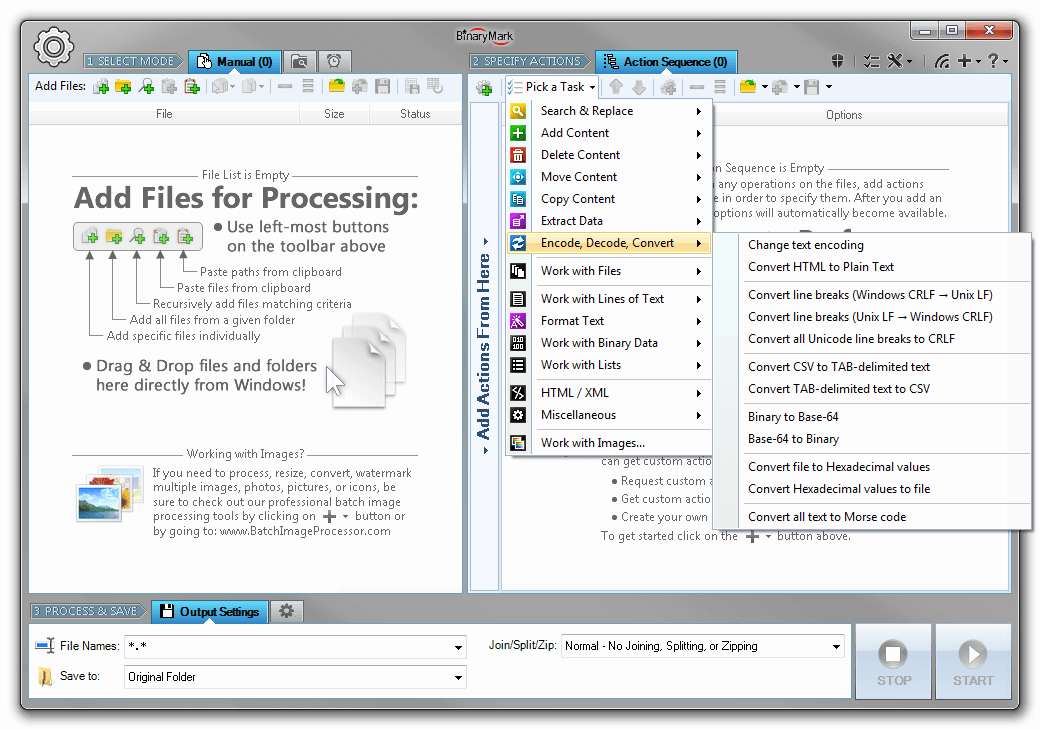
Common Tasks - Convert & Encode
Program also offers various encoding and conversion -related common tasks that help you change text file encoding, convert text to binary and vice versa, convert HTML to plain text, etc.
- Convert files between different encodings and code pages: UTF-8, UTF-7, UTF-16, ASCII, Cyrillic, etc.
- Convert files containing binary data in hex form to actual binary representation and vice versa
- Convert to and from Base-64 and Quoted-Printable encodings
- Convert HTML to plain text
- Convert Morse code to plain text and vice versa
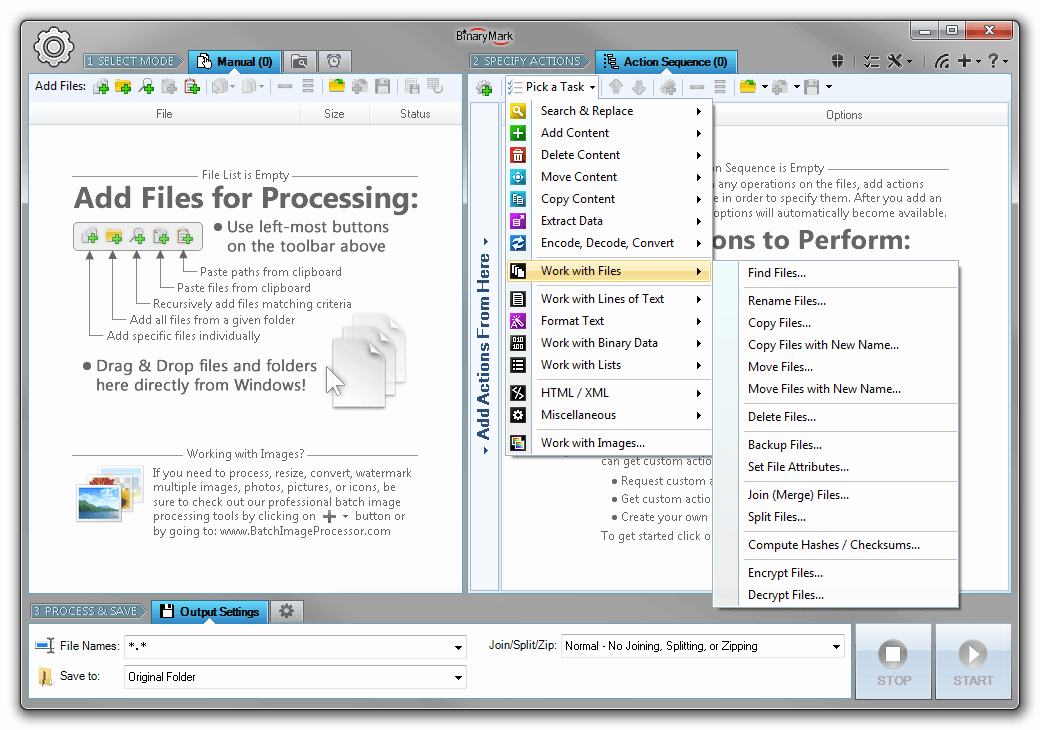
Common Tasks - Working with Files
Not only can you modify file's contents with common tasks, but it's very easy to perform various file system -related operations as well:
- Find files using content-based recursive search
- Move and copy files
- Rename files
- Delete files
- Split and join files
- Encrypt and decrypt files
- Generate file hashes
- Modify file attributes

Common Tasks - Binary Data
There are various common tasks related to working with binary data and modifying individual bytes as well as performing binary search and replace operations.
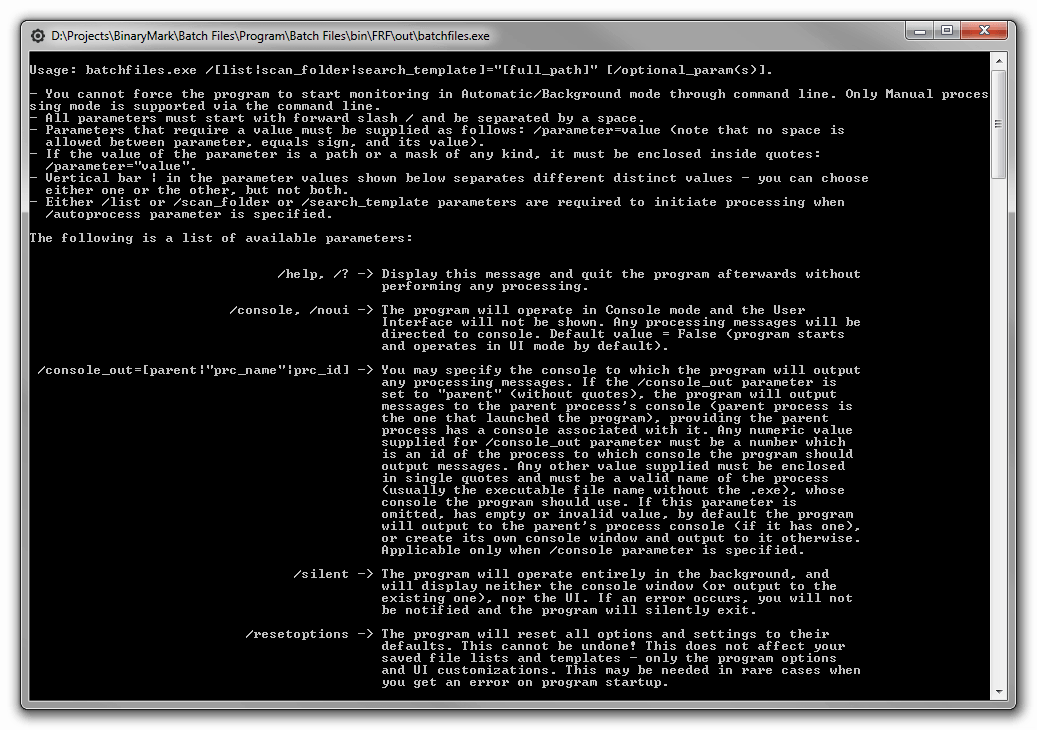
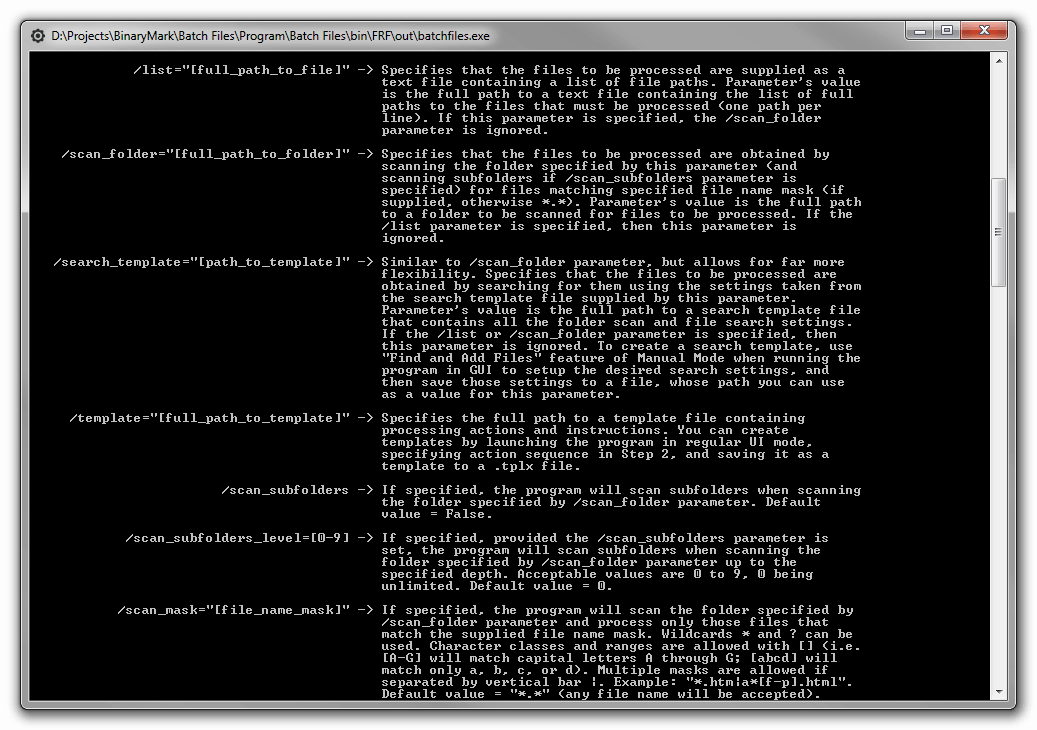
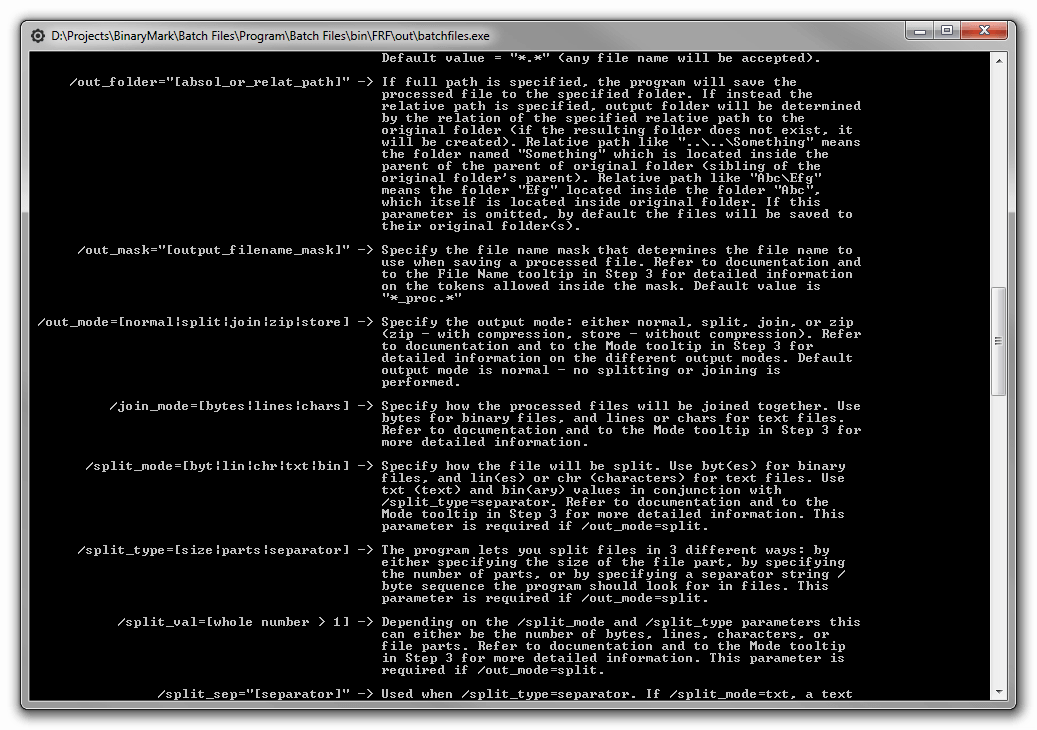
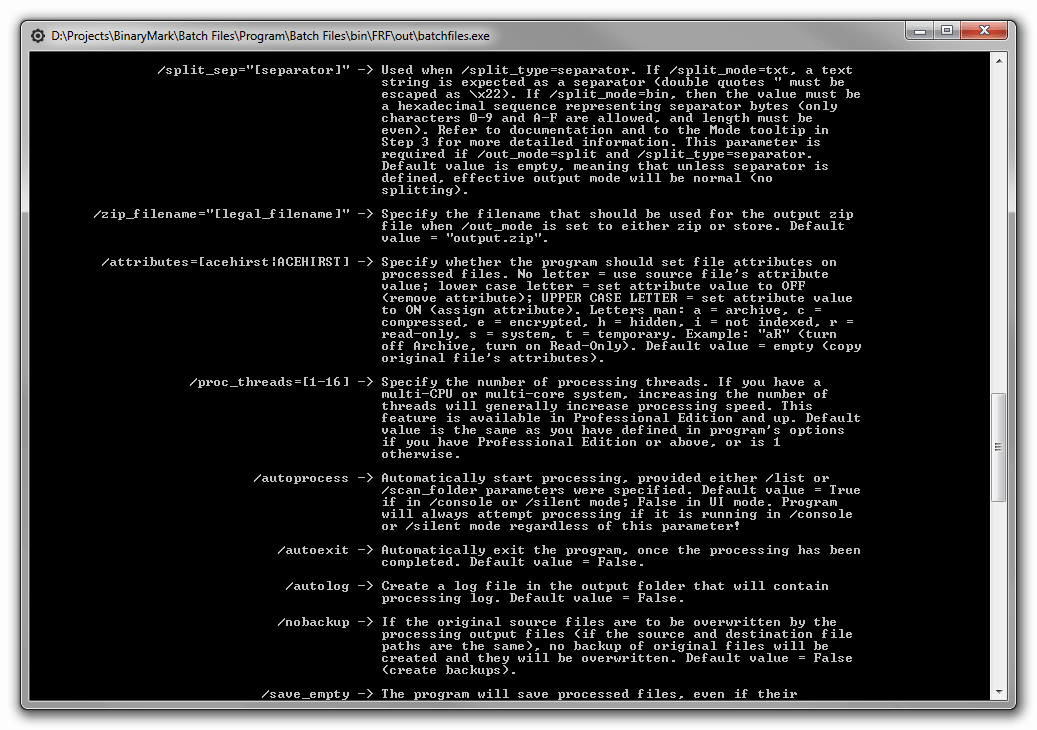
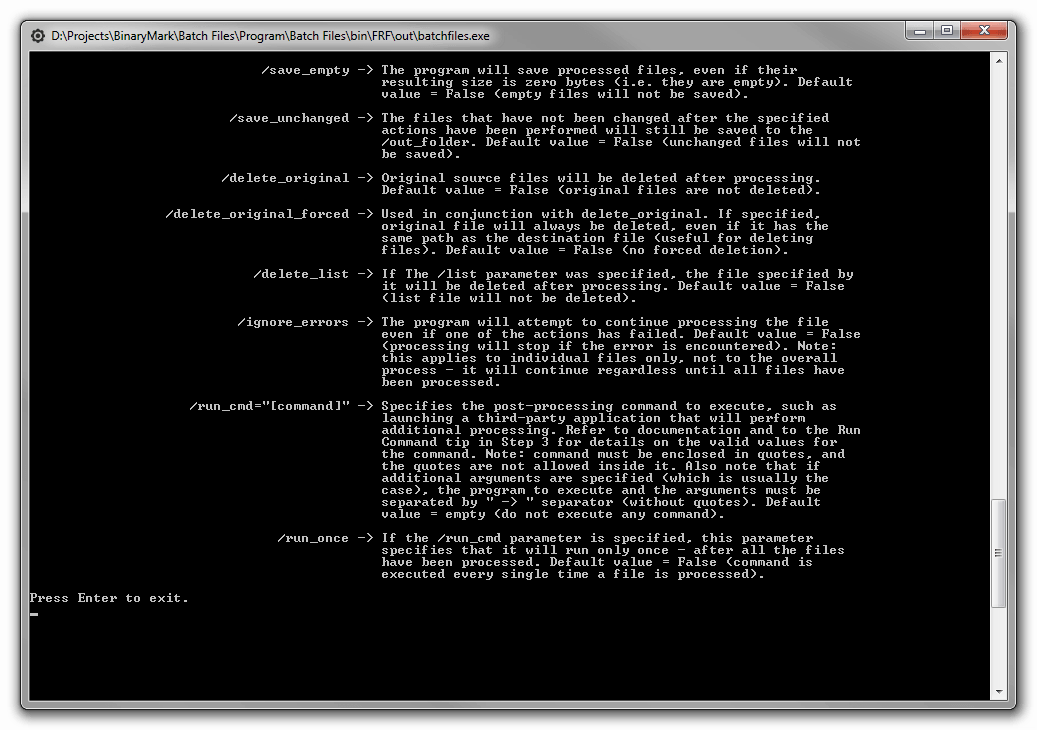
Full Command Line Support & Console Operation
Batch File Split & Join has full support for command line operation. It can not only be started from command line with specific options, but it can also run and operate entirely in console window.
A typical usage scenario would be to first specify a sequence of actions to be performed and then save that sequence to a template file. Then you can easily process files entirely from command line using a few switches: input directory and input file pattern, path to a saved action sequence template file, and output directory with file naming pattern.
Some benefits of command-line processing include:
- Ability to launch program and perform file processing on demand or by invoking it from third-party tools
- Perform processing a bit more efficiently without consuming a few extra resources needed to display and update Graphical User Interface
- Manually schedule the program to run with specific parameters using third-party scheduling programs or other automation software
- Execute batch processing tasks directly from Windows Power Shell
- Execution from a batch file with different parameters each time
- Simultaneous execution of several instances
- Faster startup and configuration as predefined command line snippets can be used, and in general typing is faster than manipulating UI elements
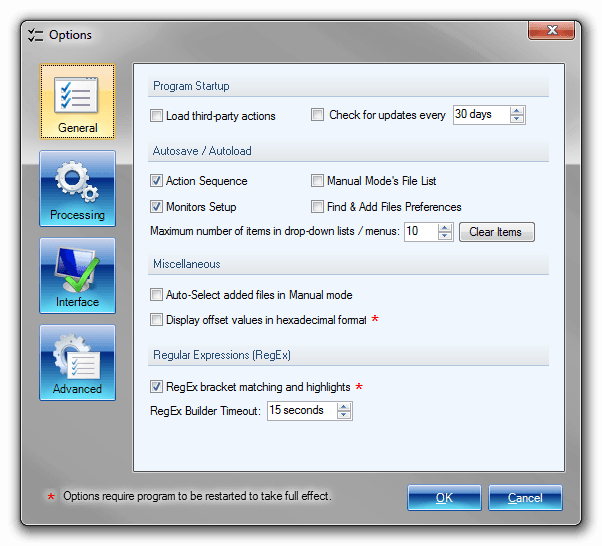
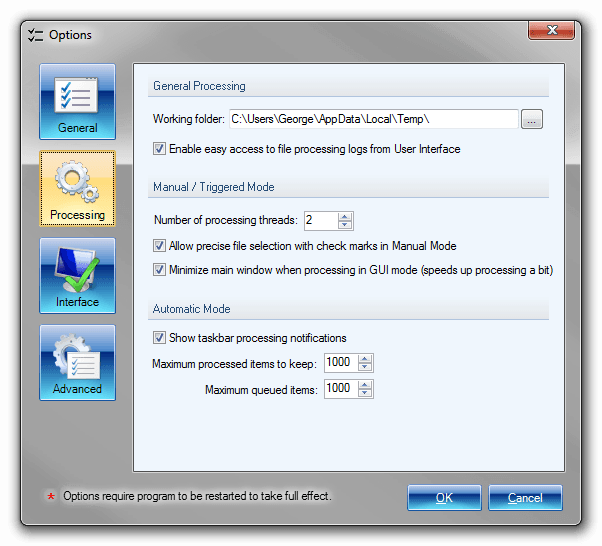
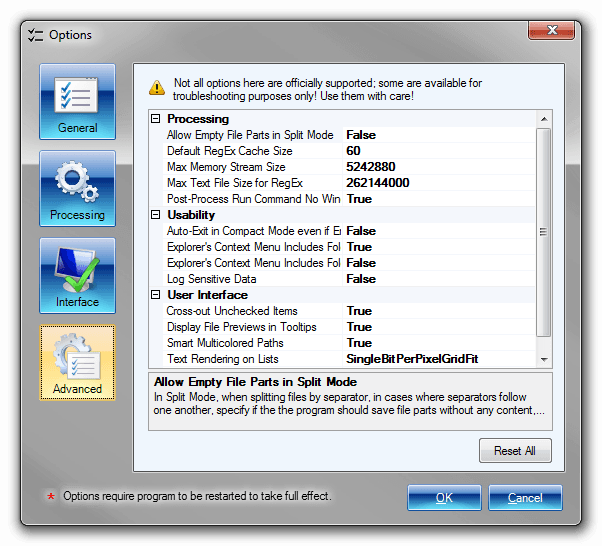
Highly Customizable with Options
The program can be easily customized to your preferences, thanks to the many options that it has. Various options include:
- Auto-load and auto-save options that control which items the program will automatically save upon exit
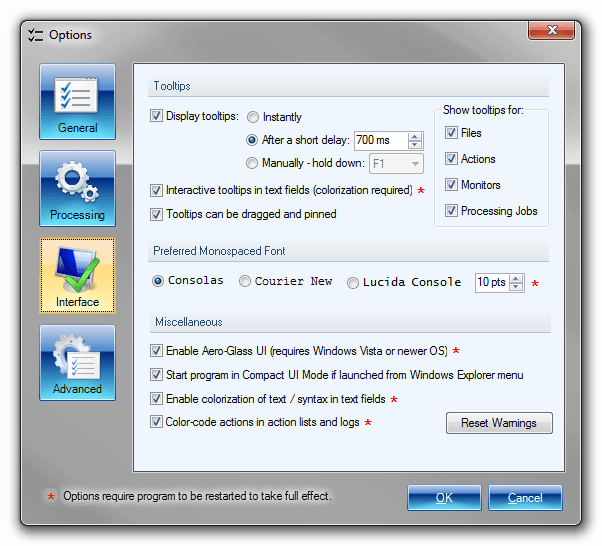
- Syntax highlighting, colorization, and interactive tooltips in textual fields
- Tooltips preferences that control how and when the tooltips will be displayed
- Font options that let you choose the default type and size of the monospace font the program uses in text fields
- Various other User Interface related settings including theme kind, color-coding, etc.
- Different processing options like the number of threads, queue size, maximum text file size for Regular Expressions, etc.
Integrated Help with Informative Tooltips
With Batch File Split & Join we have re-imagined the concept of in-place help for a software product with the goal for it to be readily-accessible, well integrated, useful, and detailed. No more clumsy external huge help files that would take hours to make sense of and relate to the program!
Instead, virtually all elements of the User Interface have very detailed, in some cases multi-paged, informative tooltips that not only explain what a particular button, checkbox, or option does, but also provide valuable insights and helpful tips letting you know how to take advantage of a particular feature.
Multi-paged tooltips can be easily viewed simply by scrolling with your mouse wheel. Certain contextual tooltips can also be moved around and pinned to stay on top of other windows. This may be invaluable if you need to keep certain information in the view while working on something else.
Very Detailed Tooltips
Batch File Split & Join features very detailed and helpful tooltips that are available for virtually all user interface elements. If the text is too long, it is broken up into several pages that you can easily scroll through with your mouse wheel. No need to view external documentation, the help is completely integrated with the product!
Movable Tooltips
Some tooltips can be moved around and pinned so they stay visible on top of other windows until closed. This is useful when a tooltip displays certain technical information that may be needed to configure certain settings, and should therefore remain visible even when the mouse is no longer hovering over its parent element!
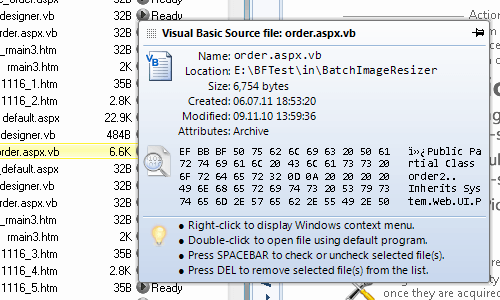
File Tooltips
There are very detailed tooltips for files in the file list! Such tooltips display not only basic file information like file name, location, size, and attributes, but also show first few dozens of bytes that make up file content! These tooltips also inform you of what actions are possible with the file selected.
List Items Tooltips
Various lists in the program that let you select different items (like tokens, tags, etc.) also offer detailed tooltips that display relevant information about items in the list.

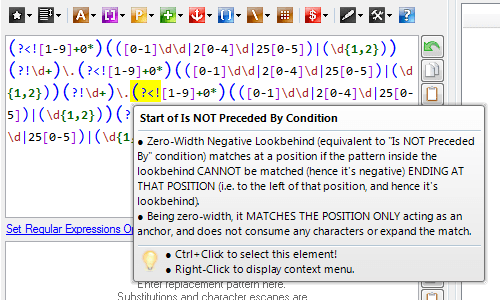
Concept-Related Tooltips
Certain tooltips not only explain what a particular button or interface element does and how it can be used, but they also explain the underlying concept, as is illustrated by this tooltip displaying information about Regular Expressions language element.
Smart Contextual Tooltips
Although optional and can be turned off, the program also offers contextual tooltips that will appear when you move your mouse over distinct parts of text in certain text fields that support syntax highlighting.
Such tooltips are featured for all text fields that accept Regular Expression patterns as input; fields that allow character escapes; and in the file name pattern designer.
This is very useful, as simply by hovering your mouse over different areas in the text fields, you will instantly know what a particular RegEx element or file name token does.
Optional Integration with Windows Explorer
Upon installation of the software, you have the option to install a Windows Shell extension that integrates a Batch Process context menu into Windows Explorer, making it super easy to simply right-click on a group of files or a folder and launch the program with the selected files and chosen operation already setup, so you can process the files right-away - directly from Windows!
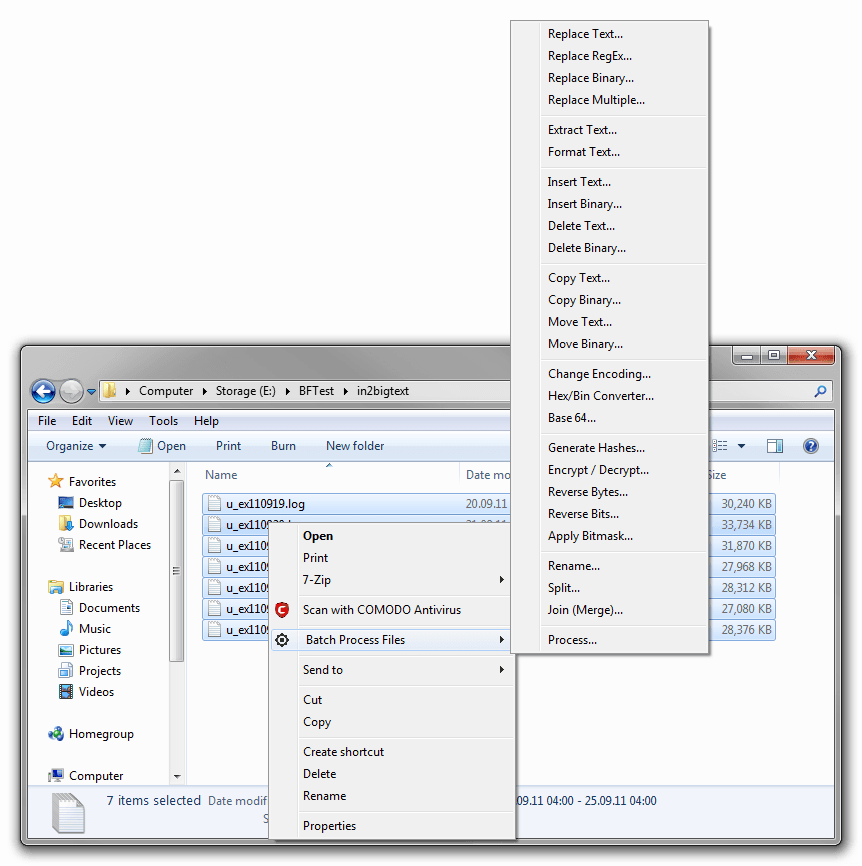
Process Files from Windows Explorer
If you install optional Windows integration component, you will be able to launch Batch File Split & Join directly from Windows explorer by selecting the files or a folder containing files that you wish to process, right-clicking on the selection, and choosing Batch Process Files menu.
Program Starts in Compact Mode
When you launch program from Windows Explorer, it starts in a very compact mode with the files you selected in Windows Explorer already automatically added and ready for processing. This is done for your convenience so you can process file right away!
By default, if the program is started from Windows Explorer, it will automatically quit once the processing has been completed. However there is an option to change this behavior if you want.

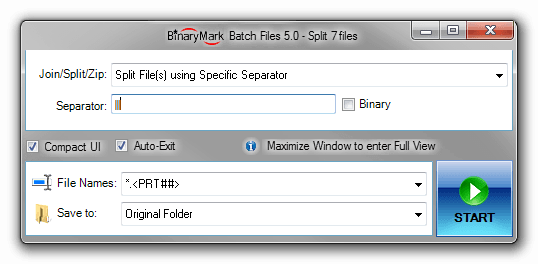
Compact Mode UI
When the program is started in compact mode, it shows only the primary action you selected in the Windows Explorer's right-click context menu when you launched the program, and additionally crucial output settings that include file naming pattern and destination to save processed files.
If this is not enough for your needs and you need to make some changes and add more actions or files, or adjust other settings, you can always enter Full View by simply maximizing the window. There is also an option for the program to always start in Full View if you want.
Advanced Logging

When processing thousands of files using complex action sequences with multiple conditions and actions, certain things might go wrong occasionally; and that's where program's excellent troubleshooting abilities come in very handy.
Program's advanced logging capabilities make it super easy to diagnose problems and get rid of any processing warnings or errors. A very detailed log is automatically generated by the program for every processed file that contains details about which actions have been performed, when, with what options, and with what results. All this information is made available to you in a nicely formatted view once the processing has been completed.
The processing log can be manually saved to a file after processing and / or automatically generated as a text log file in the destination folder(s).
Alternative User Interface Theme
Program also offers alternative User Interface skin for cases when Aero rendering is not available, or if you prefer glass-less look instead.
Alternative UI Theme
If you do not like the default glass-like Aero theme with translucency effects, or if your Operating System does not support it, this alternative theme is available and can be easily made the default.
Other Features
Some other notable features that are not represented in the screenshots above:
- Virtually all actions allow you to customize the range of their operation, so that you can restrict a particular action to operate only on a specified part of the file (as if the file itself was smaller).
- Built-in base-converter tool that lets you convert numbers and byte sequences between binary, decimal, and hexadecimal forms.
- Multi-colored smart rendering of file paths in file lists that highlights most important parts of the file path, so that you can see file name, its parent directory as well as the drive - all at a glance.
- Program automatically remembers the values you enter into drop-down lists so that next time you need them, they can be selected from a drop-down! It also remembers the file paths you specify for files and folders, so that if you ever reopen the same Select Folder or Choose Files dialog again, it will automatically be opened where you left it last time.
Customization & Extensibility
Although by itself Batch File Split & Join is a professional product, it cannot possibly offer every feature you may want, or be used in all possible scenarios. This is not a problem however, because this product was built with extensibility in mind from the ground up.
The functionality offered by Batch File Split & Join can be extended in the following ways:
- Software Development Kit (SDK) will let you develop your own actions and conditions that can be directly used by the product just as built-in ones. All that is required is basic knowledge of either C#, F#, or VB.NET and Microsoft .NET Framework 3.5 / .NET Core 3.1 or higher.
- Actions Library will let you use all the various processing actions together with their UI in your own projects. Library is provided as a COM-Compatible .NET DLL that you can use in your own projects to leverage the functionality offered by the various processing actions.
- Custom Development - should you need it, we can customize the product for you so it specifically meets your needs. Batch File Split & Join provides a solid foundation for batch file processing upon which our experienced developers can quickly create a customized, professional solution that meets your needs.
Software Development Kit (SDK)
Note the SDK is available and can be used only with Batch File Split & Join's mother product - Batch Files, which is a superset of Batch File Split & Join's features. If you plan to extend product functionality with SDK, you must obtain Complete Edition of Batch Files.
You can easily extend functionality offered by Batch File Split & Join' built-in actions by designing your own using this SDK as a guide. Batch File Split & Join provides all the basic actions that perform general tasks, such as resize, crop, watermark, etc.; however you may have a need to process images in a specific way, and hence require custom actions.
With this SDK and basic VB.NET or C# programming skills you will be able to create your own custom actions that you can then use from within the program to effectively accomplish your goals. We recommend you use Microsoft's free Visual Studio Community to develop your extensions using this SDK, but of course if you have Visual Studio, SharpDevelop IDE, or any other IDE capable of producing .NET 3.5 libraries, you can use it as well.
Actions Library
Actions Library is provided as a COM-Compatible .NET DLL that you can use in your own projects to leverage the functionality offered by the product's various processing actions. Whereas with SDK you extend the product with the actions you create, with Actions Library you extend your own solution by utilizing the functionality of the product.
For example, if you want to use file processing capabilities offered by Batch File Split & Join, with the Actions Library you will be able to do just that.
Actions Library needs to be acquired separately from the main product. So, please contact us to get Actions Library. We will also be happy to answer any questions you may have regarding licensing, pricing, integration, and other issues.
Let Us Customize Batch File Split & Join for You!
If Batch File Split & Join is not exactly what you are looking for, we can customize it for you so it specifically meets your needs! It can be done at a low cost to you, as Batch File Split & Join provides a solid foundation upon which new features can be effectively added by our experienced developers to quickly create a customized, professional solution that meet your needs!
Keep in mind that contracting us to customize the product will be much cheaper and faster than hiring a programmer or doing the work with your own resources, as we have extensive experience in the area of custom development, and what's more - Batch File Split & Join is a solid foundation upon which all the extra functionality that you desire can be built. Thousands of man-hours and over 100000's lines of code went into the creation of Batch File Split & Join, so recreating even part of its functionality from scratch would require lots of resources.
Do you need customization?
- The product does not exactly meet your needs?
- Some feature you would like to use is not in the product?
- Would you like to add another action or operation?
- Need more options and customizations?
- Want to integrate the product with your existing business logic?
Custom Development Benefits
- No programming skills are required - we do everything for you!
- Low-cost professional development by experienced team
- Fast development because it leverages existing product and infrastructure
- Professional User Interface and familiarity as new features are integrated into existing product
- Royalty-free, flexible licensing model
Look no further! Contact us to request a quote and start custom development!